Monday, April 29, 2019

The Reductive/Subtractive Technique and 9" x 12" Stencil PRAYER FLAGS


The reductive (also called subtractive) technique works this way:  First, with acrylic paint, I paint a layer of new color in a limited area -- then, while this layer is still wet, I place a stencil over it.  Holding the stencil in place with one hand, I use a paper towel or soft cloth to rub off still-wet paint in the areas that are exposed thru the openings of the stencil.  (What I mean by "new color" is that the substrate has already been coated with other acrylics, as in the examples below; and those early layers of paint have been given time to dry.)

Today's post will show a new stretched canvas with a background created almost entirely with the reductive/subtractive technique.

The stencil used in today's project is my 9" x 12" Prayer Flags --


 Below are three close-ups showing different areas of the stretched canvas....


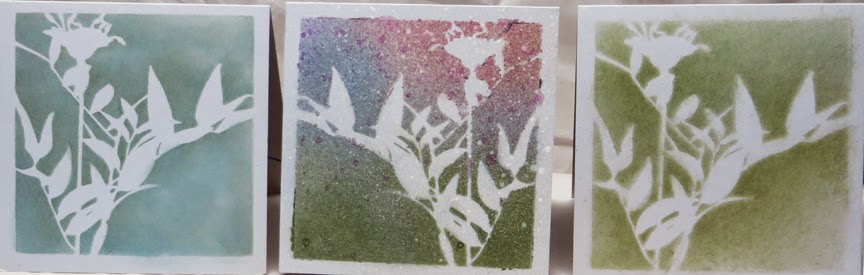
Above:  This reductive/subtractive area was done with Titanium White acrylic paint over a multi-hued background.


Above:  After the reductive technique was used in this area, I came back in with diluted acrylic paint and added these orange highlights.

Above:  This reductive/subtractive area was done with Titan Buff acrylic paint over a multi-layered background.  One of the background layers had undergone the same technique, but with blue paint.
Above:  a close-up of the focal point when the painting is near completion.  The blue foreground is the stencil itself, stained and added with heavy matte medium to become a collage element.

Above:  The entire canvas, at the point of near-completion.

Below:  Note the right side of the canvas, now that an art crayon has been used to add a blue line.  This line was then covered with matte medium to set it permanently in place.


The final version appears above; its title is Go Fly a Kite!

Thank you for visiting my blog today!  To follow it by email, please use that option in the upper right sidebar.

To scroll thru the pages of all my StencilGirl stencils, please start here.

Friday, April 26, 2019

GARDEN MONTAGE 9" x 12" Stencil


To celebrate spring, I've been making prints with my 9" x 12" stencil Garden Montage --


Some of the prints (a random collection) line up below:


And some of the collages I've made with them are below:


This is only the tip of the iceberg -- I enjoy using this stencil over and over!  I'll post more pieces made with it at a later date.

To scroll thru the pages of my StencilGirl stencils, please start here.

Many thanks for checking out my blog today!

Tuesday, April 23, 2019

Jenny Marples and THISTLES 9" x 12" Stencil


Artist Jenny Marples has done a blow-my-mind job with the three-dimensional artwork she created --


Feel free to click on this image to enlarge it, so you can better see the details of this work!

The front image in this dimensional work was created with my 9" x 12" stencil Thistle--


This particular design is also available in a 6" x 6" size --


Small Thistles

To scroll thru the pages of all my StencilGirl stencils, please start here.

Visit Jenny's blog here! -- to learn how she created today's fabulous artwork.

Thanks for stopping by today!  

Saturday, April 20, 2019

Happy Easter!


It's the happiest day of the year for me!

Hardly anyone sends Easter cards anymore, but I have one friend who does.  

Easter cards I've made this year ...


Above:  A double-print -- one atop the other, but the dark purple background print leans left, while the colorful top print leans to the right.  Made with my 6" x 6" stencil Mikki's Flowers and heavy-body acrylic paint..  Decorated with Pan Pastels.  The original background was a page from an old encyclopedia.

Above:  Made with my 6" x 6" stencil Mikki's Flowers and heavy-body acrylic paint.  Also decorated with Pan Pastels.

Above:  Made with my 6" x 6" stencil Mikki's Flowers and light modeling paste.  Decorated with Pan Pastels.

Above:  Also made with my 6" x 6" stencil Mikki's Flowers and light modeling paste.  And also decorated with Pan Pastels.
In past years, I created Easter cards with some of my other flower stencils --

You can click on the above photo to enlarge it and better see detail.  Far left and far right:  Swatton Flowers Version 1 Stencilwhich measures 6" x 6".  Middle:  Pressed Leaves 6" x 6" stencil.
You can click on the above photo to enlarge it and better see detail.  Far left: Budding Branches stencilwhich measures 6" x 6".  Middle:  Here I used part of my  Boxed Vines 9" x 12" stencil.  Far right:  I sprayed watercolor paint thru my 6" x 6" stencil Silhouette of a Wildflower Bouquet.

You can click on the above photo to enlarge it and better see detail.  On each of these cards, I used my 6" x 6" stencil Silhouette of a Wildflower Bouquet.  The far left and far right cards were colored in with a brush and Distress Ink Pads.

Thank you for stopping by this blog today!  May your Easter be as happy as mine!  To scroll thru the pages of my StencilGirl stencils, please start here.  To follow this blog by email, please use that option in the upper right sidebar.  

Sunday, April 14, 2019

Step-by-Step ... and Still Going ...


Today's post focuses on a 3-dimensional project that's still in the works.

Its base is a stretched canvas that I coated with two colors of acrylic paint.

After that paint had dried, I used masking tape to secure two of my stencils to the canvas; then, with a plastic artist's spatula, I spread molding paste thru both stencils.  (A credit card works just as well for this step.)  


Above:  the top stencil is Mimosa 6, which measures 6" x 6", and the  bottom stencil is its "big sister" stencil, Mimosa, which measures 9" x 12".

Below:  the stencils have been lifted off the canvas and placed into a basin of water, to keep the paste from hardening on them.  Later, I would lift the stencils from the water and wipe them clean with paper towels.


After the paste has had time to dry completely -- and no longer feels "cool" to the touch -- I used the spatula to place opaque white acrylic paint and orange acrylic paint onto a disposable plate.  I mixed the two colors only slightly.  With the same spatula, I spread this paint across part of the raised images, as shown below.


The photo above shows that my next step was to start brushing green liquid acrylic paint onto selected areas.

Below, another photo shows more green being introduced, this time in the form of Golden High Flow Acrylic paint.


The photo above shows a close-up of the artwork at this stage of its progress.  The photo below is another close-up, of a different area --


I diluted white acrylic paint and spattered it across part of the surface.  Two close-ups below show this spatter --


This is as far as the work has progressed.  Now I've set it aside to await further inspiration!

Many thanks for visiting my blog today!

To scroll thru the pages of my StencilGirl stencils, please start here.

Friday, April 12, 2019

PRAYER FLAGS Stencil and SKI-LIFT WORKS Stencil


My painting below was developed with layer after layer of stencil applications.  Here in its final version, it still shows subtle use of Prayer Flags Stencil (9" x 12") and Ski-Lift Works Stencil (6" x 6") ...


At other times, I use the Prayer Flags Stencil in less subtle ways --


Today's other stencil, Ski-Lift Workswas used with brown paint in this work-in-progress by Tommy McDowell, an artist known for the complexity of her works -- 


To keep tabs on Tommy McDonell, check out her website here.

Ski-Lift Works Stencil (6" x 6") in its entirety looks like this --


Prayer Flags Stencil (9" x 12") looks like this --


Thanks for stopping here today!

To scroll thru the pages of my StencilGirl stencils, please start here.

Tuesday, April 9, 2019

Focusing on 6" x 6" Mask GARDEN AT NEMOURS


Today's post features Garden at Nemours Mask, which measures 6" x 6".  The art sample above was created on an old paper scrap that I'd previously painted and covered with random scribbles.

Below is a similar print, this one made on old newsprint that had been partially spattered with sprays of acrylic paint.


The art above was printed on another sheet of old newsprint, which has been previously painted with zinc white acrylic paint, which is translucent, allowing some of the print to show.

The sample below was a double-print made with this mask.  The first print shows up faintly in the center-to-mid-right, near the top.  


Today's final sample, above, was created on an old sheet of paper that had been painted and scribbled over.  

Thanks for visiting here today!  To scroll thru all my StencilGirl stencils and masks, please start here.