March 3 will bring a release of four new masks I've designed for StencilGirl. Altho the four masks together make a set, each mask is also available individually. Here's a tease cut from one of the artworks I've made with one or more of these masks:


Stencils, Masks and Techniques ... Please scroll down the right sidebar to see a line-up of my stencils and masks.
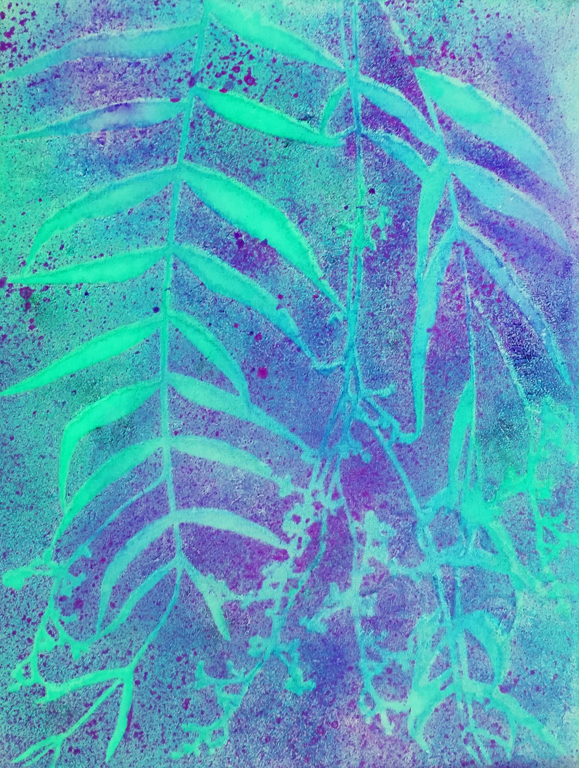
Winter Berries Mask and Winter Berries Stencil are exact opposites of each other -- which makes it exciting to use them together; this creates a play between negative space and positive space. Viewers can ask, "Which is which?" -- because negative space can visually trade places with positive space. An interesting image can challenge the viewer to see the berries first as figure (positive space), then in the opposite way, as ground (negative space.)
 |
| Above: artwork, full-view, painted using Winter Berries Mask and Winter Berries Stencil . |
 |
| Above: a close-up detail from the same artwork created with |
 |
| Winter Berries Stencil |
 |
| Winter Berries Mask |


| 9" x 12" Tangled Pods Mask |
| 9" x 12" Dangled Pods Stencil |
 |
| 6" x 6" Small Dangled Pods Stencil |
 |
| 6" X 6" Small Tangled Pods Mask |
Before discussing figure-ground, I'm announcing that March 3 will bring a release of four new masks I've designed for StencilGirl. Altho the four masks together make a set, each mask is also available individually. Here's a tease cut from one of the artworks I've made with one or more of these masks:

The principle of "figure-ground" contrast can be phrased as a question: “Which part of any silhouetted image is “figure” and which is “(back)ground?” If a silhouette is considered the figure, then the spaces around that figure is considered ground or background.


 |
| 9" x 12" Longwood Florals Stencil |
 |
| 9" x 12" Longwood Florals Mask |
 |
| 9" x 12" Winter Berries Stencil |
 |
| 9" x 12" Winter Berries Mask |
Scraps from stencil-printed papers are still lingering in my brain, perking up more ideas for their use.
With today's examples, I want to explain something that I haven't before.
I like to make greeting cards for their own sake, but there's more to it than having something to drop into the mail or hand over to a friend.
I fell in love with card-making because almost every card poses a composition challenge, but a challenge in a size that's easily manageable.
Assembling these mini-collages is a series of warm-up exercises for me, before I move forward into an art-making day that will focus on stretched canvases much larger in size.
And scraps of stencil-printed papers are perfect for greeting card compositions, letting me approach each blank card with color combinations that have already been established, so I can place all my focus on composition.
These experiments in composition are fun, and because they are just for cards, it doesn't matter whether or not each collage becomes a "masterpiece." Many of them won't. But nothing ventured, nothing gained. My goal isn't masterpieces; instead, it's to explore, teach myself something new, and most of all, have fun!
 |
| Above: Altho these foil embellishments may no longer be in stock, they were purchased from Paper Wishes, and may still be available elsewhere. |
 |
| Above: The copper foil embossed embellishment is a Dresden design, sometimes available at Etsy and possibly elsewhere. The vertical foil embellishment is from Paper Wishes. Note: These items may no longer be in stock. |
 |
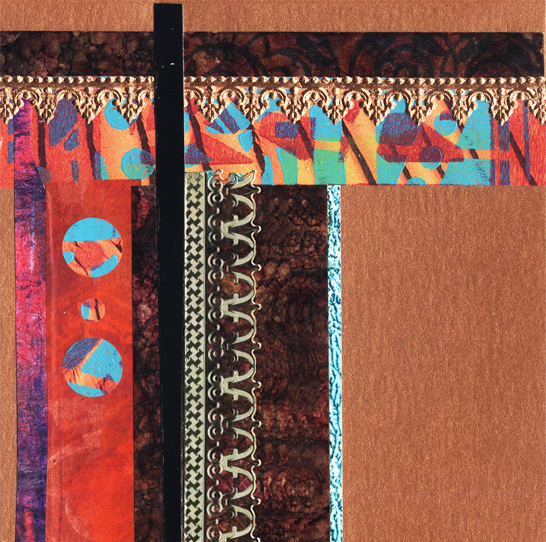
| Above: Can you tell which stencils were used in making the prints that were cut up to become scraps in this collaged greeting card cover? The magenta and blue print was made with 9" x 12" Prayer Flags. The green and purple scrap came from paper printed using 9' x 12" Vases. The bright-green and indigo-blue print was made with 9" x 12" Facets. |
 |
| Note: The above scraps -- which I created many years ago -- were not stencil prints per se, but they were printed with my own original designs that I would eventually use to design stencils -- 6" x 6" Ferns 6 Stencil and 9" x 12" Boxed Vines Stencil. |
 |
| Above: Stencil-printed papers were made with 6" x 6" mask Sprigs. Foil embossed embellishments are Dresden designs available at Etsy and elsewhere. |
After creating miniature collages, it's easier to move into large sizes:
 |
| Some papers in the collage above were printed using 9" x 12" Looking Up Through Trees L753 and 6" x 6" Looking Up Through Trees Small s793. |
 |
| Can you tell which StencilGirl stencil was used in the low-left quadrant of the above collage? Random Circles, designed by MaryBeth Shaw. |
 |
| Above: The background of this collage was printed on watercolor paper using 6" x 6" Swatton Grid and 9" x 12" L791 Palm Fronds Silhouette. Most, but not all, of the collage papers were cut from prints made with StencilGirl's May 2019 Stencil of the Month set. This set can still be purchased by members of the StencilGirl Stencil Club. |
 |
| A few of the papers in the collage above were prints made with 9" x 12" L791 Palm Fronds Silhouette. |
Today's post brings forward a circle theme, circles being one of my favorite designs. One connotation of this shape is that it suggests completeness; and I like the way that concept fits in my head.
First, I'll show the early stages of a simple painting on stretched canvas that I've titled The Moon is Out Tonight. In those early stages, it was developed with several applications of my 6" x 6" Marbles 6 Stencil s080 ....

The early stages --

Below: The painting's final layers were painted using Flower Pot Mask L398, designed by Suzi Dennis, and Tottering Shapes s806, designed by Cat Kerr --

Today's second art sample, below, is a mixed-media piece on watercolor paper. The first photo below shows it still taped to the backing board that I use for painting watercolor papers. To its left, I've taped my 6" x 6" Trivet A s166. This mask was used in subtle ways as I worked toward creating a more complex image than what I'd achieved in today's first painting, above.

Below, I've used green to outline the two areas in this mixed-media piece that were created with subtle use of Trivet A s166:

Trivet A s166 looks like this --

-- and it is one in a series of trivet stencils and masks that I've designed, all available at StencilGirlProducts.
Thank you for coming to check my blog today! To scroll thru my StencilGirl stencils and masks, please start here.
Today's post features just one Valentine --

-- for anyone like me who decides at nearly the last minute to make just one more!
The large heart is free-hand cut from a print made using my 4" x 4" M & Y Mini Stencil. The stencil itself looks like this --

4" x 4" M & Y Mini Stencil
-- and gets its name from the fact that the shapes are the stylized letters M and Y.
In making this print, I used acrylic paints; after they dried, I added a touch of crayon across the upper left area. That paint was applied with a sponge brayer loaded with heavy-body acrylic paint. Since the paint was heavy-body, it has made the printed areas appear slightly 3-dimensional.


