Wednesday, September 28, 2022

Die-Cuts ala Judy Kauffman

Judi Kauffman is a friend who has opened a door to let me peek into a world I've never explored.  I came into this with so little knowledge on this topic that I went to the Internet to educate myself.  Here's what I found --

Die-cutting is a process whereby a die is used to cut through materials such as paper and card on a die press. The process allows you to make an identical cut into material numerous times. For each job, a die, which is a shaped blade, is custom made for the item being created.

For a complete understanding of this topic, I highly recommend this website because in just a few words, with a few corresponding photos, the world of die-cutting is laid open.

As I read thru the material cited above, I was reminded that in one basic way, the process is very similar to what happens in stencil creation.  Both processes start with a specific design. Then their paths diverge.  In die-cutting, the design is translated/copied by blades shaped to match the original design.  At StencilGirlProducts.com, the design is cut from high-quality Mylar using a laser.  The die-cut goes on to create as many matching cut-outs as the heart desires. The stencil goes on to allow paint or dry media form an imprint on a substrate, and these prints can be made in endless variety.

Today's post will include two examples of die-cutting, one from the skilled fingers of Judi Kauffman and another from a manufacturer of self-adhesive decorative stickers, Paper Wishes.

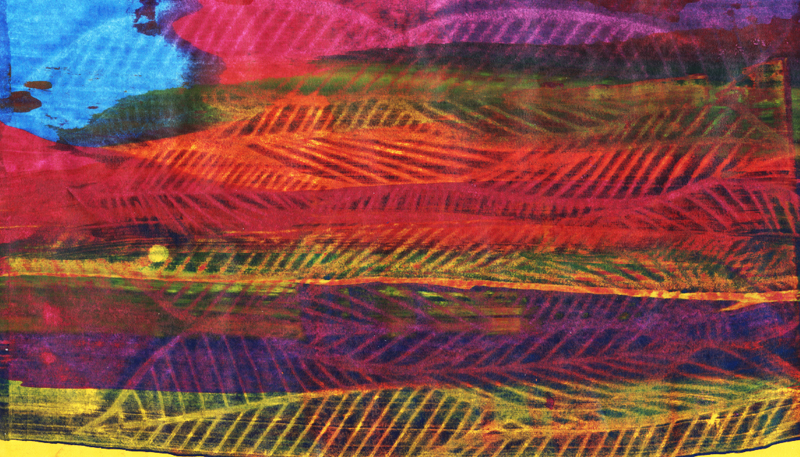
But first things first.  Before any paper became material for die-cutting, it needed printing to make it interesting.  Judi chose my 9" x 12" Twinship Stencil L268 -- which is actually a mask labeled as a stencil, but I digress! -- to make Gelli Plate prints using the colors below, as well as other colors which will appear in the die-cut examples that will follow ...


Above:  This eye-exciting print has a foreground in a hot color, red, while its pre-printed background features cool blues and aquas. 


Above:  Another yummy color combination.


Above:  This bright aqua is an attention magnet!


Above and below:  Creativity is the art of exploring new options and color combinations.


Now for the die-cut creations (notice the frame-like mountings and the surprise treats behind the doors:)


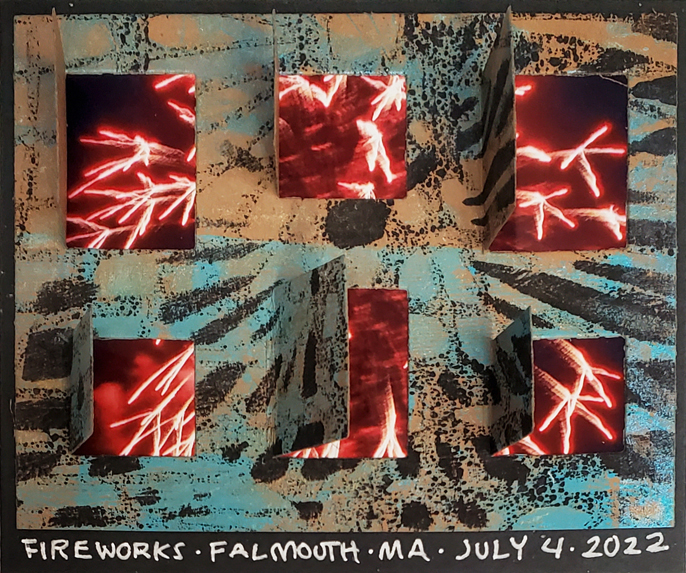
Above:  a delightful surprise gift from Judi to me! This is the front of a greeting card.


Above:  Cancelled postal stamps make these fun!


Below:  Today's second example of die-cut tools for art-making comes from Paper Wishes, manufacturer of self-adhesive decorative stickers.


More art by Judi Kauffman, as well as the stickers above, will show up again, in my next post (entitled Just Look For It!) Thanks for your showing up here today!  To scroll thru the pages of my stencils and masks at StencilGirlProducts.com, please start here.

Saturday, September 24, 2022

"Ghost Printing" and other Applications for TWINSHIP

Twinship L268 is what I titled my 9" x 12" mask shown below.  That title bloomed in my head after I took a photo of two wire baskets hanging side-by-side on a sunny wall.  The twin side-by-side baskets were casting elongated shadows.  This mask is derived from that image.


Above:  Altho listed as a "stencil," this is a mask.  In another post, I'll show the difference between the two.  I've posted on this in the past, but the latent English teacher in me feels that the topic deserves a repeat.


Artist Judi Kauffman has used Twinship L268 in many projects, and today's first photo shows a particular favorite of hers.  The original scrapbook paper that she used as her substrate came pre-printed with a soft cloudy blend of colors -- just what she wanted as background for the muted print she made with my 9" x 12"mask Twinship L268.  

Judi's muted print, also known as a "ghost print," was made using Twinship L268 while it was still covered with wet acrylic paint from its use in another project.  

"Ghost printing" works exactly like printing with a rubber stamp. 

Right after using a stencil or a mask in the usual way, the stencil or mask is often still covered with wet paint.  Why waste that?  Just follow Judi's lead and flip the stencil or mask over; then quickly press it to another paper or any other substrate (stretched canvas, etc. -- whatever you're creating your artwork on.)  

Note of advice:  For me, it works best to place scratch paper or a stiff paper towel atop the back of a stencil or mask when pressing it down to make the ghost print.  

Another tip is to use a hard rubber brayer to press the still-wet stencil or mask to the substrate.  Rolling over the scratch paper or stiff paper towel makes for a sharper imprint and uses more of the leftover paint. The barrier paper works to keeps the brayer clean.


Above:  This celebration of colors was printed on an over-sized scrapbook paper.  The slight overlap in pattern creates additional interest -- so don't be held back by the size of your gel plate!  Printed papers like this are to die cut or to incorporate into collage and mixed media projects.


Above:  3 picture postcards created from prints made in dramatic, bold dark tones. These post cards measure 4.25" x 5.5".


Above:  Four more 4.25" x 5.5" picture postcards that celebrate the drama of darks against lights.


Below:  This simple Twinship print of mine was made with acrylic paint on papers that had a past life as a sheet of foreign newsprint.


Below:  a collaged greeting card cover of mine; the pictured flowers pay tribute to a magnificent magnolia tree that once stretched branches over our driveway. For this project, I Photoshopped a photo of those heavenly flowers and reduced it to gray and white.


Below:  More pieces of that red-on-grey print were used in developing this collage on watercolor paper ....


Another way I've used Twinship has been to create a look of "holes" in sections of paintings on stretched canvas.  On the project below, I applied paint in selected areas, then placed the mask over those areas and using a soft rag to rub out areas of paint that remain visible in the mask's openings.  When the paint is still partially wet, the rag can be used dry.  As the paint begins to dry, this "subtractive" technique still works when the rag is water-dampened. If the paint has dried completely, that rag can be dampened with rubbing alcohol.  When using alcohol it's important to (1) work in a well-ventilated area and (2) work slowly to avoid removal of too much paint.


Lots and lots of thanks for visiting this blog today!  And yet another thank-you to my artist friend Judi Kauffman, for sharing more of her art.

To scroll thru the pages of my masks and stencils at  StencilGirlProducts.com, please start here.  

Tuesday, September 20, 2022

Too Soon to Think about Christmas? Nah! Consider using Stencils and Masks with Metallics ...

Today's post touches on metallic paints and oil sticks --


Above:  This 3-dimensional art sample was later cut down for use on the cover of a Christmas card.


In developing the art sample above, I started with molding paste and my 6" x 6" stencil Quilted Flower Garden.  After the paste had dried, I used two metallic oil sticks, silver and red, applying them straight from the sticks, then rubbing them into the surface with my finger (while wearing nitrile gloves.) 

Metallic crayons might work, too.  Being harder than oil sticks, they would have a different effect.

My oil sticks are Shiva brand, but probably other brands are available.

Below is a collage Christmas card.  The king on the far left was cut from scrapbook paper that had originally been white with gold marbling.  The middle king was cut from blue paper embellished with heavy-body silver metallic paint, with my 6" x 6" Marbles 6 Stencil.  Both the left king and the right king were cut from papers that had been printed with another 6" x 6" stencil of mine, Sprigs.


The art sample below started as a piece of plain red paper.  I used silver metallic paint to establish a casual-looking background.  After that paint dried, I made a print on it with dark blue acrylic paint and my 6" x 6" stencil Heron.


I used the same technique to create another Christmas card --


Stencil used above:  6" x 6" Bonsai Tree s198


Below is a very faint metallic piece, made with gold acrylic paint and another 6" x 6" stencil of mine, Sassy Spray


In its entirety, Marbles 6 Stencil looks like this --


Above:  Used in the Magi Christmas Card


And Sprigs (6" x 6") Stencil, in its entirety, looks like this -- 


Above:  Used in the Magi Christmas Card


Quilted Flower Garden (6" x 6") --


Above:  Used in the art sample at the top of this post.


6" x 6" Sassy Spray  (used with gold metallic paint on a red background in 4th art sample from the top of this post) ....


Thanks for visiting today!

To scroll thru the pages of my masks and stencils at StencilGirl Products, please start here.

Friday, September 16, 2022

Scraping Paint over Paper -- with a Stencil Underneath!


Today's post features my paint-over-stencil video, here.

Supplies:

lightweight but sturdy paper (I used Asian rice paper);

a stencil (I used Clustered Leaves);

liquid acrylic paint 

a 12-inch-wide drywall taping knife, sold at home improvement stores, or you can order it here.


This is a quick and easy technique, as the video demonstrates.

Here are some prints I've made this way --


Clustered Leaves (9'x 12" stencil)


Clustered Leaves (9'x 12" stencil)


Clustered Leaves (9'x 12" stencil)


Clustered Leaves (9'x 12" stencil)


Clustered Leaves (9'x 12" stencil)


Mimosa 9" x 12" Stencil 


 Mimosa 9" x 12" Stencil


Mimosa 9" x 12" Stencil 


Clustered Leaves (9'x 12" stencil)


Clustered Leaves (9'x 12" stencil)


Clustered Leaves (9'x 12" stencil)


Clustered Leaves (9'x 12" stencil)


This technique works better with some stencils than with others.  Experimenting is fun!

To scroll thru the pages of my sstencils and masks at StencilGirlProducts, please start here.

Thanks for checking out my blog today!

Monday, September 12, 2022

Starting today's project, I used green masking tape to secure my 9"X 12" stencil Mimosa L141 to a sheet of foreign newsprint that I'd previously coated with red acrylic paint.

Next, I started using a blue pencil to trace around the shapes contained within the stencil's frame.  The open areas in this stencil made that easy since lots of "negative" space exists around the elements that form the design.  The photo below shows where the blue outlining has begun.


Above:  The stencil has been lifted off.  What remains is the blue outlining.


Above:  I'm using 3-dimensional craft paint in a squeeze bottle to trace along all of the penciled blue outlines.


Above:  This is what the piece looked like after all of the 3-dimensional outlining was done.  I set it aside to dry overnight before moving forward.


My next step was to pull out my 12" x 14" Gelli Plate.  I used a soft rubber brayer to cover its surface with yellow-green open acrylic paint. 

Then I pressed the textured paper face-down into the wet paint.  When I lifted it again, it had left an imprint in the wet paint remaining on the plate.

I pressed fresh white paper onto the plate and burnished its back-side with my hands.  When I pulled up the paper, I got these results:


Above:  An interesting background paper for an art journal page.


I continued making prints with an assortment of colors.  

At the end of the session, my paper with the 3-dimensional paint outlining looked like this--


Above:  I had intended to use this piece only as an art-making tool, but after several printings, it took on a look that makes it an artwork in itself!


Thank you for coming to my blog today!  To scroll thru the pages of my stencils and masks at StencilGirlProducts.com, please start here.

Thursday, September 8, 2022

Judi Kauffman's Maneuver for Saving "Duds!"

 My friend Judi Kauffman ran a paint-loaded brayer across a sheet of copier paper and voila! -- she had a starting point for a new stenciled card. Those base-coat spatters and smears were to remain visible, since Judi used black paint sparingly when she added the top paint layer using my 6" x 6" mask Silhouette of a Wildflower Bouquet s236. 


Above:  A narrow black border and a stamped message of encouragement complete the face of this square fold-over greeting card.  (The stamp was designed by Judi herself for Red Castle, Inc.; it's a vintage-font stamp sporting words that Judi wholeheartedly embraces, tho she hasn't yet tried hang gliding or snorkeling!  She's going to start snorkeling and hang gliding as soon as I do! LOL)


The above print is lovely in its subtlety.

But not every print works out as well -- so Judi has a way of dealing with "duds." 

Let's see what she does, just in case (cough) any of us should ever make any duds!

Judi's duds get cut down to postcard size.  Next she goes into action with her Sakura Gelly Roll #10 pen, favoring that pen for its generously thick lines along with its ability to make perfect dots.


Above:  Judi again used my 6" x 6" mask Silhouette of a Wildflower Bouquet s236.  Her so less-than-perfect prints became unique beauties in their own right.

I won't claim to have followed flawlessly in Judi's footsteps, but I too have decorated a dud here and there.  Oddly enough, the card of mine below was printed using the same stencil. 

When I pulled the green-gold print off my gel plate, I saw that the print of the flower and foliage was too faint to stand out from its background.  So I outlined the shapes using a 3-dimensonal fabric paint.


Thanks for stopping here today! To scroll thru my stencils and masks at StencilGirlProducts, please start here.