Thursday, January 28, 2021

Valentines from Leftovers

Space restrictions meant that my January 28 post at StencilGirl Talk had to have some photos deleted.  I'm re-posting the original version here today, since a picture's worth a thousand words....  

Have a heart!  Or two.  Or five.  Or a dozen!

Getting ready for Valentine’s Day?  Or any other occasion you want to brighten with hearts?

I use leftovers in creating three-dimensional heart embellishments for greeting cards, memo magnets, hanging ornaments, art journal cover decoration, lapel pins, earrings, etc.

Today I’m describing two approaches.  First I’ll talk about leftover acrylic paints.  Secondly, I’ll show a way to use leftover stencil-printed papers.

My first project starts with wooden craft hearts 


…and a painting in progress:


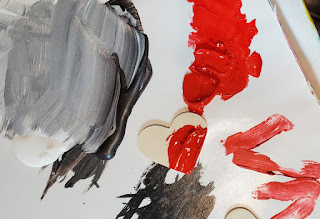
In this painting project, as shown in the two photos directly above, I’m using 6” x 6” StencilGirl® Pavilion Shadows with heavy-body black acrylic paint and 6” x 6” StencilGirl® Ski Lift Works with heavy-body red acrylic paint. Dollops of these paints, as well as heavy-body gold and white acrylic paints, are waiting on my tablet of disposable palette paper (a tablet of white paper with a glossy, resist-surface.) 


After I’m done using paints for my painting-in-progress, I place wooden craft hearts into the leftover dollops of wet paint.  When I lift them, they’re partially coated with paint that boasts a delightful 3-dimensional “squished” pattern --


Next, I double-dip each heart to load it with a second color.


I repeat this till all leftover paints are used.  


After my first set of hearts dry, they’re ready to become embellishments on a Valentine greeting card that will appear at the end of this post.

More newly-dry painted hearts are going a step further – into bling!  After placing them in a beading tray, I add glitter glue and miniature iridescent beads.  


 Most of my bling-hearts, used as embellishments, will appear at the close of this post.  But I’m showing one here; among its randomly-tilted layers is a heart cut from a stencil-print.  Stencil used:  6” x 6” StencilGirl® Marbles 6.


My second way to use leftovers starts with scraps of stencil-printed papers.  Today’s example is a foil scrap printed with 6” x 6” ” StencilGirl® Swatton Links.


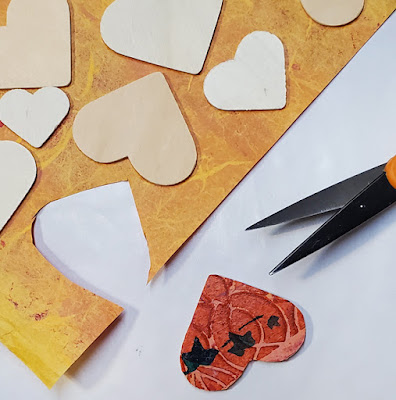
I flip the scrap backside-up and freehand-draw 2 hearts.  Or you can use wooden hearts as tracing templates. 


After cutting out the heart shapes, I glue them to a Valentine card atop a lace doily from InLoveArts


I have another paper that was left over from an earlier project, when I’d printed it using 6” x 6” ” StencilGirl® Sprigs and 6” x 6” StencilGirl® Ivy Frame 6 Stencil.


From this paper scrap, I cut a column to place on a card.  After gluing a number of craft wooden hearts to the back of the remaining scrap, I start to cut them out so I can glue them to the Valentine with the column, as well as other Valentines. 


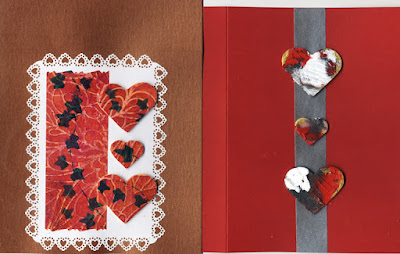
Here are today’s finished greeting cards --


What about that painting-in-progress?  Having developed into a mixed-media collage, it’s below: 


Below are 3 close-up detail photos of the artwork's stenciled areas.... 


1. Stencil used:  6" x 6" Pavilion Shadows s464 


2. Stencil used:  6" x 6" Pavilion Shadows s464 


3. Stencil used:  6" x 6" Ski Lift Works s463. 


Note:  To mail greeting cards with 3-dimensional embellishments, I recommend using padded envelopes.  You can find US postal requirements here.

Want a supply list for today’s 2-prong project?  You can find that by scrolling back here on my post to January 28, 2021.

To scroll thru the pages of my StencilGirl® stencils and masks, please start here.

Today's post at StencilGirl Talk briefly previews my two-part project for using crafters' wooden blank hearts --


-- with "leftovers" in creating 3-dimensional embellishments to become refrigerator magnets, hanging ornaments, or decorations for art journal covers, greeting cards, gift-tags, etc.

Because of space limits, a lot was left out of the StencilGirl Talk post.  Today's two posts here on my blog will fill in the gaps to avoid any possible confusion. 

Here is the supply list for the first of these two projects--

1.  heavy-body acrylic paints
3.  crafters' wooden blank hearts 
5.  miniature iridescent beads 
6.  fine-detail scissors (or a cutting board and knife)
7.  extra-strength gluestick 
8.  any kind of beading tray

The second project in today's post at StencilGirl Talk shifts the focus to using leftover stencil-printed papers with crafters' wooden blank hearts.

On my own blog today, I'm describing the same project, but here I'll use a different set of stencil-printed papers.  These papers were printed using my 9" x 12" mask Garden Montage, which looks like this:


Three examples of these papers--


The photo below shows crafters' wooden hearts and scraps of papers printed with Garden Montage; both are ready for me to take them into the next step.


Below:  a photo showing stencil-printed paper scraps flipped backside-up, with hearts glued to them; for that, I used an extra-strength gluestick.


My next 2 photos show two ways of cutting away the excess papers; the first is to use a cutting board and crafters' knife:


Below:  Option Two is to use fine-detail scissors ....


Above:  A collection of hearts decorated with leftover scraps of stencil-printed papers.

Below:  Two photos showing greeting cards decorated with hearts.


NOTE:  To mail greeting cards with 3-dimensional embellishments, I recommend using padded envelopes.  You can find US postal requirements here.


Thanks for your visit today here at my blog and at my corresponding post at StencilGirl Talk!  

To scroll thru the pages of my StencilGirl stencils, please start here.

To follow this blog by email, please use the option-box in the upper right corner.

Monday, January 25, 2021

Inspired by one of the videos of StencilGirl's MaryBeth Shaw, I've tried something new -- using stencils and masks with low-viscosity media.  Using low-viscosity ("runny") media means taking risks!  And getting surprises!  Because runny media will flow under the the areas of a mask or stencil that would otherwise remain paint-free.


For this series of experiments, I chose Sumi ink.  This black ink beads up when brushed across paper with glossy surfaces as well as paper previously coated with acrylic paints.  Sometimes the beads are small; other times, they stretch out into pools.  Either way, the lift of the stencil or mask will bring a surprise.  No two prints will match, nor will any of the prints be exact replicas of the stencils or masks used in their creation.

For my approach, I wasn't stingy in the amount of ink I used; instead, I brushed it in generous swipes over the stencils and masks.  This guaranteed a lot of beading and pooling on the papers under the stencils.


Above:  On acrylic-painted paper, I used the 6" x 6" stencil Kaleid.


Above:  On acrylic-painted paper, I used 6" x 6" stencil Pavilion Shadows.


Above:  On acrylic-painted paper, I again used my 6" x 6" stencil Kaleid.  Besides being coated with acrylic paints, this paper was textured.  Its original source had been an outdated Braille catalog.


Above:  On acrylic-painted paper, I again used 6" x 6" stencil Pavilion Shadows.


Above:  On glossy photo paper, previously printed with a photo, I used Sumi ink with my 6" x 6" stencil Trivet C.  Trivet C is one in a series of trivet stencils I've designed for StencilGirl.


I encourage you, too, to try something new ... it's good for you!

Thanks for visiting my blog today.  To subscribe, please use that option in the upper right sidebar.

To scroll thru the pages of my StencilGirl stencils and masks, please start here.

Thursday, January 21, 2021

Three-dimensional art can created with stencils and masks in several ways.  Today's post shows one approach that I took, using my 9" x 12" Tangled Pods.... 


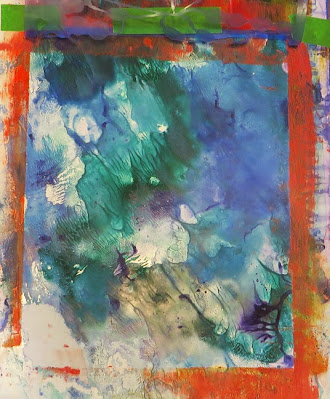
... along with matte gel mediuma spreading tool, masking tape, a soft terrycloth rag and a sturdy substrate -- in this case, I chose a large sheet of glossy cardstock that had already been monoprinted with blue and green acrylic paints.


After taping the substrate to my work surface with masking tape, I covered it with Tangled Pods and taped that down, too. 


For my next step, I spread a generous layer of matte gel medium across the top of the stencil, as shown in the two photos below.  (Gloss gel medium work work, too.)


After spreading the gel medium, I lifted off the stencil:  


Since 3-dimensional gel can just about ruin a stencil or mask if allowed to harden, I immediately cleaned the stencil 

And I set aside the art to dry overnight.  Once it had dried, I coated it with acrylic paints, first brushing them on, then using the soft rag to wipe away paint from some areas. 


The two photos directly above show the first couple of paint layers.  I continued adding layers, working toward a result that would please me.  The final piece is shown below.  One of its top  layers, a gold "metallic" paint, covers about 2/3 of the surface:


Thanks for visiting my blog today!  To follow by email, just check out the option in the upper right sidebar.


To scroll thru the pages of my StencilGirl stencils and masks, please start here.