Monday, July 29, 2019

Opposites Attract!


Do opposites attract each other?  The color wheel says they do.  Below are two prints made with 6" x 6" Pavilion Shadows stencil.  As a color wheel shows, orange and blue are complements (opposites).  Used one atop the other, they make visual combinations that excite the viewer's eye....


Below is a painting on stretched canvas created with my 9" x 12" mask Winter Berries.  The painting employs several colors, but the orange-yellow and blue color areas are the stars of the show, each contrasting vividly with the other.


Below is a stencil print that shows another combination of several colors -- pink, blue, yellow and a touch of orange -- yet, again, what the eye notices most is the contrast of blue against a field of yellow, a near-complement (notice the position of yellow on the color wheel; it's next to orange.)  


The above print was made with (bottom layer) the 9" x 12" stencil Prayer Flags and (top layer) the 9" x 12" stencil Garden Montage.


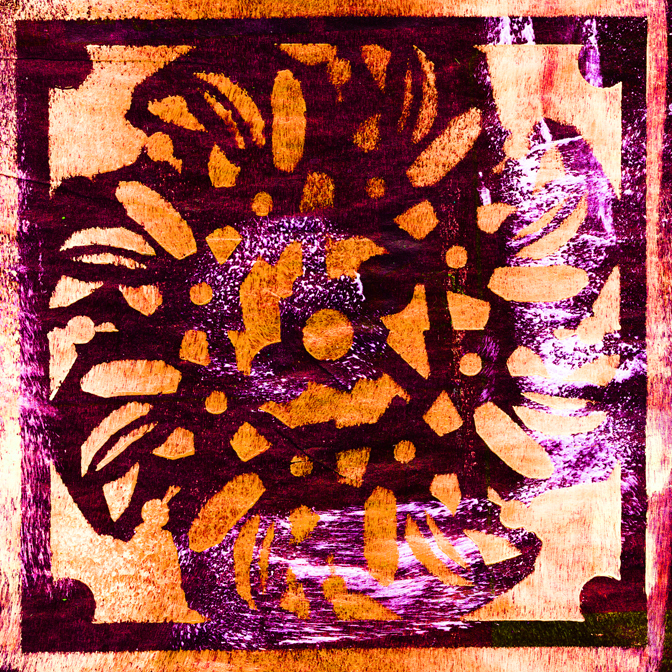
Garden Montage also went to work in creating the print below.  The background was an old calendar page with an image that was roughly 2/3 orange and 1/3 yellow.  Once the stencil was in place, I went over it with a sponge brayer loaded with light blue paint.  This print demonstrates once again that complements used together create a "pop" that entertains the viewer.


Thank you for coming to my blog today!  To scroll thru the pages of my StencilGirl stencils and masks, please start here.

Friday, July 26, 2019

Stencils Meet Collage


Stencils and collage?  So glad you asked!

Ivy Frame 6, a 6" x 6" stencil, struck me as a good way to embellish the collage below.  Its bottom layer is a Gelli Plate print.  Over that, I developed a collage using red-orange paper, blue-green-yellow mottled paper and foreign script from an old book. Next came the big blue oval, painted with matte medium-diluted acrylic paint.  (Some artists dilute acrylics with water; I use a colorless liquid medium instead, usually opting for matte rather than glossy.)

Last, I added a crown of ivy using dark green acrylic paint.     


Ivy Frame 6 itself looks like this--


Below is a simple collage that incorporates a background paper that I made with acrylic paint and a scraper.  Using a stencil in this way is shown this video of mine.  The stencil used here was my 6" x 6" Kalied.  


Kalied itself looks like this --


Still a different approach to the marriage of stencils and collage is a simple one:  Make a lot of stencil-prints using assorted colors and papers.  Then cut up the papers and combine them.  Each of the collage pieces below was cut from a print made with Garden Montage, a 9" x 11" mask.


Garden Montage in its entirety looks like this:


Once in a while, I alter a paint-stained stencil with scissors, then use it as an element in a mixed-media collage --


The collage above began with diluted paints on Yupo.  After those paints dried, I added the stained stencil, 6" x 6" Sassy Spray.  (Heavy matte medium gel was the adhesive I chose.)  The last step was to add a couple of small bits of paper in the upper left.

Sassy Spray, before it meets paint stain and scissors, looks like this--


To round out today's post, I'm circling back to an artwork like the one at the top of this post.  This is another collage that started with prepared background paper -- in this case, prepared with acrylic paints, texture-making tools and a squeeze bottle of fabric paint.  Over that, I added an old print of mine, created back when I was carving my own rubber stamps.  (Seeing this collage makes me want to dig out that eye rubber stamp to use it again!)  Over that, I added four pieces of paper.  The fourth piece, printed in bright red-orange-purple on blue, is actually a silhouette of a human figure.  This figure is more easily recognized when you click on the image below to enlarge it.  


The human figure above was cut from a print made with Small Tangled Pods, a 6" x 6" mask.

Small Tangled Pods looks like this --


Thanks for visiting my blog today!  To scroll thru the pages of my StencilGirl stencils and masks, please start here.  To follow this blog by email, please use that option in the upper right sidebar. 

Tuesday, July 23, 2019

Light Value Domination vs. Dark Value Domination


Does value have value?  Oh yes!

In the art world, "value" is a word used to indicate the darkness of any color, the lightness of every color, and 5 - 10 of the shades that fall between these two extremes.

One example of a value scale is here.

A typical value scale shows 5 - 10 squares in a vertical row or a horizontal row.  At one end of this scale is a hue that's nearly white.  Each successive square shows a darker hue.  The row of squares ends with a square that's so dark it's nearly black.  

Some artists use a rule-of-thumb that each artwork looks best when it's 80 per cent dark and 20 per cent light, or 20 per cent dark and 80 per cent light.

Today's art samples fit into that 80/20 per cent rule-of-thumb.  

These are not finished artworks; they are simple stencil-prints.  But they show the value of value:  what a difference it makes in the viewer's eye when a piece is dark-dominant or light-dominant.

At times, I find it helpful to look at examples like this, to remind myself of the difference in an art piece that stands out when pieces with dominant light values are contrasted with pieces wherein dark values dominate.


Above:  Light values dominate this image, created on an old calendar page with acrylic paint and my 6" x 6" stencil Mikki's Flowers.

Below:  Dark values dominate this image, also created using acrylic paint and my 6" x 6" stencil Mikki's Flowers.

The same stencil ... but what a contrast!  To my eye, the difference between dark value dominance and light value dominance is more striking than color differences.


Above:  Light values dominate this image, made with acrylic paint and my 12" x 12" stencil Prayer Flags.


Below:  Dark values dominate this image, also created using acrylic paint and my 12" x 12" stencil Prayer Flags .


Above:  Light values dominate this image, made with acrylic paint and my 6" x 6" stencil Swatton Links.


Below:  Despite the light-value background, it's dark values that dominate this image, also created using acrylic paint and my 6" x 6" stencil Swatton Links.


Thank you for stopping by my blog today!  To scroll thru the pages of my stencils and masks at StencilGirlProducts.com,  please start here.  

Saturday, July 20, 2019

Variety of Artworks from StencilGirl's StencilClub,


Above, Shelly Hilligoss Sturges shows us a creative, striking way to use my 9" x 12" stencil Vintage Script -- by using it backward, she made it exciting in a way I'd never imagined!  I love it when I run across an artist like Shelly, who thinks outside the box!

The artwork below shows more innovation paired with strong visual language, this time by Jill McDowell, who is a StencilGirl Creative Team Member.


Jill used several StencilGirl stencils in developing the art above, and among them, my 6" x 6" Heron stencil.

Below is art by Mary C. Nasser, who used one of my two hot air balloon stencils.   (Each of these two stencils come with same-size masks.)  The background was made with a stencil by Valerie Sjodin -- an artist whose work I'd admired for years, having had the good fortune to discover her long before her welcome addition to the team of designers at StencilGirl.


Above:  A charming detail from a larger, equally charming, painting by artist Kim Ross, who used my 6" x 6" Cats stencil.

By clicking on the image below, you can enlarge it to better see detail.  Among other StencilGirl stencils, artist Lisa Dobry used my 9" x 12" stencil Prayer Flags to add texture to the background of this two-page spread in her art journal.


Above:  Again, by clicking on the shot above, you can better see its details.  This art was created by StencilGirl Columnist Jennifer Armstrong.  Jennifer used my 6" x 6" stencil Pressed Leaves to make this gentle, happy image. 

The exciting artwork below was done by Terry O'Neill, with StencilGirl stencils that include my 9" x 12" stencil Thistle (which also comes in a 6" x 6" size.) 


I'm so very grateful that these artists have allowed me to use their photos in this blog!

And my thanks to you, too, for stopping by here today!

To scroll thru the pages of my StencilGirl stencils and masks, please start here.

Sunday, July 14, 2019

Greeting Cards and Envelopes


Recently I stencil-printed a new batch of greeting cards and envelopes.  Usually when I do this, I match the envelopes with the cards.  But this time, my needs were different.  So here is the mis-matching collection ... starting with envelopes I've printed with Fern Fronds Silhouette Stencil Mini --


And here is a third envelope, this one covered with multiple prints from the same stencil ....


My two greeting cards most recently made are collages I've created with cut-out pieces of acrylic paint-stained masks by Trish McKenney's fantastic series of tree branch masks.


Thanks for visiting here today!  To scroll thru the pages of my StencilGirl stencils and masks, please start here.

Thursday, July 11, 2019

Nothing's Ever a Waste


I believe nothing is ever a waste!  If a stencil-print turns out in a way that disappoints me, I look for a way to make lemonade from the lemon.

Today's post springs from an experience I had using my 9"x 12"stencil Boxed Vines... 


When I found myself with a less-than-perfect Gelli Plate print -- made with this stencil and a deep dark red acrylic paint -- I asked myself,  "Where can I go from here?"  

I decided to disguise the flaws.  I mixed modeling paste with silver metallic powder, then used a small plastic spatula to spread a thin layer of this textured silver paint over most of the flawed Gelli Plate print.   

With the same spatula , I covered the rest of the flawed print with a thin layer of reflective silver acrylic paint.  

Once the two silvery paints had dried, I cut the images into pieces to fit my 6"x 6" dark-bronze blank greeting cards (JamPaper.com.)  As a last step, I added swirls and dots with glitter glue...


Because this deep bronze metallic cardstock is very dark, I sometimes line the insides of the cards with lightweight papers, cut to fit, as shown below -- 


Other times, instead of using a paper liner like the one above, I use white marker-pens for adding my message inside these greeting cards.

The main reason I like to use 6" x 6" greeting card blanks is that they perfectly fit my 6" x 6" stencils and masks.  But, beyond that, I like the square shape, even for projects like today's, which could fit on any size greeting card (or art journal page.)

However, since the Postal Service has a non-machinable surcharge for mailing 6"x 6" cards, I use two Forever stamps when mailing them.

Thanks for visiting my blog today!  To scroll thru the pages of my StencilGirl stencils and masks, please start here

Tuesday, July 9, 2019

A GIVEAWAY! 4 FREE STENCILS/MASKS


Four free stencils/masks are up for grabs in this giveaway -- details are here:  http://heartworkbycecilia.blogspot.com.

  Deadline to enter is 12:00 am July 12, U.S. Eastern Standard Time.  The winner will be announced July 13, here -- http://heartworkbycecilia.blogspot.com.

Monday, July 8, 2019

A Variety of Stencil-Made Artworks


Stencil prints abound here! 

Today's post features art created with acrylic paints.  It starts with a print made by using my 6" x 6" stencil Trivet A -- 


-- and this is just the first in my stencil series based on trivet patterns.  To see all of them, please check here.

Number two position in this line-up is the portfolio piece below:


The two-part collage above has a monoprint background; its foreground is a paint-stained stencil that has been cut free from its frame.  Sassy Spray is the title of this 6" x 6" stencil.

Below is a two-step print that started with blue acrylic paint and my 9" x 12" stencil Clustered Leaves.  Over that, I made a yellow print using another 9" x 12" stencil of mine, Fantasia.


Above is a print made with my 6" x 6" stencil Kaleid.

And below is a print created with my 9" x 12" Mimosa Stencil --


-- and the stencil used above also comes in a 6" x 6" size, Mimosa 6.

Many thanks for taking time to check out this blog today!  To scroll thru the pages of my StencilGirl stencils and masks, please start here.

Friday, July 5, 2019

Summer-Themed Stencils and Masks


Summer is blooming outdoors and -- thanks to stencils -- indoors too!


Above:  Made with part of 9" x 12" stencil Blooming Where Planted.

Above:  A 6" x 6" greeting card collage compiled from prints made with 6"  x 6" Garden Montage.

Above:  Made with 6" x 6" stencil Ginkgo.

Above:  a print made with 9" x 12" stencil It's Jungle Out There (9" x 12" and cut from its original frame.)

Above:  A print made on holographic gold foil giftwrap using 6" x 6" stencil Mikki's Flowers (which also comes as a mask.)

Above:  Artwork on stretched canvas created with acrylic paints and collage-embellished (center) with a paint-stained stencil.  Used:  6" x 6" mask Small Tangled Pods and 6" x 6" stencil Small Dangled Pods.  (These pod patterns also come as a 9" x 12" stencil and a 9" x 12" mask.) 

Above:  A print made with 6" x 6" stencil Swaying Grasses on an old encyclopedia page that has botanical illustrations.

Thanks for visiting this blog today!  You can scroll thru the pages of my StencilGirl stencils and masks here.

Monday, July 1, 2019

GARDEN MONTAGE and FERN FRONDS SILHOUETTE MINI Stencils with Acrylic Paints

Garden Montage (9" x 12") stencil gets employed pretty often around here! 


Above:  I often use foreign newsprint as backgrounds for my prints.  I like the background that peeks thru, here and there.


Above is a print that I made on marbled paper.  (I purchased this paper already marbled -- lacking the patience to do it myself!)


Above is a print made on plain paper.

After I've collected a lot of prints, I cut them into pieces for use as collage elements -- either on stretched canvas, or on greeting cards.  (I usually buy the greeting card blanks at JAMPaper.com; another good company is LCI.)

Below are two greeting cards assembled this way --


Below is an example of a stencil print that's been cut to a smaller size and used in a collage on a canvas.  This a close-up detail shot.  The canvas as a whole is still being developed.  The stencil used here is Fern Fronds Silhouette Stencil Mini (4" x 4".)  


Thanks for stopping by today!  To scroll thru the pages of my StencilGirl masks and stencils, please start here.