Sunday, August 28, 2022

Embossing with Stencils on Aluminum Tape

Home improvement stores carry rolls of plumber's aluminum tape like this, which measures just shy of 2 inches in width.  When it comes off the roll, it has a paper backing that you can peel off after decorating the silvery top side.  Under that baking, there's adhesive.

I'm sure it does a good job with ducts and in its other applications -- but for me, it's part of my collection of art-making supplies!  Below are two examples of ways I've used it.   

Today's first art sample is a Christmas card that was quick and easy to make.  I simply rolled out the tape and -- while its white paper backing was still covering the self-adhesive side -- used one of my Borders series of stencils -- Swatton Borders # 2 -- with red paint, adding a pattern.  After that paint dried, I trimmed one end of the tape to be slanted, suggesting a candle being burned.  Then I removed the white backing, exposing the adhesive side of the tape, and used that to attach it to the card cover.  (The flame was cut from marbled paper.)


Today's second art sample results from different a technique: 

For this project, besides the aluminum tape, acrylic paint and stencils, I used alcohol inks, Sharpie pens, an embossing stylus, padding (a yellow craft foam sheet) and masking tape.

The next photo, below, shows a close-up of aluminum tape that's been removed from the roll and taped into place with blue masking tape.

Atop those 2 strips of aluminum tape, I've placed my Wrought Iron Gate stencil  L224; its width  of 9" x 12"lets me position the stencil exactly where I want it.   


I traced inside the stencils' open areas with an embossing stylus, the top of which is shown below -- but a ballpoint pen would work, too.  (In the photo below I've moved on to using part of another stencil, to be shown at the bottom of this post.)


My next step was to lift off the stencil to reveal the embossed tape -- 


Below are two photos showing the embossed tapes with alcohol inks added--


I liked the colors of these inks, but wasn't happy with the way the embossed line-work disappeared under them.  So I began experimenting.  One experiment was to remove most of the ink with rubbing alcohol.  I also got out my Sharpie pens, knowing that these deeply embossed lines would be easy to trace.  But to be on the safe side, I replaced the stencils, lining them up with the embossed line-work --


After lifting off the stencil a second time, I had the results below.


Above:  The lower strip of tape has been embossed, alcohol-inked, and wiped with rubbing alcohol.  Some of the alcohol ink remains, highlighting the embossed line-work.
Below is a 6"X6" greeting card I made using this tape --


Stencils used in today's projects:


Swatton Borders #1 stencil (9" x 12")


Swatton Borders #2 stencil (9" x 12")


Wrought Iron Gate stencil (9" x 12")


Many thanks for visiting my blog today! To scroll thru the pages of my stencils and masks at StencilGirlProducts, please start 

Wednesday, August 24, 2022

 Hot Air Balloons are my stencil-and-masks sets available at StencilGirlProducts.com.  The larger sheet, containing both mask and stencil, measures 6" x 6" and the smaller, 4" x 4".  Except for size, they're identical.  The graphic below has the right-side mask removed from the sheet and placed to the right--


Today's post starts with an imprint made with the 6"x 6" stencil -- but before reaching for the hot air balloon, I'd created its background, using the traditional sponge-daubing/pouncing approach to apply brownish acrylic paint thru my 6" x 6" Swatton Grid Stencil s077.

For the balloon, I used a sponge dipped sparingly in heavy-bodied Titanium White.  Applied with a pouncing motion, this heavy-bodied paint produced subtle peaks and valleys.  Once dry, the paint gave me a textured surface that easily accepted Pan Pastels.  


Swatton Grid Stencil s077 looks like this --


More prints made with my 6" x 6" Hot Air Balloon s547 stencil ...


The background above is a monoprint.  The balloon was added with sponge-daubing Titanium White heavy-body paint thru the stencil.


The above background is a vintage paper coated with acrylic paint.  The balloon was added in the same way as described earlier.


The above background is a sheet of foreign newsprint (comics page), previously painted green with acrylic paint.  I've collaged this to the cover of a 6" x 6" blank fold-over greeting card made with metallic bronze cardstock.


Many thanks for stopping by my blog today!

To scroll thru the pages of my stencils and masks at StencilGirlProducts.com, please start here.

Saturday, August 20, 2022

Fun with "Accordion" Packing Paper

 "Accordion" packing paper often arrives at my doorstep inside cardboard shipping boxes, wrapped around orders for protection  during transit.

When I open those boxes, I snatch up the accordion packing paper.  To me, it can become a painting surface that expands in a fun way.

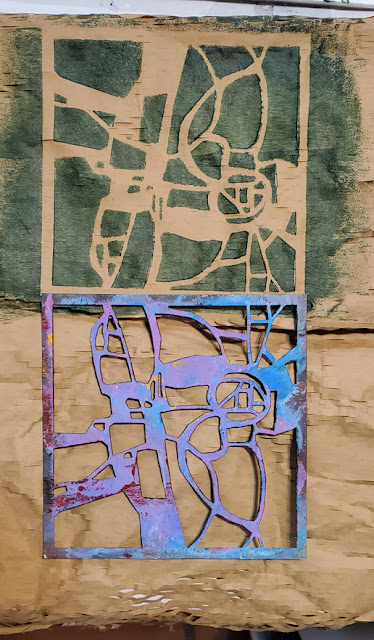
This paper is always plain brown, so it calls out for color.  In today's post I'm using dark green acrylic paint with s864 Abstract Composition Background Mask #1, making a print on a section of the "accordion" that is still flat (has not yet been stretched out.)


In the photo above, you can tell that it's accordion paper by running a glance along the top and bottom edges of the brown paper. The paper's main area has not yet been stretched out, so it's relatively flat, easily accepting this mask and the green acrylic paint that I apply over it, using a sponge brayer.

Below: The mask has been lifted off to show the finished print.


(The underside of this mask is stained bright blue due to having been used in an earlier project.)


Finally comes the fun part -- taking hold of each side of the print and stretching the accordion paper to pull open the holes that make up the surface of this packing paper.


Today's quick and easy exercise is here to spark ideas.  What can you do with accordion packing paper and stencils?  Combine designs and colors in layers?  You will come up with ideas that will give you wacky fun papers for collage or an art journal.  Since the stretched paper will be somewhat three-dimensional, you may prefer to use it on the cover of an art journal rather than one of the inner pages.

Thank you for stopping here today! To scroll thru the pages of my masks and stencils at StencilGirlProducts.com, please start here.

Tuesday, August 16, 2022

My 9" x 12" stencil Vintage Script L267 --


-- stars in today's post of two parts:

Part 1

In my collection of papers, I had on hand some novelty paper pre-printed in antiquated script. 

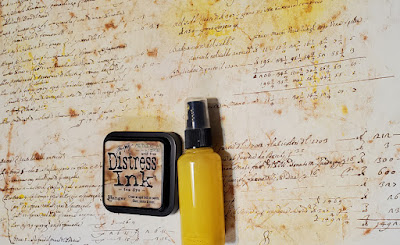
To enrich the color of the original paper, I started with one of the brownish shades of Distress Ink.  I unlidded the inkpad, inverted it and and smeared the inkpad across some areas of the paper. Then I used a mister bottle to randomly spray water-diluted Golden High Flow in a yellowish shade.


Next (below), I brushed across the paper a layer of water-diluted zinc white acrylic paint --


Above, I've placed 9" x 12" stencil Vintage Script L267 onto the prepared paper.  Below is the final print made with dark brown acrylic paint.


Part 2

9" x 12" stencil Vintage Script L267 was among the collection of stencils from StencilGirl Products used in this project to create a lovely monochromatic page in the art journal of artist Natalie May.  Using this combination of stencils had beautiful results!

To scroll thru my stencils and masks at StencilGirlProducts.com, please start here.  Thanks for spending time here at my blog today!

Friday, August 12, 2022

Letting Go!

Lots of interesting discussions go on in most online art-making classes, and the class led by Louise Fletcher has by far the most vocal participants I've encountered.

Louise's class is aimed at artists who focus on representational art-masking as well as those wanting to start or enrich the experience of abstraction in art-making.

At StencilGirlProducts.com, many of my stencils and masks are representational.  For example, Cats s183 clearly depicts cats in a variety of poses.  Nevertheless, I see myself as having evolved into an abstract artist despite my college background that focused on representational imagery.

So anything I say comes from that mindset.  And from that position comes my message for today.  It can be boiled down to two words:  "Let go!" 

To elaborate....

My experience has been that some artists -- usually men -- start with a concept or even a mental image of what they want to accomplish. For those, it works. 

But, among painters/collage artists of nonrepresentational art, I suspect it's much more common to simply follow the process: Start with making a mark. Then respond, visually, to that mark ... repeat, repeat, repeat ... as if the artist and the artwork are having a conversation. 

The artist may come to a point of feeling the "conversation" has ended, but only for the time being; the issue under discussion remains to be resolved, later. 

One of my past art teachers used that very word -- "resolved." She would leave an unfinished piece when its "spark" had died (creative excitement had ebbed.) She would come back to it later, sometimes even years later, and at that point -- seeing it thru new eyes -- she would know exactly how to resolve it.

I gave found over time that I work the same way she does. 

There are no "mistakes" -- there is only progress. 

Our every brushstroke, every color choice, etc., teaches us something, even when we may not be immediately aware of that.

I suggest trusting that this learning does happen. I think that trust will help with the letting go -- which, at least in my opinion, leads to the most expressive abstract artworks. "Playing" and "letting go" feel the same to me, and I find the process addictive, no matter what results from each session.

There will always be critics -- both outside ourselves as well as within. I say, let the critics stew in their own sour sauce ... while I get on with the adventure of creating.


Cats s183 (6" x 6")


Thanks for hearing my soapbox speech of today! To scroll thru the pages of my masks and stencils at StencilGirlProducts.com, please start here.

Monday, August 8, 2022

Unique Party Favor Boxes by Judi Kauffman !

 My friend Judi Kauffman has shown me an entirely new-to-me way to use stencil- and mask-printed paper.  

Till Judi came along, if you'd asked me  "What is a favor bag?" or "What is an ATC storage box?" my come back would have been one word:  "Huh!?"

When I saw Judi's photos, however, understanding was immediate.  After all, I'd been the one who'd had the pleasure of making party favors for my daughter's bridal shower in 2019.  At that time, a friend suggested using tiny pots of baby succulents as favors, so my love for succulents  took over.  (And a few of the shower guests were seen leaving with 3 or 4 potted baby succulents clasped close to their chests!) 

Had I known Judi back then, her influence would have had me using stencil- or mask-printed papers to decorate party favor holders like the ones starring in today's post.  My little potted succulents would have been nestled into those holders!

The starting point for making these little mementoes is the wedding aisle of a craft store or, in the woodcraft aisle, the woodcraft version of a party favor holder.

If you choose the wedding aisle you'll find "naked" flat shapes die-cut from corrugated cardboard or cardstock.  

If you opt instead for the woodcraft aisle, you'll find the woodcraft version, but here the party favor holder are already assembled. (These small holders are a form of what sculpting artists call "armatures" -- three-dimensional skeletal structures created to be covered by some form of sculptural art.) 

The corrugated cardboard or cardstock die-cuts look somewhat like this:


Above:  This drawing is my (very) rough sketch of what the cardboard or cardstock die-cut shapes look like, while still flat. These shapes vary; some have tops that fold over to close across the tops of the boxes.  Judi's has an open top with twin handles.


Below: Judi's double prints of Fire Cherries Mask L879 adorn this party favor holder, making it unique among all party favor holders!


Above:  a broad-side view.


Above:  a view of one of the narrow sides.


In developing decorative paper to cover this favor giftbox, Judi covered the paper's surface with acrylic paint in random colors but mainly light orange, turquoise and the interference version of aqua (also called color-shift aqua.)  Once those paints dried, she placed 9" x 12" Fire Cherries Mask L879 onto the paper and applied black acrylic paint.

After allowing the black topcoat to dry, Judi folded and assembled the piece.  (Gluestick is generally her go-to adhesive.)

Some time age, I'd designed ATC Mixup Swatton #1 L768 and ATC Mixup Swatton #2 L769 -- without giving a thought as to storage for the resulting Artist Trading Card-sized mini-artworks to be created with these stencils and masks!  Here's an example to carry across an idea of what ATCs may look like:


Above:  An Artist Trading Card-sized sample made using one of the masks included in the 9" x 12" sheet of heavy Mylar entitled  ATC Mixup Swatton #2 L769 

In its entirely, Fire Cherries Mask L879 looks like this --


Please know I'm grateful for you for taking time to check out my blog today! To scroll thru the pages of my stencils and masks at StencilGirlProducts.com, please start here.

Thursday, August 4, 2022

For the first time since 2019, I'm hoping it will work out for me to take part in the Canterbury Art Show and Sale.  One of the pieces I plan to enter -- maybe in the juried section, maybe not -- is a piece that I created using a combination of elements.  The main element:  my 9" x 12" Fantasia L450.  

Mardi Gras is the title that I chose for this mixed-media collage on stretched canvas.

My first step, shown below --


-- was to spread an even layer of metallic gold acrylic paint across the surface of the stretched canvas.  To reach near-perfection for an even surface, I used a tool that's found in home improvement stores, a 12-inch-wide tape knife.  These "knives" come in several widths; I chose this one because my stretched canvas was 12" x 12".

For me, it takes several passes over the surface before I'm satisfied that the result will be smooth enough to accept a stencil print.  This means starting with more paint than needed, and catching leftover paint along the edges of the canvas, after each pass of the "knife."  (Each pass of the knife is a gentle pull all the way across the surface, without pausing.) Collecting leftover paint would be really sloppy if I were using liquid acrylic paint, so I use heavy body acrylic for this kind of project.


Above:  After the gold metallic paint dried, I added 9" x 12" Fantasia L450 and some of the Artist Trading Card-sized stencils that come in ATC Mixup Swatton #1 and ATC Mixup Swatton #2.   (Each "mixup" sheet measures 9" x 12" and contains 9 stencils or masks, along with some free-bonus masks.) In the photo above, these small masks have been cut free from their original 9" x 12" sheets.

I added Golden High Flow acrylic paints as my next step.  After those dried, I lifted off the stencils and masks.  Results are in the two photos immediately below...


A close-up of one section of the paint-stained canvas.


The entire paint-stained canvas.


At this point, I'd achieved my background.  To continue, I placed 9" x 12" Fantasia L450 onto the back side of paper bonded with blue textured metallic foil -- shown below:


With a Sharpie black felt-tip marker, I traced part of the pattern of this mask onto the back of that metallic paper.  A close-up is below ....


Once I finished tracing as much as I wanted, I cut around that traced area with scissors.  To cut out the individual shapes, I switched to an Xacto knife and a cutting board --


Next, I turned the metallic paper right side up and, with gloss gel medium, glued it atop the painted background.

After adding that paper cut-out, I went on to add some scissor-altered stencils paint-stained from earlier projects.  Some of those customized stained stencils came from The Script Collection: May 2019's Stencil Club 3-piece set at StencilGirlProducts.com.  I also used -- the yellow circles in the lower right) -- part of Puddles s331, designed by Ray Missigman.  


Thanks for stopping by today!  To scroll thru the pages of my stencils and masks at StencilGirlProducts.com, please start here.