Tuesday, October 26, 2021

 I love to use stencil- and mask-printed papers in collages that I create on greeting card covers, bookmarks, postcards and stretched canvases of several sizes.  All of my StencilGirl masks and stencils are here -- 1 or 2 pages of them, depending on how you have your options set up -- so I won't identify the ones that I used in each of today's collage art samples.  But if anyone has a question as to what was used in each piece, please let me know in the Comments section.

I hope today's samples will spark your own creative adventure ideas!  


Thank you for taking time to check my blog post for today!  

Friday, October 22, 2021

Ready for more ideas on using paint-coated stencils and masks (or pieces of them) as collage elements?


The above artwork, on stretched canvas, was created with stencils or masks designed by these 2 StencilGirl designers --

Curves (6" x 6") by Mary Beth Shaw

Undulating Line Waves (9" x 12") by Trish McKinney

For the art above, the technique I used is on a video that's included with the May 2019 StencilGirl StencilClub 3-piece stencil set.  After that paint had dried, I used one of the stained stencils -- Curves -- as a collage piece.  It's glued to the canvas at the middle left edge. 

I took the same approach in developing the artwork below.  But this time, I glued the stained stencils to the canvas first. Then I painted over them.  Stencils used:  


Valerie Sjodin's 9" x 12" Spirit Wind Mask 

Trish McKinney's Criss-Cross Ribbon Swirls (9" x 12")


Below is an artwork created with several of my masks and stencils, including my Palm Fronds Silhouette series (which comes in 3 sizes -- 6" x 6" and 4" x 4" and 9" x 12".)  The background had been developed using acrylic paints, molding paste and pastel crayons -- paired with my 6" x 6" Mimosa stencil, my 9" x 12" Mimosa stencil, and my 6" x 6" Kaleid stencil. 


The next pair of photos show a diptych I created using 9" x 12" Soulful Scribbles stencils by Traci Bautista.  My final step was to cut a pair of columns from two of Traci's paint-stained stencils, then to glue one onto each piece in the two-piece set (entitled Rainbow.)


In the above artwork, the background was created with a 9" x 12" StencilGirl stencil -- Letter Mania by Suzi Dennis. The acrylic paint-stained stencil filling the bulk of the area is my 9" x 12" Branching Blossoms Silhouette, which has been cut free from its outer border.  

Today's final piece of art is a complex abstract on stretched canvas.  My first step was to lay in a background using acrylic paints and acrylic-painted collage papers.  Many of those papers had originally been printed with stencils and masks.

What followed was sorting thru my collection of paint-stained stencils and cutting them into shapes, before adding them as collage elements.   These stencils included:

(1) my 6" x 6" Sassy Spray  

(2) my 9" x 12" Prayer Flags

(3) my 9" x 12" It's a Jungle Out There

(4) my Palm Fronds Silhouette stencils 
(which come in 3 sizes -- 6" x 6" and 4" x 4" and 9" x 12".)  

(5) my 6" x 6" Mimosa

(6) my 6" x 6" Small Dangled Pods  (part of my 4-piece Pods series)

(7) 9" x 12" Web by Mary Beth Shaw

(8) 9" x 12" Soulful Scribbles stencils by Traci Bautista

(9) 6" x 6" MB Makes Marks Pipette by Mary Beth Shaw


Above:  this artwork was juror-accepted for inclusion in the 2019 Open Juried Show at the Guild of Creative Art, Shrewsbury, NJ, and received the award of Best Acrylic Art of 2019.


To scroll thru the pages of my StencilGirl stencils and masks, please start here.  Many thanks for stopping to visit my blog today!

Monday, October 18, 2021

Paint-Stained Stencils and Masks as Collage Elements

It's long been fun for me to set aside the prettiest of my paint-stained StencilGirl masks and stencils...

... and what follows is (1) I order new replacements! -- and (2) cut apart these stencils and masks stained with acrylic paints for use as collage elements.  Because these stencils and masks have been used in multiple previous projects, each is unique; no two are stained with the same color combinations or patterns.

Paint-coated masks and stencils are easy to cut apart with scissors, or a hobby knife paired with a cutting board.  But I use Joyce Chen scissors, originally marketed as a kitchen tool for cutting apart chicken bones!

Often, these collage elements are added in the finishing steps as I develop my artworks on stretched canvas.  Other times, I've added them to an artwork during an early phase in the process, since I sometimes decide to add more paint atop them -- or even to cover them with thin tissue paper that I can fold and wrinkle around these pieces of sturdy Mylar.  

When adding tissue paper as the last layer, I use liquid matte medium.  But to adhere the stencil-pieces to the substrate, I always use acrylic heavy-body matte gel medium .


Above:  stencils and masks used include ...

...my Prayer Flags (9" x 12") 

...Warped Holes 9 (9" x 12") designed by Lizzie Mayne

... and City Stencil (9" x 12") designed by Jamie Fingal. 


Next on today's post:  5 close-ups showing stencils and masks, paint-coated and scissor-altered, showing up as collage bits; these 5 are all part of a bigger piece on stretched canvas.  Most of these close-ups show stencil or mask prints as a bottom layer, while the stained and modified stencils or masks are used as a top layer.....


Above upper left and center:  SASSY SPRAY S465 (this stained mask is a collage element added over a print made with Palm Fronds Silhouette Small s238)


Moving now to new territory --


Above:  part of my 9" x 12" Blooming Where Planted,  stained with acrylic paints, then collaged over a background printed with my 9" x 12" Prayer Flags.


In developing the artwork above, I used these stencils and masks of mine ....

....6" x 6" Pavilion Shadows 

.....6" x 6" Palm Fronds Silhouette Small (also available as a 4" x 4" mini)

....6" x 6" Kaleid

....6" x 6" Trivet A (also available as a 9" x 12" stencil)

....and the 6" x 6" stencil (borders removed) from the May 2019 StencilClub 3-piece set.

The following 2 photos show abstract compositions created on backgrounds that are fairly tame; my goal in creating them was to give the stencils and masks the leading role in each of the pieces:


Above: 6" x 6" Kaleid  (left) and 4" x 4" Palm Fronds Silhouette Mini (right)


Above:  orange-and-yellow pieces are cut from 6" x 6" Palm Fronds Silhouette Small and the central purple-green stained stencil is cut from my 9" x 12" stencil Blooming Where Planted 


Thanks for stopping by here today!  To scroll thru the pages of my StencilGirl stencils and masks, please start here.

Thursday, October 14, 2021

Stencil- and Mask-Decorated Giftwrap

What special occasions and celebrations do you have coming up?  Why not get out your stencils -- and start your festivities on paper?

November 15, my daughter and son-in-law will be giving me a grandson! 

So of course I wanted at least some of my gifts wrapped in paper I've stencil-decorated ....

I started with a roll of heavy foil giftwrap bought years ago at a dollar store.  It was high-quality paper that had gone awry while passing thru the factory's printing process, so instead of being printed with wedding wishes as intended, it was printed with the scattered, faint scraps of white paint shown below.  It begged to be printed with heavy-body acrylic paint, in a baby boy color!


Lined up below are my masks and stencils that, to my eye, said "baby boy."


Top: Hot Air Balloon and Mask Mini M185 (4" x 4")...second from top:  6" x 6" Penguin Family s393 ... third from the top (and at the bottom):  Hot Air Balloon and Mask s547 (6" x 6")...second from bottom:  6" x 6" LOVE s828.


Below is a shot of the line-up receiving its coat of heavy-body pastel blue acrylic paint, via a sponge brayer --


Above:  The first lineup has been printed; stencils and masks have been moved to the next row, ready for printing.


After printing one full sheet with the sponge brayer, I switched to spray paint.  

Before spraying, I added a layer of Titanium White to hide the original background -- so that pastel blue spray paint would stand out better.  A close-up of one print is below:


Above:  spray-printed with Hot Air Balloon and Mask s547 (6" x 6")


Below:  a view of the back of the giftwrapped baby present.  Penguin Family s393 had made the image that my daughter liked the best.....


Below:  The front of the gift --


My thanks for your coming to check out my blog today!  To scroll thru the pages of my StencilGirl masks and stencils, please start here.

Sunday, October 10, 2021

One Way -- among many! -- to Use Stencil-Printed Papers

 The idea for today's project isn't original, but it's something I never tried before.


I started with a small gift box that came with a matching lid...


Above:  On the bottom left is a piece of foreign newsprint that has been stencil-printed on its unseen other side, using my 6" x 6" stencil Ornamental Iron Curls s462.  To its right is the gift box lid, which I've coated with acrylic heavy gel medium.

Below:  While the gel was still wet, I pressed the gel-covered lid upside-down onto the newsprint.  

My next step was use a green marker to draw lines radiating out from the four corners.  I didn't bother with math-perfect measurements!  I knew I would be trimming off excess paper at the top and bottom. 


After cutting off that excess paper, I cut along each of the 4 green lines.  Then I started brushing heavy gel medium onto the flaps.  As each flag was coated with gel, I folded it up, over the side of the box lid.... 


The finished box lid -- now right-side up -- appears on the bottom far left in the photo below.  As noted earlier, this foreign newsprint had previously been printed on this side with my 6" x 6" stencil Ornamental Iron Curls s462.


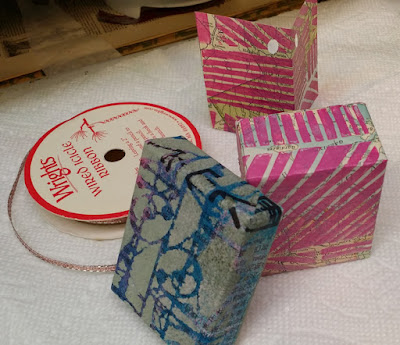
In the photo above, at the top left, lies an old map that's been printed with my 9" x 12" Loopy Ladders L434.  In the lower right is the bottom of the gift box.

I used the pink-printed map to cover the bottom of the gift box, following the same steps as I had when covering its lid.

Since I had some leftover Loopy Ladders L434-printed paper, I cut a rectangular strip from it to use as a gift tag.  That tag appears on the upper right in the photo below; you can see I've folded it into half and used a hole punch on one corner.


Below are two shots of the finished mini gift box.  


Featured today: 


6" x 6" Ornamental Iron Curls s462


9" x 12" Loopy Ladders L434 


Many thanks for taking time to visit my blog!

To scroll thru the pages of my StencilGirl masks and stencils, please start here.