
Today's post brings you two artsy projects, both here thru the courtesy and generosity of my friend Judi Kauffman.
Judi's second gift today will be her showing us how to make a unique mini-book!
But first: two greeting cards.
Both projects started when Judi walked into a book sale at her local library and handed over a dime for a damaged novel written in French.
She restrained herself till she got home, whereupon she ripped out pages to alter with paint, an old brush, and one of my stencils ... 9" x 12" Blooming Where Planted L449.
In addition to those altered book pages, Judi tore off pieces of newsprint previously used for protecting her work surface, as well as for wiping excess paint from brushes before dipping them into rinse-water. *


Above, each of these two greeting card covers has a background printed using Blooming Where Planted L44. The background of each is beautifully embellished with bits of torn paper, a cancelled postal stamp and glitter dot stickers. (Similar dot stickers are available here.) Judi used double-sided adhesive tape to secure the rectangular layers on these cards; and she used a gluestick for everything else.
For her mini-book, Judi started by taking measurements and cutting.
Then -- as shown below -- she placed two squares of cardstock side-by-side on the back side (un-stenciled side) of the paper. She spaced the cardstock squares to leave a narrow vertical stripe between the two squares; this is the area that will become the book's spine, and will function like a hinge.
 |
| Above: Step 1 |
Above: Notice that Judi had left a roomy margin of paper along all four edges. Also notice that the two long (horizontal) sides were cut straight, while the two short (vertical) sides were angled.

Above: Judi's second step was to fold the long sides in around the cardstock and secure them with glue.
Step three is illustrated below ...

Above: The two short sides were folded and glued. Notice that this simple 3-step sequence gives the illusion of mitered corners -- without need to create actual mitered corners. (In case you don't know, mitering corners isn't easy; it begins with math and gets worse from there.)
Guided by measurements she'd made earlier, Judi cut out a small stack of blank copy papers to match the size of the book. The papers needed to be twice the width as the book when the book was closed; their height needed to be just slightly less than the height of the book, so they would fit neatly inside.
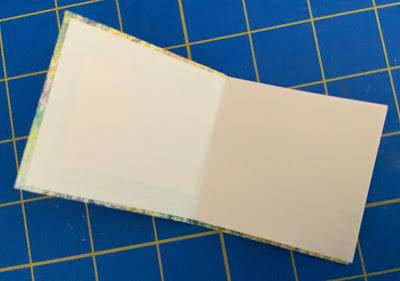
Judi folded the cut-to-size papers into halves. (This "stack" of folded papers is called a "signature".) The left side of the first folded paper was secured to the inside of the left book cover with a gluestick. Likewise, the right side of the folded paper was glued to the inside of the right cover.
Below you can see a top view of this charming blank-paged mini-book in its final form.
 |

No comments:
Post a Comment