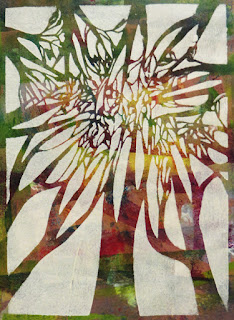
Saturday, November 30, 2019

Gifts!


Want an idea for a Christmas or Hanukkah gift?  Feast your eyes on these shoes decorated by photographer Kim Ross!  In this gift for her sister-in-law, Kim used acrylic paints and included prints made with my 6" x 6" Cats stencil.  Feel free to click on the photo below to enlarge it and better see details....   


And gifts mean giftbags -- the easy way to giftwrap!


Above:  a collaged giftbag, featuring a star cut from a print made with 6" x 6" stencils Sprigs and Trivet A.  Below is a close-up:


Above:  a collaged giftbag created with a cut-out from a print made using Quilted Flower Garden.  The center of each flower has been embellished with red glitter glue (Rangers Industries.)  Clicking on the photo above, you can better see details.

Below:  two photos of a collaged giftbag made with a cut-out from a stencil-print on gold metallic giftwrap paper using Tiger Lily, a 6" x 6" stencil.  The first photo shows the bag in its entirety.  The second shows a close-up taken from a side view to show off the gold metallic giftwrap under the acrylic paints.


Today's final giftbag is one of my favorites because it's collage paper is cut from another print on gold metallic giftwrap paper.  This time, I used my 9" x 12" Winter Berries Mask to make the print.  I especially like the way this pattern mimics garland around the tree.  The trunk is cut from paper printed with my 6" x 6" stencil Sprigs.


Many thanks for taking time to come here today!  To scroll thru the pages of my StencilGirl stencils and masks, please start here.

Friday, November 22, 2019

More Trees!


Continuing the theme of using my brand-new tree-celebrating stencil -- available here -- on creative backgrounds, today's post starts with two of these prints made on old calendar pages:


Moving on to other backgrounds ...


Note:  the art sample above was made first with the new stencil pointing downward.  Atop that layer, I painted another layer, this time with the trees pointing upward.

Above:  the goal of this print was to work toward an abstract image of some kind.


Thanks for stopping here today!  To scroll thru the pages of my StencilGirl stencils and masks, please start  here.

Tuesday, November 19, 2019

Full-Sized 9" x 12" Stencil Prints with Detailed Close-ups

Today's post returns to the theme that I started in my November 16 post announcing the release of my newest 9" x 12" stencil, a celebration of trees shown here.

It's a simple theme -- merely a display of full-size prints on wild-and-crazy backgrounds; and, below each full-sized print, a close-up or two of areas to better show details.  Acrylic paints were what I used in every piece.  Backgrounds were created with a variety of techniques and foregrounds were made with sponge brayers loaded with heavy-body acrylics.


Note:  the two photos directly above show a background that I'd created with my 9" x 12" Winter Berries mask.

More to come in future posts -- to show the amazing difference between prints when a wide variety of backgrounds are used.

Thank you for taking time to visit my blog today!

To scroll thru the pages of my StencilGirl stencils and masks, please start here.

Saturday, November 16, 2019

Experimenting with my Newest StencilGirl Stencil


Here you can see my just-released 9" x 12" stencil, designed to celebrate the glory of creation, standing in a forest or park and looking up.

Today I'm showing a sequence of photos that show my adventure in 3-dimensional art, using this stencil.

Below, you can see this stencil's already stained green from earlier adventures.  With masking tape, I've secured it to a red background -- a sheet of Yupo that had been previously printed with older stencils.  Across the top, I've used an art spatula to generously deposit a line of heavy gloss gel medium.  Above that line is a partial view of the advertising sheet of plastic that I'll use as a spreading tool.


Below:  With that plastic spreader, I've smoothed a layer of gel downward across the stencil and its pre-painted background Yupo.  


Above, you can see what resulted when I lifted off the stencil. Because I've used gel medium, it appears as a near-white layer, but after drying, it will be transparent because I used gloss gel.  I could have used matte gel, which contains a small amount of ground marble to dim its sheen.  Matte gel also moves toward transparency as it dries, but it never becomes as clear as gloss gel. 

In the upper right corner you can now see the earlier imprint that I'd made using M & Y, one of my 4" x 4" mini-stencils.  That imprint will disappear as I move forward in my art experiment, so I'm just ignoring it.  But for the time being, it's visible in the two close-ups below.  The close-ups show details in the gel once it's dried.  It's clear, so the way to show it is to let it reflect light.


Next, below, you can see my black Sumi ink and a sponge brush.


Above: I've started to spread the ink generously across the 3-dimensional gel, now that the gel has thoroughly dried.

 Below are two close-ups showing the way the black ink pools in textured areas --


Below:  With a rag, I've started to rub ink from some of the higher-level areas.  Altho it appears as if I've already added metallic gold, I haven't yet.  The pale gold area is reflection of light.


Now, I've decided to shift from ink to water-soluble solids.  First, I've rubbed watercolor pencils over the raised areas of the 3-dimensional surface....


Second, I've switched to Caran d'ache watercolor crayon:


Above:  My next step has been to spread a pale metallic gold across the raised areas, using a Shiva stick, as shown both above and below --  


Above, I have started to rub off some of the excess from the waxy Shiva stick.

Below is a close-up shot of the project as it has reached this stage of development.


I haven't finished this project yet, since the full-view shot doesn't please me as much as the detailed area above.  

I may let this piece rest while I move on to other art adventures.  Later when I come back to it with "new eyes," I'll continue my experiments.

Thanks for visiting here today!

To scroll thru the pages of my StencilGirl stencils and masks, please start here.

Wednesday, November 13, 2019

New Stencil Released Today


Have you ever stood in a park or forest and looked up thru trees? -- did you have a "John Muir moment," when the glory of creation brought sweet joy into your heart?

Here, you can see my brand-new 9" x 12" stencil that I drew to celebrate the feeling that can fill me when I get a chance to take in this view.

In the first two art samples I'm showing here today, I used another StencilGirl 9" x 12" stencil, Figures Praising, designed by Valerie Sjodin (one of my all-time favorite artists, whose work I had followed long before she delighted me in becoming a fellow designer at StencilGirl!)


The praising figure in the foreground -- Figures Praising, designed by Valerie Sjodin -- was cut from a print I'd made using my stencil Blooming Where Planted.  You can click on this image to enlarge it and better see detail.
The small hearts added to each of the praising figures were cut out with a hole punch.

Moving on ....

Below:  First, I'll show a few "catch-all sheets" which will eventually become fascinating backgrounds for stencil printing ....


Above are just a few examples of the kinds of papers used in my tree prints shown today. 

These "catch-all" sheets accumulate when I'm working on large projects and need to clean my brush.  I wipe the brush clean across scrap papers, rather than rinse it in water that later goes down the sink.  This approach is a better way to go, in helping protect the environment.  

Now, I'll show a series of full-page prints paired with close-ups showing details of each full-sized 9" x 12" print.  I made this series to demonstrate the wide range of looks that can be achieved when you use this brand-new stencil atop paper previously used as a "catch-all" paper for leftover acrylic paints.


Original full-size 9' x 12" print.


Details in a close-up.


Original full-size 9' x 12" print.


Close-up detail number 1.


Close-up detail number 2.


Original full-size 9' x 12" print.

Details in a close-up.

More ways of using this just-released stencil will be posted soon!

Thanks for visiting here today!  To scroll thru the pages of my StencilGirl stencils and masks, please start here.  To follow this blog by email, please use that option in the upper right sidebar.