
I've surprised myself by looking back over a number of years and finding how often I've used the technique I'm highlighting today.
I call it the scraping technique -- a "wet" version of the dry rubbing technique that's been around forever. Immediately below is an example of a dry rubbing that I did with an Art Bar crayon and my 9" x 12" mask Trivet A 9.

Instead of dry crayon (or other soft media such as pastel sticks or an Art Bar), today's wet scraping approach calls for acrylic paint fresh out of the tube or jar.
I've tried this with both liquid acrylics and heavy body. I think the latter generally work better. But experimenting is a good idea, because different papers react differently with each type of paint, when used in this technique.
For the results that I like, I use stencils and masks with medium-to-large openings. Instead of dry crayon (or other soft media such as pastel sticks or an Art Bar), today's wet scraping approach calls for acrylic paint fresh out of the tube or jar.
I've tried this with both liquid acrylics and heavy body. I think the latter generally work better. But experimenting is a good idea, because different papers react differently with each type of paint, when used in this technique.
Below are the six masks and stencils -- all by STENCILGIRL(TM)Products -- that I've chosen for today's first round of art samples.
Top row, L to R -- my 6" x 6"mask Trivet B, my 6" x 6" Mimosa and (far right) Curvie Lattice (by Mary Beth Shaw)
Bottom row, L to R -- two copies of my 6" x 6" mask Kaleid and (far right) Intersections (by Wendy Aikin)
 |
| Above: I have used masking tape to secure the stencils and masks to my work surface. |
My next step, shown above, was to use more masking tape to secure a sheet of Lineco tissue atop the stencils. Without that, the tissue wouldn't stay in place during the scraping.
You can click on the photo below to enlarge it and better see these details: wet acrylic paint sits atop each column of stencils, ready to be scraped downward over the paper. Far left: blue paint; middle: Titan Buff paint; far right: red paint.

Above: Over the tissue, I've spread the tools I could have used for the scraping. The shower-wall-cleaning "squeegie" did a better job than the Princeton Wedge (altho the Wedge is great for other projects.) The paint-covered credit card and the white rigid-plastic wedge (from a home supply store) have been used in the past.
I've learned that different scraping tools work better than others, depending on the type of tissue used.

Above: Paint has been scraped down across the stencils; then more paint was added and scraped down in the same way. I made sure to keep using steady pressure as I ran the scraping tool downward.
Important tip: If using Lineco tissue paper, remove the paper from the stencils as soon as you have finished the paint-scraping. If the paint is allowed to dry first, the paper will stick to the stencils and will be more difficult to remove.
I used both Lineco tissue and dry-wax deli paper for this technique and found that the Lineco tissue will expand and form wrinkles as it is being scraped by the paint-loaded tool. This does not happen with the deli paper. However, the deli paper is more resistant to the paint, and needs to be scraped more than once.
After the above paint had dried, I turned the tissue over and repeated the same technique on the other side of the same tissue. I used different colors of paint on the second side so that, when finished, the paper would be printed on both sides, with non-matching prints.
Two-sided printing on translucent papers makes for more interesting results.
Important note: Doing both sides of the tissue makes the finished product stronger. When cutting up the finished paper, make sure to check both sides before making the final cuts. Sometimes you will like the "top" side of one section and the "bottom" side of another section of the printed paper.
After paint has dried on the second side, the tissue paper is ready to be cut for use in collages, greeting card covers, scrapbooking, art journaling, etc.
 |
The above photo was taken during another paint-scraping session. On the far right is the mostly-red substrate (an old Gelli Plate print) as it looked before the scrape. On the far left is the palette paper holding the off-white acrylic paint that is being spread. In the top middle is the old motel room key (like a credit card) which I was using to spread the off-white paint across the mostly-red substrate. My 9"X 12" stencil Mimosa is taped down securely right under the thin but sturdy paper. Holding the credit card scraper at different angles, while pressing it downward over the substrate, produces slightly different scraping results. Below: Yet another sheet of stencil-scraped paper serves as background for the word "Love," which is a freehand cut-out. Again the stencil used was my 9"X 12" Mimosa. |
 |
You can on the image below to enlarge it. The imprint of my 6" x 6" stencil Mimosa 6 runs across the top. At bottom left, the imprint of Kaleid is visible.
 |
In the photo below, paint has been scraped across my 6"X 6" stencil Kaleid --
 |
Rounding out today's post is a repeat of a post from about a year ago. For this, I made a video, here.
I have to smile at adding this segment, because I find I'm now recommending different types of paint and scrapers! Once again, let me say that experimenting is always a good idea -- try everything!
Supplies for this last segment:
lightweight but sturdy paper (I used Asian rice paper);
a stencil (I used Clustered Leaves);
liquid acrylic paint;
a 12-inch-wide drywall taping knife, sold at home improvement stores, or you can order it here.
This is a quick and easy technique, as the video demonstrates.
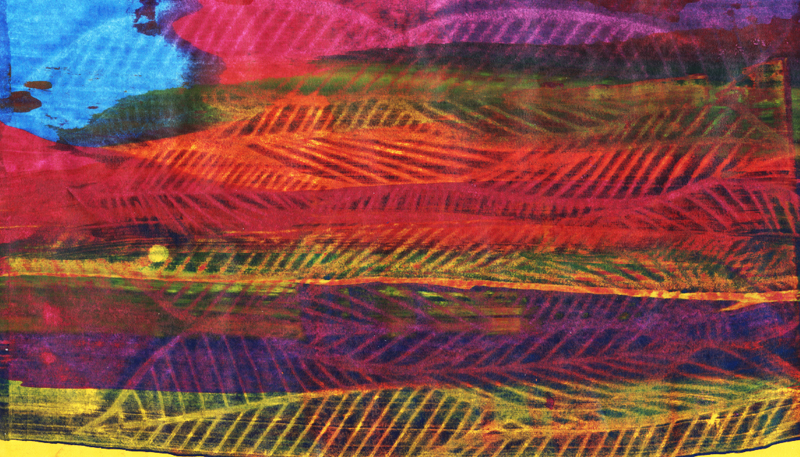
Some prints I've made this way --
 |
| Clustered Leaves (9"x 12" mask) |
 |
| Clustered Leaves (9"x 12" mask) |

Clustered Leaves (9"x 12" mask)
 |
| Clustered Leaves (9"x 12" mask) |

Clustered Leaves (9"x 12" mask)
 |
| Mimosa 9" x 12" Stencil |
 |
| Mimosa 9" x 12" Stencil |
 |
| Mimosa 9" x 12" Stencil |
 |
| Clustered Leaves (9"x 12" mask) |
 |
| Clustered Leaves (9"x 12" mask) |
 |
| Clustered Leaves (9"x 12" mask) |
 |
| Clustered Leaves (9"x 12" mask) |
This technique works better with some stencils than with others. Experimenting is fun! Art-making is all about adventure!
To scroll thru the pages of my StencilGirl stencils and masks, please start here.
To follow this blog by email, please use that option in the upper right sidebar.
To follow this blog by email, please use that option in the upper right sidebar.
Hi Ms Swatton -- I'm really drawn to your M&Y stencil on StencilGirl, but I'd like to use it or something like it in a large-scale wall format (similar to this stencil from another manker https://www.stencilrevolution.com/products/mud-cloth-pattern-wall-stencil ). Is it possible to get M&Y in a large format? If you would like to take this conversation away from this public forum, you can contact me through my website at http://www.priestdesign.com/about
ReplyDeleteThank you!
I asked my boss about it and the answer was that the company doesn't make stencils in large formats. I'm sorry!
ReplyDelete