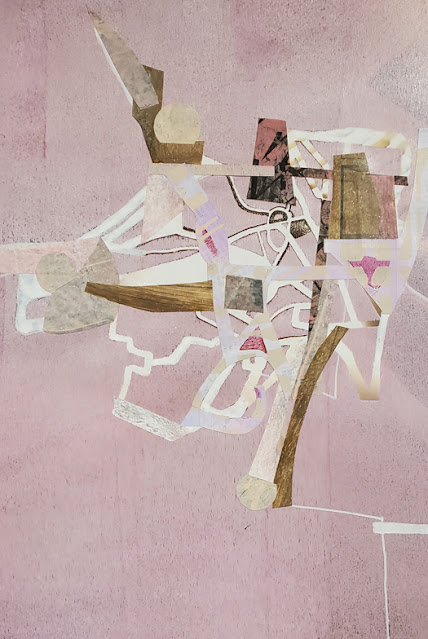
Today's post aims to illustrate that these masks put into your hands a quick, easy way to establish backbones/scaffolding/ framework for a variety of abstract artmaking adventures.
I see them as launching pads into abstraction for any artist wanting to break away, temporarily or permanently, from the representational art-making that most of us have practiced, from childhood onward.
Let's begin with part of a page from an old picture calendar. (Yes, I still use wall calendars!) These papers are usually more sturdy than magazine pages or old print-outs of my artwork on copy paper. Sturdy or not, all three of these papers are popular with me because they provide backgrounds for stencil-printing that are readymade with details, complexity and color. An interesting background puts you ahead, even before you start!
But I do at times use flimsier paper. The example below shows one of my art sample print-outs on plain copy paper; over that, I used masking tape to secure my 6" x 6" Abstract Composition Backbones Mask 1 s864. (This mask was stained pink as result of an earlier project.)
I then went over the mask using a sponge brayer loaded with heavy-body light magenta acrylic paint.
After I lifted off the mask, what remained was the print below; the light magenta was opaque, so most of the original background disappeared; but just enough of it remains to lend unique "flavor" and visual interest to the print.
Below: an example of a print made over a magazine photo--
 |
| Above: This print was made using 6" x 6" Kaleid s085 with blue acrylic paint, on a busy, chaotic background. |
Where am I going with all this? It's backstory for today's sequence of steps that I took in developing a pale pink artwork with my 6" x 6" Abstract Composition Backbones Mask 3 s866. (I've scissor-customized this mask, cutting it free from its square frame.) This project started with a magazine page background that'd been mostly obscured behind a layer of pale pink that I sponge-brayered over this mask. Interesting patterns, shapes and colors from the original magazine page are still somewhat visible now that the mask's been removed. In these remaining designs, I saw temptation for building upon them with a Sharpie opaque white paint marker pen.
Below, I drew lines to connect that dominant image to the right edge of the paper as well as the bottom edge. On the left of that main design, I outlined the original print to give it visual strength and weight. With another 2 lines, I connected this large shape to the left edge of the paper. (Here in the West, we read left-to-right. So, many of my abstracts give the viewer a left-edge "entry point" and a "pathway" visually leading into the artwork, to reach the star of the show. And most of my abstracts provide the viewer's eye with another path, on the right side, to lead visual attention out toward that edge. This second line has the goal of "finishing" a piece -- almost the same as putting a period at the end of a sentence. Additionally, all of the linework has the goal of "anchoring" the chief image so that it doesn't appear as a loose mass afloat in space. Overall visual satisfaction is the result of this "period-like finish" and the "anchoring.")
Below: This separate example of art-in-progress is moving thru the same progression as the pale pink art sample .....
 |
| Above: The same step-by-step approach was applied to this print-in-progress; a layer of opaque paint (mixture of purple and pink) was sponged across 6" x 6" Abstract Composition Backbones Mask 3 s866 while the mask was taped to a background of hectic color. After the mask was lifted, I used the same marker to extend lines from the central image, tethering it to 3 sides of the paper. I didn't add linework to the far right side because the large white area on this side of the print was enough, by itself, to draw a viewer's eye toward the right edge of the paper. |
 |
| Above: on this art-in-progress, more linework was added. Notice how linework has greatly altered and enhanced the original print. |
Below: Let's return to today's main (pale pink) art-in-progress.
Above, I've started to add collage papers to the original framework; and in the upper left I've extended a white line as an eye-catching bridge to connect the main attraction with the paper's edge. This dominant abstract design is now "anchored" on all four sides.
Below: I added more collage papers ...
... and at that point, I called the pale pink artwork finished.
Today's post has only scratched the surface of all that these masks can do for you. Here are examples that used only one mask at a time. But try layering one mask atop another when laying down an opaque coat of acrylic paint over an overloaded background. That combination will give you instant ultra-complexity, which you can develop in any direction that tempts you.
Thanks for taking time to check out my blog today! To scroll thru the pages of my stencils and masks at StencilGirlProducts, please start here.


No comments:
Post a Comment