

Today's post brings me back to wet-strength (artist-grade) tissue papers. Also available elsewhere, from other tissue-making companies, these papers appear mostly white, with only a faint translucence, until they're glued to a dark background. Once they're saturated with any gluing medium, they become more translucent. Here I've used a gluestick. Heavy body matte medium gel will also work. I don't recommend using regular-strength matte medium (gel or liquid), or regular-strength gloss medium (gel or liquid) because these two media make the tissue difficult to work with. (Note: This is NOT the same tissue paper as what's used in giftwrapping.)
Not only are there other companies that make wet-strength tissue paper; also, there is such a thing as resin-coated tissue paper. Altho I have been generously gifted with this paper by my longtime friend Cindy Powell, I've been too busy (read: overwhelmed) to start on that stash. Those generously gifted papers are newer; I'm still trying to work my way thru wet-strength tissue paper that I bought years ago.
Ages ago I made a video on wet-rubbing as an approach to making prints with masks and stencils. The first part of this video is cut off; it should begin, "In the old days, people used to make dry rubbings using thin paper and soft media like crayons, charcoal, etc."
Today's post circles back to "the old days" because its focus in on dry rubbings, using the tissue cited above.
I could have used a soft medium like charcoal or crayon, but colored pencils were my choice.
Not watercolor pencils!
My goal here was to skip over an optional second step that would be needed if I were to use any medium likely to smear with touch or to melt upon exposure to liquid. This includes watercolor pencils, water-soluble crayons, charcoal and pastels of any type.
That second step would be to seal the rubbing-printed papers that would probably smear or bleed.
One way to do this is to spread an even, thin layer of gloss gel or matte gel (preferably gloss) across the surface of a gel plate that's the same size as, or larger than, the paper bearing rubbings. While the gel is still wet, place that rubbing-printed paper face-down and spread it with your hands, working from the paper's plain back-side, to make sure this paper makes full contact with the gel. Then peel off the paper and set it aside, or hang it, to dry.
Another option would be to step outdoors and use a toxic spray-sealant to evenly cover the paper printed with the rubbing. (I've done that; I don't recommend it.)
A third potential approach comes from an online class taught by Sally Hirst, a UK artist extraordinaire.
Sally uses a flexible scraper*, with heavy-body matte or gloss gel medium, to lay down a thin barrier-layer over paper rubbing-printed with soft media that would smear if touched or melt if introduced to moisture. Since these gels are a form of liquid, it's definitely best to go over each area of the rubbing-printed paper once only. Going over it again, even one extra time, could introduce enough moisture to cause smearing.
However! There's no need to do any sealing whatsoever if regular (as opposed to watercolor) color pencils are used. Prismacolor is one of several brands that work well for me.
This issue -- to seal or not to seal -- mattered to me because today's project is only the first step in a longer future process of using today's prints in mixed-media collages. When today's papers work their way into later art projects, I don't want any unhappy surprises of colors and patterns melting or smearing. That kind of "looseness" is fine if it's part of an artist's bigger plan, but for me, these surprises are usually unwelcome.
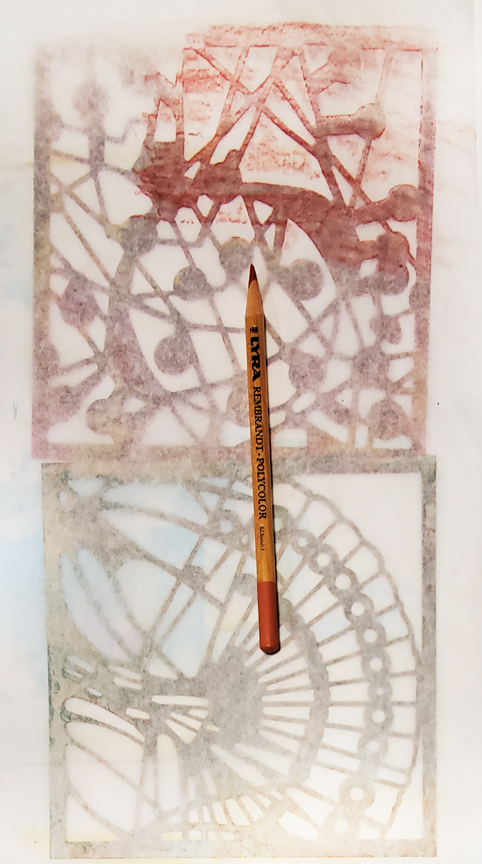
Above: Having placed a sheet of tissue over my two new 6" x 6" masks -- Chandelier s971 and Diatom s972 -- I've begun a dry (red) tracing. As I continued to use these color pencils, I periodically stopped to stab them into my electric pencil sharpener; this gave me a continuous wide edge of color as I slanted the pencils.

Below: a close-up showing most of the patterns created by dry rubbing.

These rubbing-colored tissues will be cut or torn apart in much the same way as those in my original post of September 28. But this time the backgrounds won't be black. These rubbings wouldn't show up as well on dark backgrounds.
*My favorite flexible spreader, for this particular kind of application, is here. Sally's spreader of this kind is made by another company and works equally well. Other spreaders work better for me when I'm working with other materials; for example, dollar-store spatulas work beautifully for some projects.
Thanks for checking out my blog today! To scroll thru the pages of my masks and stencils at StencilGirlProducts.com, please start here.
Wonderful, fun techniques to try! I like the metal scraper idea, I have to try that. Thanks for sharing your video too!
ReplyDelete