
How I love making Christmas cards and giftbags!
Back when my 6" x 6" Sprigs was released, a fellow StencilGirl StencilClub member commented that, in it, she saw the figure of an angel. I wish I could remember the name of this member so I could give credit where credit is due -- because she saw the angel before I did! The angel figure was an unintentional part of my overall design, titled Sprigs because to my own (limited) way of thinking, it resembled sprigs of just-budding leaves.For this project, I used my favorite tool, a sponge brayer. But a Gelli Plate, or the traditional sponge-pouncing method, would work just as well.
Besides the sponge brayer, my supplies included:
white and gold marbled paper
heavy body red acrylic paint
a disposable foam plate
glitter in a squeeze bottle
iridescent (also called "metallic") acrylic paint
a flat, small paint brush
masking tape (optional)
6" x 6" Sprigs -- which looks like this:

For starters, I rolled the brayer in heavy body acrylic paint till it was well-loaded. Then I placed my already-paint-stained Sprigs atop that marbled paper. I started in one corner of the sheet since this paper was large enough to hold 4 imprints from a 6" x 6" mask or stencil.

If you've never used a sponge brayer with a mask or stencil, you may want to start with securing it in place with masking tape. Here I've skipped that step; having become used to making prints this way, I've learned how to hold the stencil securely with one hand while running the brayer over it. Just be aware that a paint-loaded sponge brayer is likely to move the stencil or mask while it's in use, unless it's being held in place.
The photo below shows my first print (on the left); to its right, I've placed Sprigs atop a fresh area of the paper. I'm ready to make the second print ....
The photo below shows my first print (on the left); to its right, I've placed Sprigs atop a fresh area of the paper. I'm ready to make the second print ....

Below is a shot of two side-by-side marbled papers, each with four prints.

While those imprints were drying, I brought out my glitter-glue (in a squeeze-bottle), my "metallic" acrylic paints and a small flat brush. (I also assembled some color pencils and Gelato sticks; I later decided not to use them, but they appear in the photos below.)
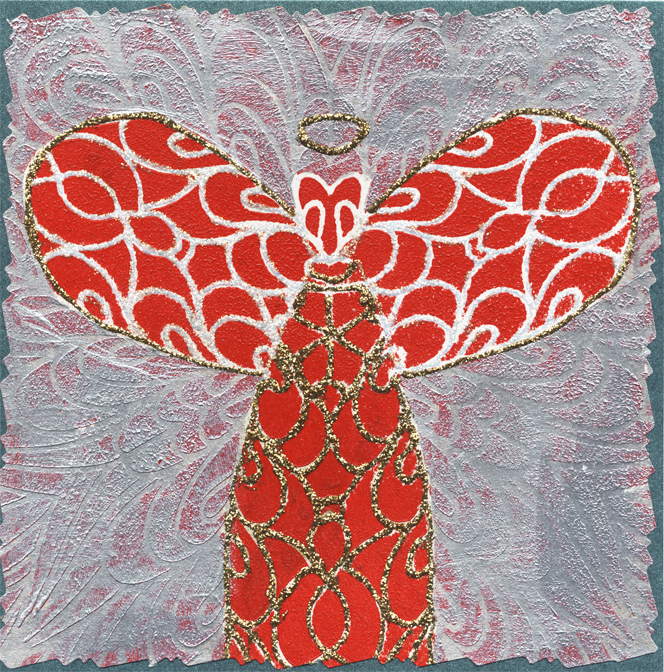
With the glitter, I outlined the angel figures by following the lines already established by the prints themselves.


As you can see above, I brushed "metallic" paints onto the wings of some angels; with other angels, I used the paint to fill in the angels' backgrounds.
My last step was to cut apart the prints and collage them onto Christmas cards and giftbags...


For a future Christmas, I plan to print and cut out more angels, to create hanging ornaments for the tree!
Thanks for visiting my blog today! To scroll thru the pages of my StencilGirl stencils and masks, please start here. To follow this blog by email, please use that option in the upper right sidebar.
Thanks for visiting my blog today! To scroll thru the pages of my StencilGirl stencils and masks, please start here. To follow this blog by email, please use that option in the upper right sidebar.
No comments:
Post a Comment