Wednesday, December 2, 2020

How I love making Christmas cards and giftbags!  

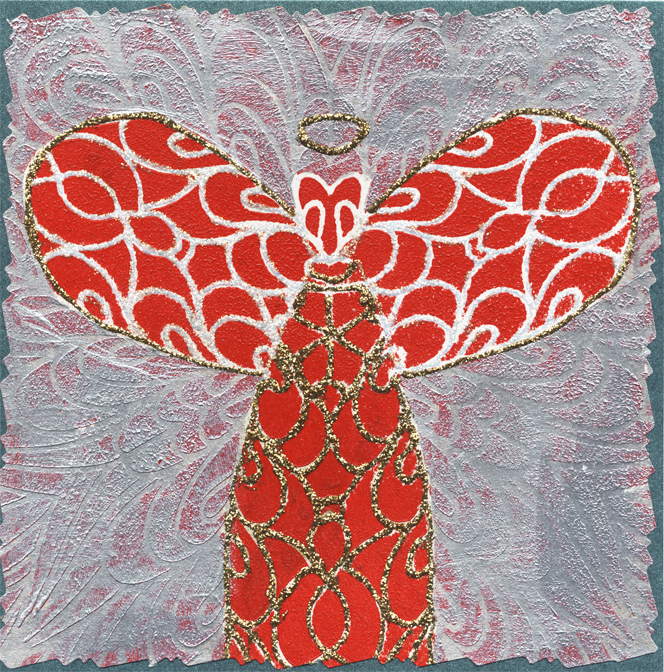
Back when my 6" x 6" Sprigs was released, a fellow StencilGirl StencilClub member commented that, in it, she saw the figure of an angel.  I wish I could remember the name of this member so I could give credit where credit is due -- because she saw the angel before I did!  The angel figure was an unintentional part of my overall design, titled Sprigs because to my own (limited) way of thinking, it resembled sprigs of just-budding leaves. 


For this project, I used my favorite tool, a sponge brayer.  But a Gelli Plate, or the traditional sponge-pouncing method, would work just as well. 

Besides the sponge brayer, my supplies included:

white and gold marbled paper
heavy body red acrylic paint
a disposable foam plate
glitter in a squeeze bottle
iridescent (also called "metallic") acrylic paint
a flat, small paint brush
masking tape (optional)

6" x 6" Sprigs -- which looks like this:


For starters, I rolled the brayer in heavy body acrylic paint till it was well-loaded.  Then I placed my already-paint-stained Sprigs atop that marbled paper.  I started in one corner of the sheet since this paper was large enough to hold 4 imprints from a 6" x 6" mask or stencil.


If you've never used a sponge brayer with a mask or stencil, you may want to start with securing it in place with masking tape.  Here I've skipped that step; having become used to making prints this way, I've learned how to hold the stencil securely with one hand while running the brayer over it.  Just be aware that a paint-loaded sponge brayer is likely to move the stencil or mask while it's in use, unless it's being held in place.

The photo below shows my first print (on the left); to its right, I've placed 
Sprigs atop a fresh area of the paper.  I'm ready to make the second print ....


Below is a shot of two side-by-side marbled papers, each with four prints.


While those imprints were drying, I brought out my glitter-glue (in a squeeze-bottle), my "metallic" acrylic paints and a small flat brush. (I also assembled some color pencils and Gelato sticks; I later decided not to use them, but they appear in the photos below.) 

With the glitter, I outlined the angel figures by following the lines already established by the prints themselves.


As you can see above, I brushed "metallic" paints onto the wings of some angels; with other angels, I used the paint to fill in the angels' backgrounds. 

My last step was to cut apart the prints and collage them onto Christmas cards and giftbags...


For a future Christmas, I plan to print and cut out more angels, to create hanging ornaments for the tree!

Thanks for visiting my blog today!  To scroll thru the pages of my StencilGirl stencils and masks, please start here.  To follow this blog by email, please use that option in the upper right sidebar.

Sunday, November 22, 2020


Garden at Nemours Stencil S844 , my recently released stencil (an exact reversal of Garden at Nemours Mask D658) has established its image in a number of my abstract artworks, sometimes with other stencils or masks; other times, going solo. 


In the painting above, the center features an area printed with Garden at Nemours Stencil S844Its background and "frame" show the earlier print, which was made with 9" x 12" Longwood Florals Mask.

Below:  Garden at Nemours Stencil S844 was printed in dark green (which unfortunately appears as near-black) as a final touch to an abstract painting that I'd developed using 6" x 6" Palm Fronds Silhouette Small.


In building the painting below, I started with a pre-printed, figured background glued to a sturdy sheet of watercolor paper.  Over that background I made my first two prints with purple acrylic paint, Palm Fronds Silhouette Small (6" x 6") and Palm Fronds Silhouette Mini (4" x 4".)  Opposite on the color wheel from purple is yellow, so I used that color in making the top print using Garden at Nemours Stencil S844 --


Below:  the background in this print appears to have been printed with a stencil or mask; however, what I'd used was an old plastic doily, bought at a flea market.


Above:  Once more, the dark green acrylic paint, in this photo, appears nearly black. 

StencilGirl's own Carol Baxter has come up with delicious titles for the following two artworks created with Garden at Nemours Stencil S844  --


The mixed-media collage above is entitled Morning!  And my artwork below bears the title Night.


Below:    This mixed-media collage features stark black and muted grays as background for a vividly red imprint from Garden at Nemours Stencil S844--


Today's final artwork, below, started life as a sheet of foreign newsprint mounted onto sturdy watercolor paper.  A happy hodgepodge of colors landed across the whole surface.  After those acrylic paints had dried, I made a print using Garden at Nemours Stencil S844.  Now it's ready for framing!


Thank you sincerely for finding your way here to my blog today!  To scroll thru the pages of my StencilGirl stencils and masks, please start here.

Thursday, November 19, 2020

 How would it look to make a print with my new 6" x 6" Garden at Nemours Stencil S844 right on top of a print made with my 6" x 6" LOVE Stencil?  Not to keep you in suspense --


Another question:  What can happen when an abstract-making mood strikes and what's on hand are 6" x 6" Garden at Nemours Stencil S844 and its exact reverse companion, 6" x 6" Garden at Nemours Mask S658?  This --


And this --


And this--


And this--


And this--


And this--


And this--


And this, below ... yes, both stencil and mask were used, altho one of the prints is shyly hiding in the background.


What fun to have both Garden at Nemours Stencil S844 and  Garden at Nemours Mask S658 on hand!  Exact opposites can play well together, bringing both unity and variety to artwork.

Thanks for stopping here today.  To scroll thru the pages of my StencilGirl stencils and masks, please start here.

Wednesday, November 18, 2020

 As today's guest on StencilGirl Talk, I'm giving step-by step directions to detail my process in developing the artwork I'm posting here.

In my own blog post for today, I want to supplement today's StencilGirl Talk with a supply list:


(1.)  Two each of these stencils -- Mimosa Stencil (9" x 12") ...


... and Mimosa 6 Stencil (6" x 6") ...


(2.) scissors with short, extra-sharp blades

(3.) paper towels or a soft cloth

(4.) dimensional media such as coarse pumice gel, glass bead gel, light molding paste, etc.

(5.) iridescent beads

(6.) a stretched canvas, canvas board or any sturdy substrate

(7.) plastic or metal artist's spatula

(8.) blue, aqua and "metallic" gold acrylic paint and paintbrush

(9.) a water mister bottle

(10.) water in a basin sized to hold 9" x 12" stencils or masks


These supplies are included in today's write-up at StencilGirl Talk but I'm listing them separately here, for the sake of easier advance preparation.


Below:  the finished artwork.


Thank you for visiting my blog today!  I hope you've enjoyed the project detailed in today's StencilGirl Talk!  And I hope you'll follow this blog by taking that option in the upper right sidebar.  My upcoming posts will continue with art samples and artwork-developing ideas to feature my just-released 6" x 6" Garden at Nemours Stencil (S844).

Monday, November 16, 2020

 A couple of months ago, I posted about creating mirror-image prints using my 6" x 6" mask Looking Up Through Trees Small.  

Making each of those prints, I used the same mask twice ....


Above:  The first print has been made and its paint has dried.  The mask has been placed back onto the substrate and secured with masking tape.  I'll use the sponge brayer (upper right) to apply another layer of heavy-body acrylic paint thru the mask.

Below:  An example of a finished print created in this way --


What I'd worked with, at that time, had been the same mask, used twice.  

But now I have a newly released stencil that's the reverse image of my 6" x 6" Garden at Nemours Mask (S658).

Garden at Nemours Mask looks like this:


My brand-new 6" x 6" Garden at Nemours Stencil (S844) looks like this:


On the mask, the "black" areas are negative space; the mask has been laser-cut to create garden imagery as "positive" space.  The negative space defines the positive areas.

On the just-released stencil version, the opposite is true.  The "black" areas are now "positive" and are defined by the "black" areas that have been cut out.  The same image is presented, but this is done by way of a reversal of negative and positive spaces. 

A mask gets its name from the fact that its solid ("white") shapes function to mask out part of the image when a print is being made.

A stencil usually has more "white" areas and its image contains "bridges" (small pieces of Mylar) that hold the design, and the stencil itself, together. 

One of my early experiments with the mask and the brand-new stencil was to place them onto a sheet of Yupo, a synthetic paper-substitute with an ultra-smooth, almost slippery, surface.  This surface makes possible lively flows of liquid color -- watercolor or Golden High Flow Acrylic paints or "plain" inks or alcohol inks.  (Or any combination thereof.)

Here, my choice was the Golden High Flow Acrylics.  My approach was the same technique that I demonstrated in the video that is part of the May 2019 StencilGirl StencilClub set-of-the-month.  

I placed the newly-created Garden at Nemours Stencil S844 on the top half of the Yupo sheet; and with this stencil, I used a "hot" red (Naphthol Red Light) as well as an orange-yellow (Diarylide Yellow.)  These color names are the ones used by Golden Paints; other companies may use different names, so the part to remember is "hot" red and orange-yellow.  

A "cool" red, in contrast, has a faint bluish tint.  

The "hot" reds usually work best with orange-yellow because these two colors are near-neighbors on the color wheel. (Color wheel examples can be found online when you search "color wheel.")  This close proximity makes them known as analagous (or harmonious) colors.  Colors near one another or the color wheel "play well" together.  "Playing well" together greatly reduces the chance of creating "muddy" (muted) colors.

On the top half of the image below, I used Garden at Nemours Stencil S844 and on the bottom half, I used Garden at Nemours Mask S658.  Thus a is created a mirror image that somewhat resembles the mirror-image prints I'd made previously using Looking Up Through Trees Small.

I like to strive for somewhat different "looks" in each of my artworks, so using the mask and the new stencil together helped me work in that direction; I wanted results that would resemble -- yet differ -- from the Looking Up Through Trees Small double-prints.


 Above:  the print's bottom half was made with Golden Phalto Blue Green Shade and Phalto Green Blue Shade.  Both are "cool" colors, chosen because I wanted high contrast between the top and the bottom of this painting.

"Hot" colors are perceived by the viewer's eye as coming forward, whereas "cool" colors are perceived as receding.  Using these opposites together creates a "push-pull" effect for the viewer.  The goal here is to make for a more lively, interesting painting.

My next post will explore other ways to use Garden at Nemours Stencil S844 and Garden at Nemours Mask S658 together.  

Thanks for checking out my blog today!  To follow this blog by email, please use that option in the upper right sidebar.  To scroll thru the pages of my StencilGirl stencils and masks, please start here.

Sunday, November 15, 2020

To continue the theme of combining hands-on stencil-prints with digital art , today's post presents a few ways in which 6" x 6" Garden at Nemours Stencil S844 has worked in this happy pairing off.

Altho Photoshop is the program that I use for making digital art, lots of image-altering software is available for use in smartphones, PCs, tablets and laptops.  It's been my (limited) experience that all these programs work nearly the same.

For today, first I bring you a combination method that's simple:  Make hands-on stencil prints onto backgrounds that have been digitally created and printed on sturdy papers.  For my hands-on printmaking, I used heavy body acrylic paints.


The two backgrounds above had been derived from photos I'd taken of abstract shapes found on my travels.

The background below had been a photo I'd taken when visiting a nearby historic farmhouse....


The background for the piece directly below was an all-digital collage previously developed in Photoshop and printed on the same sturdy paper.


Because I had printed the above backgrounds on sturdy papers, there was no warping when I used acrylic paints to make my stencil prints.

Another approach to using 6" x 6" Garden at Nemours Stencil S844 with digital art is more time-consuming but with results that are equally fun.

Step-by-step, here is the route I followed in making this kind of artwork.

Below:  a collage that I created by hand.  No digital work yet.  (In the upper right, I had used 6" x 6" Pavilion Shadows to make the pale white imprint on a gray area.)


Below:  I made this print with acrylic paint and both 6" x 6" Garden at Nemours Stencil S844 as well as its equal-sized opposite, Garden at Nemours Mask S658.  My background had been yet another piece of Photoshop-generated artwork that I'd printed onto sturdy paper.


After making the print above by hand, I scanned the image into Photoshop and desaturated it to create the digital image below --


In Photoshop, I made 3 digital copies of this black-and-white image, then reduced each of these to a different size.

My last step was to digitally add these three to a photo of the black-white-red handmade collage shown earlier.  You can find the three of them in the extra-large image below.  Using Photoshop, I was able to further manipulate the 3 black-and-white stencil prints by making their white parts transparent.


Bottom line for today's post:  6" x 6" Garden at Nemours Stencil S844 -- and its opposite, Garden at Nemours Mask S658 -- are a whole lot more versatile than what may appear at first glance.

Thanks for sticking with me thru today's journey!

To scroll thru my StencilGirl stencils and masks, please start here.

To follow this blog by email, please use that option in the upper right sidebar.


Saturday, November 14, 2020

This post focuses on what happens when brand-new 6" x 6" Garden at Nemours Stencil (S844) is paired with 6" x 6" Garden at Nemours Mask (S658) .  Because they are exact opposites, they tickle the brain with creative possibilities.

What do I mean by exact opposites? A picture is worth a thousand words --


Above: 6" x 6" Garden at Nemours Mask (S658)

Above:  6" x 6" Garden at Nemours Stencil (S844)


Here's the key to the above:  White = the areas that will be covered by the Mylar when paint is applied.  Black = the areas that will not be covered by Mylar when paint is applied.  


The abstract painting-starter above was made with both stencil and mask.  I call this an abstract painting "starter" because it will be further developed, by adding more layers of paint and/or by being cut into shapes destined for collage.

Below:  Another abstract painting "starter", this one developed thru use of opposing angles to print with both Garden at Nemours Stencil  and Garden at Nemours MaskThe background had started life as a photo from an old magazine.  As this piece continues on its journey to resolution, more paint layers will further obscure this background photo.


Below:  This "starter" piece, on watercolor paper, has evolved thru the use of both mask and stencil. 


Below:  This painting "starter" began on a background of white paper smeared with a wide streak of purple paint. The yellow print was made with Garden at Nemours Mask (S658) and the next layer (blue) was made using Garden at Nemours Stencil (S844).  Notice how the subtle similarities between the two designs create unity; yet, at the same time, the left-leaning yellow image contrasts with the right-leaning of the blue image.  This contrast makes for variety to heighten overall visual interest.


Today's next-to-last art sample is below.  High contrast has already been created; the original print was made on a pale yellow-green background using Garden at Nemours Stencil (S844) with bright magenta paint.  Next, I used Garden at Nemours Mask (S658) and dark green acrylic paint.  The high contrast is created in two ways, the more obvious one being the contrast between pale yellow-green and dark green.  This is a contrast in value.

A less obvious device is also at work here; the pale yellow-green and the bright magenta (red-violet) are near-opposites on the color wheel.  This is a contrast in hue.  

Thus the art sample below shows two ways of creating high contrast in a painting, and that visual effect is plain to see....


Today's final art sample, below ....


.... offers another example of color wheel opposites and near-opposites working together.  The result is that each appears brighter when it's placed side-by-side with its opposite or near-opposite.  In this case, those two color opposites are orange/yellow-orange and blue.

Another characteristic of this composition is that it has a way of ramping the brightness higher still.  Its background print -- made with yellow-orange-red and Garden at Nemours Stencil (S844) -- has become a neutral colored area, now that it's covered with in blue using Garden at Nemours Mask (S658).  This neutral color surrounds many yellow-orange-red areas, causing the "yellow fellows" to appear even brighter than they would otherwise. 

This "neutrality" of color is sometimes called "mud" because, as color wheel opposites or near-opposites, they cancel out the original two colors when mixed together.  

Thanks for following my logic and explanations in today's post; I hope they make sense.  To flip thru the pages of my StencilGirl stencils and masks , please start here.