Sunday, December 27, 2020

Nancy Sanderson Curry, one of my all-time favorite artists, a dear kindred spirit and a friend-across-the-miles, has floored me yet again with her use of my 9" x 12" mask Garden Montage.  The mask in its entirety looks like this:


Nancy has used selected areas of the mask in making this 3-piece series of gorgeous prints --


To keep track of Nancy's ongoing art projects, visit here.  You'll be glad you did!

Today's second featured artist Is Lynne Forsythe.

This issue of StencilGirl Talk carries a video by Lynne; in it, among other StencilGirl stencils, she has chosen to use my 6" x 6" Ornamental Iron Curls, shown below --


To keep up with Lynne, you can catch her here.

Thanks for stopping to check out my blog today!  To scroll thru the pages of my StencilGirl stencils and masks, please start here.


Tuesday, December 8, 2020

 It's really easy to make pillar candle Christmas cards!  This image is my favorite for this special season, celebrating the Light that has come into our world.

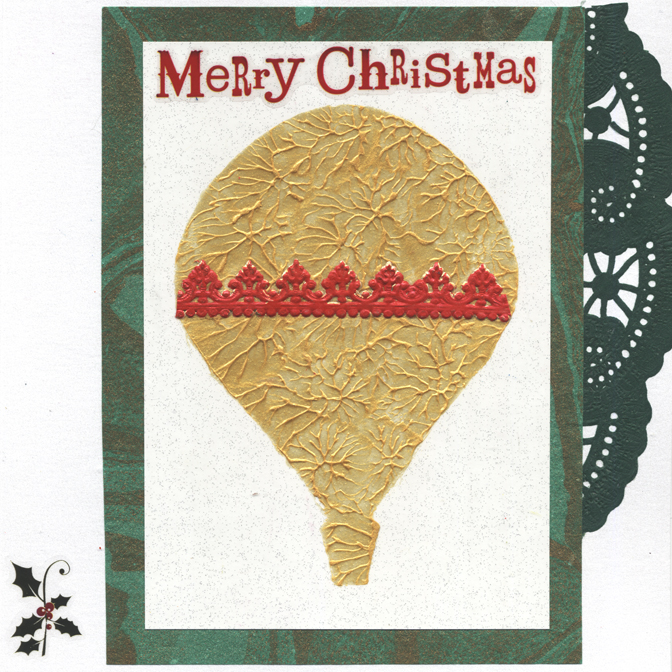
And today's first card is full of bling!  

First, I made a print on holographic giftwrap paper using my 9" x 12" mask Facets ....


.... then I cut the 9" x 12" print into columns of the right width and length to star at center stage on my "metallic"-sheen  greeting card blanks that measure 6" x 6" (from JamPaper.com.)


The finished card, above, shows that I gave it additional bling when I used a gluestick to add a circle of Dresden embellished foil (available at Etsy and Amazon, among others.)

The flame was freehand cut from yellow-orange and red papers.

Most of my "candle flames" are freehand cut from edges of papers that I've stencil-printed using yellow, red and orange acrylic paints.  But I sometimes use foil papers; for example, the background yellow frame in the card below was cut from an old Christmas card that'd been printed on gold-foil cardstock:


Above:  This pillar candle was cut from a print made with iridescent ("metallic") gold acrylic paint and my 6" x 6" Palm Fronds Silhouette Small.  The greeting card blank (likewise from JamPaper.com) is "metallic" blue.  (I use the term "metallic" to indicate anything with a sheen.  In the case of paints, this sheen comes from finely ground mica, a mineral with a reflective surface.)

Below is a pillar candle that started with a gold "flame" cut from textured gold foil.  The candle itself was cut from paper that had been printed multiple times; the top print was made with red acrylic paint and my 6" x 6" mask Pavilion Shadows.... 


Besides making my own Christmas cards, I enjoy making giftbags.  The first one below features a freehand-cut star that I cut from paper stencil-printed multiple times.  The top-layer print was done with red acrylic paint and my 6" x 6" mask Sprigs:


The giftbag above was decorated with a freehand-cut Christmas tree that had started as a full-page print made with my 9" x 12" Winter Berries Mask and red acrylic paint.

Today's last Christmas giftbag was decorated with a tree freehand-cut from a collage.  I'd developed the collage by cutting a variety of stencil-printed papers into small pieces, then randomly reassembling the pieces and gluing them to a light cardstock background.  This happens to be my favorite giftbag because, to my eye, there's something festive in this randomly arranged collage.


I buy plain white giftbags here.  If you like giftboxes better than giftbags, here is one place to find them.

My 9" x 12" Winter Berries Mask in its entirety looks like this--


My 6" x 6" mask Sprigs in its entirety looks like this:


In its entirety, my 6" x 6" mask Pavilion Shadows looks like this....


My 6" x 6" Palm Fronds Silhouette Small in its entirety looks like this:


Thanks for visiting my blog today!  To scroll thru my StencilGirl stencils and masks, please start here.

Sunday, December 6, 2020

Ghosts of Christmasses past?  Not by a long shot!  But today's post brings back memories of Christmas cards created in earlier years.

The Christmas tree below started with bright silver foil-laminated paper.  With masking tape, I blocked off parts of my 5" x 6" stencil Ferns 6; then I applied green acrylic paint thru the part that remained.  After that dried, I used glitter glue to add red and silver dots to the leaves as well as silver highlights to parts of the stem. 


Ferns 6, in its entirety, looks like this --


Next in line:  My 6" x 6" Tiger Lily, paired with red acrylic paint, made a bold statement on the muted silver background below.  With a gluestick, I added this print onto metallic green cardstock and placed a commercial star sticker at its center.  (My 6" x 6" greeting card blanks come from JamPaper.com.  The Post Office has a surcharge on 6" x 6" envelopes sent thru the mail.  I over-pay the P.O. by using two "forever" stamps on each envelope; for me, it's just easier this way.)


The Christmas card above was cut from a larger sheet of paper that I'd printed using alcohol inks on glossy cardstock.  The church window effect comes from my having used my 9" x 12" Facets -- which, in its entirety, looks like this:


Below:  This simple but unique card began with red cardstock that I printed with my 6" x 6" Bamboo Wall, using a mix of light greens with dark green acrylic paints.  Glitter glue created the "garland" and the ornamental dangling silver ball. 


Above:  A simple yet one-of-a-kind Christmas card, made on red cardstock that I'd previously brushed with silver metallic acrylic paint.  Atop that silver area, I used very dark green acrylic paint to make a print with 6" x 6" Bonsai Tree Stencil.  With a hole punch, I cut 3 small "Christmas ornaments" from a separate sheet of red paper.  I added these to the tree with a gluestick.

Below -- Once more I used Bonsai Tree Stencil, this time on a metallic silver background using white acrylic paint.  Highlights came last, bringing finishing touches of silver, gold and red. 


What do the Chinese letters in Bonsai Tree Stencil say?  God loves you!  There's the Christmas message in a nutshell.

Many thanks for stopping by my blog today!  To scroll thru the pages of my StencilGirl stencils and masks, please start here


Saturday, December 5, 2020

Making last-minute Christmas gifts can be as simple as digitally combining a photo of stencil-printed art with an inspirational quote; these quickie-gifts can be printed on cardstock, and given either ready-to-frame or already framed.  To make these gifts personal, you can pick out inspirational quotes or affirmations that speak specifically to each person on your gift-giving list. 

At StencilGirl StencilClub, Lisa Dobry had come up with one of her as-always brilliant ideas for the month of October.  Club members were encouraged to include printed lists of inspirational quotes with their monthly trades.  And Lisa mentioned we could each post inspirational quotes or messages daily in the StencilClub Facebook group.

This October event lit a fuse in my head; the results are shown in today's post.  They're destined to be printed and matted, to be given as gifts.

Each of these is labeled with the identifying number of the individual mask or stencil that I used in creating the quote's background; for example, the first one below was printed using StencilGirl's S236.


Bouquets of thank-yous for coming to see my blog today!  To scroll thru the pages of my StencilGirl stencils and masks, please start here.

Friday, December 4, 2020

A scattering of earlier years' favorite Christmas cards and a stocking-stuffer gift --


Above:  This 6" x 6" Christmas card started with dark green paper.  A commercial sticker sparkles at the center of this print created by applying red acrylic paint thru my 6" x 6" Quilted Flower Garden


Below:  This card was developed with the same stencil that had starred in creating one of my Thanksgiving cards.  But this time, it was modeling paste that I spread thru the stencil's openings.  As soon as I lifted off the stencil, I placed it in a basin of water to keep it wet until cleaning time.  3-dimensional media such as modeling paste should be removed from stencils before it can harden; unlike many plain acrylic paints, 3-dimensional media can partially or completely clog stencil openings.  After the modeling paste had dried I added silver glitter glue to the leaves.  My metallic bronze background is a greeting card blank from JamPaper.com.  Stencil used:  Pressed Leaves (6" x 6").


The palm-sized, blank-paged journal below came from a dollar store; its front and back cardboards were already covered with textured gold metallic papers.  To further decorate its front, I used green acrylic paint and part of my 6" x 6" Ornamental Iron Curls.  In my experience, the easiest way to use part of a stencil or mask is to cover the unneeded areas with masking tape.


Below:  6" x 6" Ornamental Iron Curls in its entirety looks like this --


A similar design is also available in Artist Trading Card size, as one of nine stencils included in ATC Mixup Swatton # 2.....


6" x 6" Ornamental Iron Curls was also used in printing papers that I cut into pillar candle shapes for more Christmas card covers.  Above each candle, I added an orange flame-shaped paper embellished with red glitter glue:


Today's next Christmas card memory, below, started with another print that I pared down with scissors:  9" x 12" Winter Berries Mask.  After cutting out a 6" x 6" square from that larger print, I used a gluestick to add a slender dark green background to become a frame for another pillar candle.  This candle had been cut from foil giftwrap paper that I'd printed using both my 6" x 6" Mimosa 6 stencil as well as my 9" x 12" Winter Berries Stencil.


Winter Berries Stencil (used in printing the lower half of the pillar candle) looks like this, in its entirety --


... and its reverse image, Winter Berries Mask (used with red acrylic paint) looks like this --


The striped top of that pillar candle was printed using my 6" x 6" Mimosa 6, which looks like this in its entirety --


Thanks so much for stopping here at my blog today!  To scroll thru the pages of my StencilGirl stencils and masks, please start here.

Thursday, December 3, 2020

My 2020 Christmas cards, as usual, depart from designs associated with typical Christmas cards. 

Each year I challenge myself to make cards using an eclectic mix of stencils and/or masks.

Today's post opens with three cards that were created with stickers, green paper doilies, Dresden embellished foils, marbled background papers and prints made on sparkling white cardstock, using my 6" x 6" Hot Air Balloon and Mask (This stencil-and-mask set also comes in a mini 4" x 4" size.  Additionally, an Artist Trading Card size is  included as one of 9 stencils in 12" x 9" ATC Mixup Swatton # 1.)


The prints on each of the three cards above were created with a homemade mixture of metallic gold pigment powder and heavy gloss gel.  I applied this mixture liberally thru the stencil, leaving rough textures on all three prints.  Altho I had used Dresden embellished foils on the top two cards, the third balloon card, directly above, was garnished with trim cut from a gold metallic doily.  After gluing the trim around the balloon, I added dots of red glitter glue.  

Below:  More Dresden embellished foil, as well as glitter glue, decorate this card which features a double-print on Christmas song-paper.  Both prints, one with green acrylic paint and another with red acrylic, were made with 6" x 6" Ornamental Iron Curls.  When making the second print, I turned the mask to face a different direction from the first print.


Coming up next:  My first step in making the card below was to print metallic silver paper by applying red acrylic paint thru my 6" x 6" Seaweed 6 Stencil.  After cutting out that print (with decorative edging scissors by Fiskars), I glued it to a metallic silver greeting card blank from JamPaper.com.  Then I cut out shapes from gold marbled green paper; and as I glued them to the silver paper, I arranged them into the shape of an angel.  The angel's wings and halo are pieces of Dresden embellished foil.  My last step was to spread iridescent glitter glue around the angel, using a cotton swab.    


The card below was printed with my 6" x 6" Heron --


Today's final series of cards are below.


The above Christmas ball started as silver metallic paper printed with red acrylic paint and my 4" x 4 " R & ETo get a round shape, I traced a circle around a plastic container; then I used fine-detail scissors to make the cut-out.  The top loop and the squiggles were made with glitter glue. I followed the same steps in creating the card below, except that this time I made the print using my 6" x 6" Swatton Grid Stencil.


My 4' x 4" M & Y was used in developing the card below.  Its loop as well as the loop and other decorations on the card above were pieces of Dresden embellished foil, which I apply with the same gluestick that I used in adding the cut-out balls to the greeting card covers.  


The glitter glue I use is made by Ranger Industries.  Dresden embossed foils are available from several Etsy vendors and from Amazon.

Thanks for visiting my blog today!  To scroll thru the pages of my StencilGirl stencils and masks, please start here.