Friday, August 30, 2019

Introducing 4" x 4" Mini Stencils/Masks -- M & Y and R & E -- at StencilGirlProducts.com


These 4" x 4" relative newcomers could be called stencils or masks; the line dividing the definitions of these two labels is blurring, in today's jargon.  


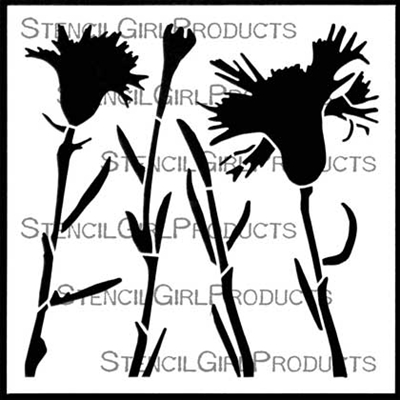
My inspiration for these two designs -- M and Y alongside R and E -- arose from my long-held love for customizing letters of the alphabet.  Although these two minis were originally based on alphabetic letter combinations, they have evolved into abstract patterns. 


M & Y, measuring 4" x 4"

R & E, measuring 4" x 4"

Two photos launch today's post --


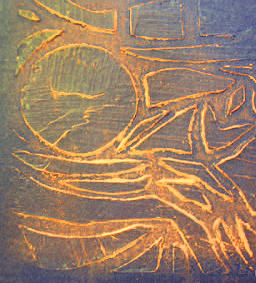
The first photo, above, shows the start of a new painting on stretched canvas.  The bottom layer was created using my 9" x 12" Winter Berries Mask.  After that first layer of acrylics had dried, I added a layer of translucent gold acrylic paint.  That two-part combination became foundation for this art adventure.  I used my just-released stencils several times, layer by layer, waiting for paint to dry between applications of layers.

The finished piece below -- you can click on the image to enlarge it and better see detail -- shows very little of the Winter Berries imprint, but it's there.  After deciding enough layers of the new stencils had been added, I covered the background areas around the canvas with a collection of acrylic paints.  Here the resulting background looks black, but in reality, it's a blend of dark purples, dark blues and dark magentas. 


On another stretched canvas, I started with Liquitex Black Lava medium, spreading it thru both new stencils with an old credit card.  After this first application of lava medium had dried, I used the stencils in the same way a few more times.  Also, I put the lava-laden stencils to work as stamps -- flipping them over to press the excess lava medium onto the canvas.  Immediately after using the lava medium each time, I dipped the stencils into a basin of water and wiped them clean with soft rags (old terrycloth washcloths work well.)  I don't usually clean my stencils, but whenever I use a 3-dimensional medium like lava medium, I clean stencils and masks to prevent their openings from getting clogged.


The final artwork above shows that I added acrylic paints and inks to the entire central area of the canvas, filling in the lava-prints and the areas around them.  

My next-to-last step was to develop the pale beige edges using the stencils, repeatedly sponging thru them with light shades of yellow, magenta and blue. 

Before calling the piece done, I lightly went over some of the raised lava prints with Krink Permanent Paint Sticks.  These are oil-based  jumbo-sized crayons.  Their color goes on wet but dries very quickly.  

Other companies make this kind of crayon; one is Sakura.  Another is Shiva.  However, the Shiva sticks that I've used have taken a long time to dry.  

Thanks for visiting here today!

To follow this blog by email, please use that option in the upper right sidebar. 

Tuesday, August 27, 2019

Layering with Stencils


So many ways to use stencils and/or stencil-prints in creating layers!

Below is a 6" x 6" greeting card layered with prints made with (1) Sassy Spray (bottom layer); (2) May 2019 StencilClub 4"x 4" stencil (center layer); and (3) a heart cut from a print made with Clustered Leaves (top layer.)


Incidentlly, I just happened across an online listing for Clustered Leaves -- which is certainly available at StencilGirl -- as being "unavailable" at PaperArtsy.  :-(  !!!

Below is an example of a different kind of layering.  All that I did here was to place my 9" x 12" stencil Garden Montage over an old page from a picture-calendar, then apply a layer of translucent purple acrylic paint....


Next, I'll show a close-up of a different approach to layering.  The first layer below was made with my 6" x 6" stencil Kaleid, which I placed on a sheet of matboard (a sturdy cardboard that comes in colors.  This matboard was a medium blue.)  

With an old credit card, I created the first layer by spreading heavy-body matte medium across the stencil.  I lifted the stencil off immediately.  While waiting for the matboard to dry, I dipped the stencil into water, before wiping off the matte medium with a dry rag  (old washcloths are great for this!)  Normally I don't clean stencils, but I do when I've used any 3-dimensional medium.  This prevents any permanent gunking-up that might obscure the stencil's details.

Once the matte medium on the matboard had dried, I rubbed its surface with a layer of yellow-orange Pan Pastel --  


The most popular way of layering with stencils is to apply layers of paint to an art journal page, a stretched canvas, or any other sturdy substrate.  Below is a close-up of an artwork-in-progress on stretched canvas.  Layers of paint (pale pink, pale yellow-green, etc.) form the background for this white print made with my 9" x 12" stencil Loopy Ladders.  (You can click on the image below to enlarge it and better see details.)  Because this is an unfinished piece of art, I already know that I will be adding still more layers of acrylic or watercolor to enrich the finished work.


Thank you for visiting my blog today!  To scroll thru the pages of my StencilGirl stencils and masks, please start here.

Sunday, August 18, 2019

Vase Stencils


It's fun putting together a couple of simple collages ....


Above:  The foreground was cut from a print made with my 9" x 12" Vases stencil and my 9" x  12" stencil Facets.  The background is digital art created years ago.


 Below:  Atop another background of digital art created years ago, I've collaged a foreground created with a second print made with my 9" x 12" Vases stencil.


I love the feminine shapes of vases and have designed two stencils to prove it --


my 9" x 12" Vases stencil


my 9" x 12" stencil Two Vases.


I appreciate your visiting here today!  To scroll thru the pages of my StencilGirl stencils and masks, please start here.

Thursday, August 15, 2019

Think Green!


Green -- the color of hope; of new beginnings!

Please click on the image below to better see details both in the green background and orange-green foreground.


Above:  Before being cut into collage pieces, the foreground papers were printed with my 9"x 12" stencil Feathers 9.  The green background is a Gelli Plate print made with my 9" x 12" stencil Vases.

For today's project, green was definitely on my mind.  My supplies: 


"bleeding" tissue paper (tissue that loses color when wet)

a scraping tool (an old credit card or an artist's spatula)

a container of water

silhouette stencils*

masking tape (optional)

a hair drier (optional)

Nitrile or latex gloves (optional, but recommended)

a paintbrush or a spritzer water filled with water

any 3-dimensional medium, such as molding paste, Titanium White heavy body acrylic paint, heavy gloss gel medium or heavy matte gel medium

a sturdy substrate (I used greeting card blanks cut from 140-lb. watercolor paper)


Masking tape is optional, but I think it helps make this particular technique more successful than it might be otherwise.  Below, I've taped one of my silhouette stencils -- Ginkgo -- to my blank greeting card cover.  I've also taped the card cover to my work surface.


Note:  The stencil is stained with paint from previous uses!

Below lower left:  heavy gel medium and an old credit card.


The next photo shows that I have switched from the credit card to an artist's spatula.  You can click on this image to better see details.  Here, I've begun to spread the gel medium thru the stencil openings.


Note:  I've used only the right side of the stencil.


The photo above shows the surface after the stencil has been lifted.  (When using any three-dimensional medium, I immediately clean the stencil.  Otherwise some of the stencil openings might be permanently closed, once the medium dries.)

While waiting for the gel to dry, I've brought out the tissue paper.  There are several brands available; the photo below shows the one I've chosen.


Below:  Having let the gel dry, I've cut a piece of tissue to a size just larger than the card cover.  On the left is the brush for spreading water across the card cover's surface.  A water spritzer will work, too.


Below:  After wetting the surface with water, I've covered it with the tissue paper.  My next step was to press my glove-protected fingertips all around each of the individual  three-dimensional shapes --  to insure that the tissue paper touches the areas around the shapes.


Above is another greeting card cover, pictured during the same tissue-bleeding phase of the process.  For this card, I used my 6" x 6" silhouette stencil Small Thistles.

The tissue paper can be allowed to air-dry, but as shown below, I've used a hair drier.


The tissue peels off the substrate very easily, once it's completely dry.

Two examples are below --


Above are two card covers created this way.  I could have left them  as-is, but I decided to keep going a little more --


Above, on the Small Thistles card, I've used glitter glue to outline  shapes.  Below, on the Ginkgo card, I have added Pan Pastels to the raised leaves.


Today's stencils include:


9" x 12" Vases


6" x 6" Small Thistles (which also comes in a 9" x 12" size)


Feathers 9 stencil (9" x 12" but also comes in a 6" x 6" size)


Ginkgo (6" x 6")

Thanks for stopping here today!  To scroll thru  the pages of my StencilGirl stencils and masks, please start here.  To follow this blog via email, please use that option in the upper right sidebar.
  

Tuesday, August 13, 2019

Layers with Stencils and Masks


I love putting orange and green together! -- they bring out the best in each other.   Today's first art sample is an intense orange-red acrylic print on sturdy tissue paper.  The stencil used for this background print is 6" x 6" Sprigs (a.k.a. "the stencil with the hidden angel!")

The dark green border was likewise printed with acrylic paint; and for this, the stencil put to work was 6" x 6" Ivy Frame 6.  (A similar border is available in a 9" x 12" size -- Ivy Frame 9.)


Lots of other colors play well together, too!  Another double-stencil-print is below.  Pavilion Shadows measures 6" x 6" and so does the mask Small Tangled Pods.  (Small Tangled Pods is just one in a series of pod-themed stencils and masks:  6" x 6" Small Dangled Pods stencil, 9" x 12" Dangled Pods stencil and 9" x 12" Tangled Pods.)


Above is a third double-stencil-print; the pale blue and green  background print was made with a homemade temporary cardboard stencil -- no longer in use since it lacked the durability and precision of a StencilGirl laser-cut stencil.  The top layer was made with my 6" x 6" stencil Kaleid

Below, in layers of acrylic paint, the two 6" x 6" stencils used were Sprigs and Tiger Lily-- 


Above:  Tiger Lily (6" x 6") and 9" x 12" Prayer Flags.

Many thanks for coming to visit here today!  To scroll thru the pages of my StencilGirl stencils and masks, please start here.

Wednesday, August 7, 2019

Thistles -- The Noble "Weed" in Stencils


Thistle is a 9" x 12" stencil that evolved from my love of flowers, be they wild or garden-variety.  

Artist Terry O'Neill has used this stencil along with two other StencilGirl stencils to create today's topmost artwork:


Above:  One of my paintings on canvas, developed with Thistle -- not using it directly, but instead, placing it onto the upper left substrate three separate times, so as to create the look of one stem with three blooms.  In the lower central area, I created the bloom by using my 6" x 6" stencil Small Thistles.  For the stalk under the central flower, I went back to using the 9" x 12" Thistle .

Above:  Another painting of mine.  This time, I used the 9" x 12" Thistle directly -- exactly as the image appears on the stencil itself, with each stalk standing separately.
Today's two stencils look like this--

Above:  9" x 12" Thistle stencil


Above:  6" x 6" stencil Small Thistles

Many thanks for visiting here today!  To scroll thru the pages of my StencilGirl stencils, please start here.

Sunday, August 4, 2019

"Cleaning Prints" with Stencils


Every once in a while, after using a stencil, I take the trouble to clean it, always on old newspapers or other scrap papers.  (To clean them, I use Windex and/or rubbing alcohol with a soft rag.)  And a few times, those cleaning-prints please my eye as much as the original prints ...


Above:  This print was made with the 6" x 6" stencil Pressed Leaves.


Above:  This is the cleaning print created with the 6" x 6" stencil Pressed Leaves.


Below is a multi-layered print developed with my 9" x 12" stencil Queen Anne's Lace....


And -- altho the original artwork was a different one from what's shown above, below is a similar cleaning-print made with the same stencil  --


When the cleaning prints turn out this well, I wish I'd used better background paper!

The 9" x 12" stencil Queen Anne's Lace looks like this in its entirety --


Below is a cleaning print made with part of my 9" x 12" stencil/mask Garden Montage ....


This stencil/mask looks like this in its entirety --


Below is a cleaning print that happened with my 9" x 12" stencil It's a Jungle Out There ....


It's a Jungle Out There itself looks like this --


Thank you for visiting here today!  To scroll thru the pages of my StencilGirl masks and stencils, please start here.