Saturday, July 30, 2022

Still More Acrylic Paint-Stained Stencils as Collage Elements

My scissors and I are back at it -- whacking apart paint-covered stencils and masks to use them as collage elements.  I've posted on this topic several times, and by all appearances I'll probably continue creating new artworks this way.


The collage above was a fun project for me and I played out that theme of fun in adding small blocks of print cut from books and catalogs.  These little gems include:

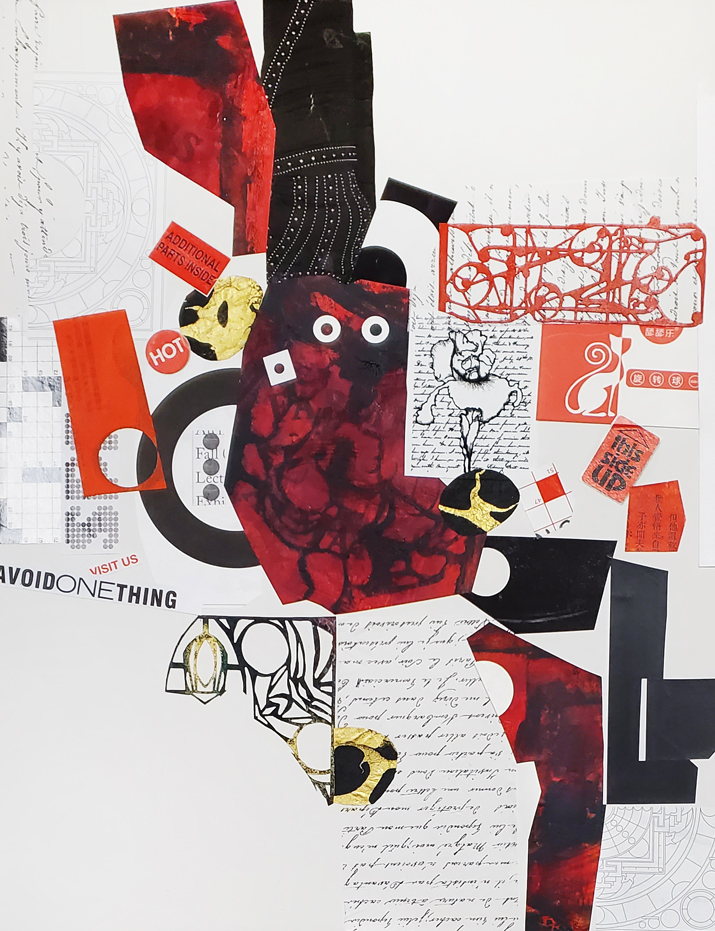
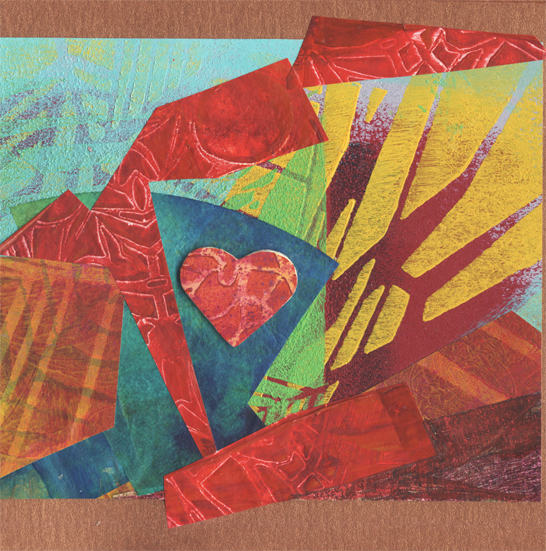
This Side Up (which has become the title of this collage on stretched canvas), Avoid One Thing, Visit Us, Hot and Additional Parts Inside.  This nonsequential cluster of phrases just simply made me happy!

The bold more-or-less vertical foundation of this collage is deep dark red paper that I imprinted with 6" x 6" Abstract Composition Backbones Mask 2 s865 and, as soon as the paint dried, proceeded to cut he paper into chunks.

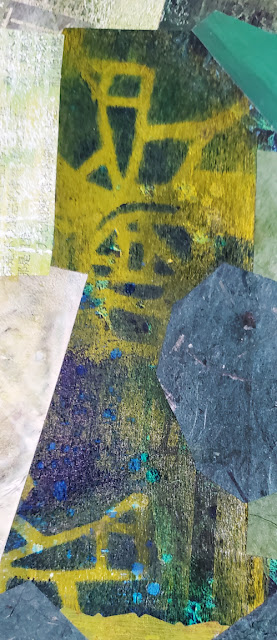
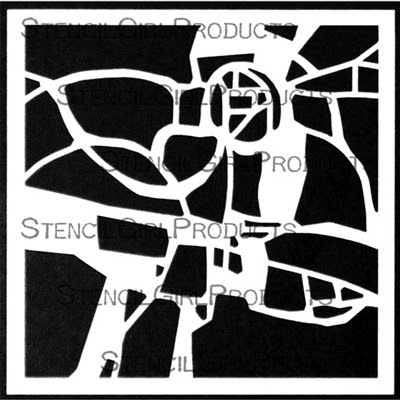
Immediately under the large chunk of this paper, I've added part of my 6" x 6" Kaleid s085, one of many in my collection of paint-covered stencils and masks that bear the signs of use in earlier projects.

(As I write this, that huge collection is AWOL!  I must have put in "a really safe place" where I would "be sure to remember it!"  I've asked St. Anthony to be on the lookout; he kindly comes thru for me every time.)

At the base of the collage's upper right corner sits part of another paint-stained mask of mine, 6" x 6" Ornamental Iron Curls s462.  

Here is a close-up shot of one area of this collage --


This Side Up started as an exercise for a wonderful art-making class that I'm taking online, made available by Louise Fletcher and her team.  My goal of this particular piece was to create contrast by bringing together circles and altered squares.  (The large black piece crowning this artwork was cut from a clothing catalog; the dress was black and decorated with circular buttons.)

Another new collage of mine, titled It's Complicated, looks like this:


The above collage has was juried into the juried section of artwork at the 2022 Canterbury Art Show and Sale, Rumson, NJ.


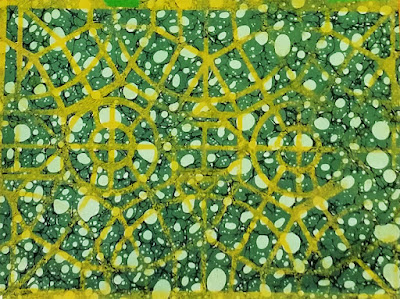
In developing this collage, I chose the majority of paint-covered stencils from Soulful Scribbles series designed by Traci Bautista.

Included in this piece are papers I printed using my 4" x 4" Palm Fronds Silhouette m050, 9" x 12" Twinship L268 and one of the stencils from my mimosa series.

My stencils and masks used in today's post include:  


Palm Fronds Silhouette m050


Twinship L268


Kaleid s085


Ornamental Iron Curls s462


and paper printed using Abstract Composition Backbones Mask 2 s865 ....


and papers printed with my mimosa series. (One measures 9" x 12" size the other is 6" x 6".)

Thank you for coming to see my blog today!  To scroll thru my masks and stencils at StencilGirlProducts.com, please start here.

Tuesday, July 26, 2022

Acrylic Paint-Covered Stencils as Collage

 At times, I incorporate acrylic paint-stained stencils as embellishments in my abstract artworks on stretched canvas.  Just one example is in the photo below.


In the artwork above, I created the base with acrylic paints (including some metallic hues in the focal area.)  Next, I used color pens to draw random lines from top to bottom and side to side across the piece.  Finally, with heavy body matte medium as my adhesive, I added pieces of paint-stained masks, all of which had been scissor-customized into "new" shapes after I'd cut from their original frames.  Each of the above paint-stained "stencil-bits" came from my collection Abstract Composition Backbones Masks.

The photo below shows a partial print made using 6" x 6" Abstract Composition Backbones Mask 1 s964 ...


Abstract Composition Backbones Mask 1 s964, in its entirety, looks like this --


The photo below shows a collage I've created using s964 as well as other stencil-printed papers ....


In the collage shown above, some stencil-printed papers were cut from the print below.  This print's original background paper was a flyleaf from an old encyclopedia volume.  The subtle foreground, printed with yellow acrylic paint, was created using 9" x 12" Facets L283:


Above:  To my eye, this subtle yellow print made with Facets L283 -- since it has circular patterns --makes a happy marriage with the background's bubbly pattern.


9" x 12" Facets L283


Now to U-turn back to the green collage:  The embellishments across its face are paint-stained bits and pieces cut from 9" x 12" Winter Berries Mask L677.  The following photo shows a close-up of one area that better displays the berries --


Winter Berries Mask L677 in its original form looks like this:


Many thanks to you, for checking out my blog today!
To scroll thru the pages of my stencils and masks at StencilGirl Products.com, please start here.

Friday, July 22, 2022

Introducing Kate Word's Latest Artwork!

For the gorgeous artwork launching today's post, I'm afloat on clouds to introduce a new artwork by Texas artist Kate Word.  

This time, Kate's choice of substrate was a round convex gallery wrap canvas from Jerry's Artarama. I'm going to try these canvases myself because, as the photo below shows, the result packs quite a visual punch....


Above:  I'm really appreciating the way this convex presentation combines with its "North Pole" of white and near-white.  In my eyes, this combination creates a luminosity to delight the senses.


If you remember my earlier post showcasing the work of this extraordinary artist, you'll immediately notice -- and stand in awe, as I did -- that Kate's work has increased in complexity, delighting and entertaining the attention of viewers who'll find it hard to look elsewhere. 

Kate's first step was to use several stencils and masks from StencilGirlProducts.com in printing papers for inclusion in this multi-layered collage. 

The most prominent of these include 9" x 12" Circular Patterns for Play L411, designed by Carolyn Dube; 9" x 12" Longwood Florals Stencil L676 and the 3-piece StencilClub Stencil-of-the-Month set of May 2019.  The latter two were my design.

If you're like me, you'll want to gaze at this artwork all day!

Once you can tear your eyes away, I'll continue this post with a few much more modest collages of my own, small collages created as greeting card covers.  Two of them may look familiar from long-ago posts of mine, but these have been updated/dressed up with the help of stencil-printed paper-covered crafter's wooden hearts. After being covered with stencil-printed paper, each of these wooden hearts gives a greeting card a three-dimensional crowning element.


The papers used in assembling these three greeting cards were printed with these masks and stencils:

9" x 12" Palm Fronds Silhouette Large L791

6" x 6" Palm Fronds Silhouette Small s238

6" x 6" Sprigs s523

6" x 6" Ivy Frame 6 Stencil s096

6" x 6" Kaleid s085


As always, my gratitude is heartily extended to Kate Word and to you, my readers, for checking out my blog today. To scroll thru the pages of my stencils and masks at StencilGirlProducts.com, please start here.

Monday, July 18, 2022

Addendum

 Today's post, short and sweet, adds two photos to yesterday's post.  These photos show Judi Kauffman's mini-book in my daughter's hand, to give a clear idea of scale.  This mini-book really is mini!  


And, for today, du-du--du-- dat's all, folks!

Sunday, July 17, 2022

Judi Kauffman Makes a Mini-Book! (Wait for It!)

Today's post brings you two artsy projects, both here thru the courtesy and generosity of my friend Judi Kauffman. 

Judi's second gift today will be her showing us how to make a unique mini-book!

But first:  two greeting cards.  

Both projects started when Judi walked into a book sale at her local library and handed over a dime for a damaged novel written in French. 

She restrained herself till she got home, whereupon she ripped out pages to alter with paint, an old brush, and one of my stencils ... 9" x 12" Blooming Where Planted L449.

In addition to those altered book pages, Judi tore off pieces of newsprint previously used for protecting her work surface, as well as for wiping excess paint from brushes before dipping them into rinse-water. *


Above, each of these two greeting card covers has a 
background printed using Blooming Where Planted L44.  The background of each is beautifully embellished with bits of torn paper, a cancelled postal stamp and glitter dot stickers. (Similar dot stickers are available here.)  Judi used double-sided adhesive tape to secure the rectangular layers on these cards; and she used a gluestick for everything else.

Turning from those two greeting cards to the second project of the day, we'll see that Judi has brought a new mini-book into the world, its blank pages ready for recorded thoughts or travel notes.  (So much more fun than recording everything into a smartphone! Can we really trust cyberspace?)

For her mini-book, Judi started by taking measurements and cutting.  

Then -- as shown below -- she placed two squares of cardstock side-by-side on the back side (un-stenciled side) of the paper.  She spaced the cardstock squares to leave a narrow vertical stripe between the two squares; this is the area that will become the book's spine, and will function like a hinge.


Above:  Step 1


Above:  Notice that Judi had left a roomy margin of paper along all four edges. Also notice that the two long (horizontal) sides were cut straight, while the two short (vertical) sides were angled.


Above: Judi's second step was to fold the long sides in around the cardstock and secure them with glue.

Step three is illustrated below ...


Above:  The two short sides were folded and glued. Notice that this simple 3-step sequence gives the illusion of mitered corners -- without need to create actual mitered corners.  (In case you don't know, mitering corners isn't easy; it begins with math and gets worse from there.)

Guided by measurements she'd made earlier, Judi cut out a small stack of blank copy papers to match the size of the book.  The papers needed to be twice the width as the book when the book was closed; their height needed to be just slightly less than the height of the book, so they would fit neatly inside. 


Judi folded the cut-to-size papers into halves.  (This "stack" of folded papers is called a "signature".)  The left side of the first folded paper was secured to the inside of the left book cover with a gluestick.  Likewise, the right side of the folded paper was glued to the inside of the right cover. 

Below you can see a top view of this charming blank-paged mini-book in its final form.


Below:  a direct photo of the cover of the finished mini-book.   Notice the artistic complexity resulting from foreign newsprint "peeking out" from behind layers of acrylic paints that Judi had randomly applied thru the stencil.


To my delight, Judi’s promised to send more projects as they’re completed.

*I've written about this kind of paper in earlier posts, since I follow the same practice that Judi does.  I call mine "catch-all paper".  It starts life as plain newsprint or scrap paper that protects the artist's work area.  This paper "catches" spills of paint while the artist works, but even more important, it's a place to wipe excess acrylic paint from brushes before brushes are placed into rinse-water.  This practice prevents much of the excess acrylic paint from going down the drain, carried by the brushes' rinse-water.

In its entirety, 9" x 12" Blooming Where Planted L449 looks like this ....


To scroll thru the pages of my stencils and masks at StencilGirlProducts.com, please start here. Thanks for checking out my blog post today!

Wednesday, July 13, 2022

Summer's Flowers

 Although the glitter doesn't show up very well on the first art sample below, I'll launch today's post with it because making it helped me in welcoming a long-awaited summer!  

Before introducing the squeeze-bottle glitter-glue, I placed my 6" x 6" stencil Budding Branches s249 on a 6" x 6" greeting card blank and sprayed the surface with green watercolor in a mister bottle. 


Today's second piece started life as a sheet of newsprint that I was using to clean stencils after using them elsewhere.  But I liked the results, so I added a frame using the same acrylic paint and a sponge brayer.  This print was made with part of my 6" x 6" stencil Swatton Flowers Version 1 s078...


In making the print below, I first covered an old encyclopedia page with a layer of Titanium White acrylic paint.  After that had dried, I used red-orange acrylic paint with my 6" x 6" stencil Silhouette of a Wildflower Bouquet s236.  In the very center of this image, you can see a subtle print of a flower that was an illustration in this pre-1923 encyclopedia.  


Today's final pair of prints were made with two of my 9" x 12" stencils -- Mimosa 9 L141 and Thistles L594.  Foreign newsprint was the substrate I chose; some of its lettering is still visible in both backgrounds below --


In its entirety, Thistle 9 L594 looks like this --


And Mimosa Stencil 9 L141 in its 9" x 12" version looks like this --


(Also available:  Mimosa 6 Stencil s126 which measures 6" x 6".)

Finally, in its entirety, Swatton Flowers Version 1 s078 looks like this --


Many thanks for visiting my blog today!

To scroll thru the pages of my stencils and masks at StencilGirlProducts.com, please start here.

Saturday, July 9, 2022

My Way to Store Stencils

When you start collecting stencils, you quickly learn is that storing them means their demand to be separated from one another.  Without separation, stencils can easily tangle, and getting them apart has to be done slowly and carefully to reduce damage.

I like the 3-ring bonder approach because it lets me slide each stencil into a transparent page protector, and the built-in binder rings hold pages in place.  I keep 9” x 12” stencil collections in albums roughly 12” x 12”  … and smaller binders house 6” x 6” and 4" x 4" stencils. In both binders I slip a sheet of paper into each page protector to keep stencils separated as well as easily visible.

To organize pages, I often label with sticky, repositionable index tabs.


Above:  I use this small binder for 6" x 6" stencils and 4" x 4" stencils. Stencils shown: (6” x 6”) s658 and S237 and (4” x 4”) M051.


Above:  I use this 12" x 12" binder for 9" x 12" stencils. 
Stencils shown
: Tangled Pods L344 and Two Fans L230. 


Above:  I store my closed binders vertically on a repurposed shelving unit.


Above:  My 12" x 12" binder is on the left and its smaller companion binder is on the right.


Supplies:

Organizing tabs --

https://smile.amazon.com/s?k=500+Pieces+Tabs+2+Inch+Sticky+Index+Tabs%2C+Writable+and+Repositionable

Page protectors -- https://www.scrapbook.com/store/uc-pp724287.html

3-ring album -- https://www.scrapbook.com/store/sbc-album-3702.html

A cheaper version of this approach to storing is to use rings without binders.  One example is here.  Other sizes are also available.

This second option allows more stencils to be bound together -- your only limit is the size of the rings.  This approach is cheaper than using binders, but the stored stencils may need to be stored horizontally on a shelf or in a drawer because they may be too floppy for vertical storage like mine. 

Thanks for stopping here today! To scroll thru the pages of my stencils and masks at StencilGirlProducts, please start here.

Tuesday, July 5, 2022

That Metallic Look ...

Some time ago, on StencilGirl Talk blog, I did a how-to write-up entitled Foiled Again!  You can read it, and see its step-by-step photos, using this link


Among the photos posted there are the three immediately below --


In the 3 art samples above, each features a ribbon that's become metallic with the help of rub-on foil and my 6" x 6" stencil Kaleid s085.  A supply list is included in that write-up at StencilGirl Talk blog. (Use this link.) 

Another approach to getting a metallic look with stencils is simply to start with foil, textured or plain.  You can opt for copy-paper-size foil sheets available at art/craft stores; or metallic gift-wrap; or even pieces of foil-laminated paper that comes for a free ride in some types of junk mail.  I've used all three.


Above:  I started with plain gold foil-paper, made a print on it with Ornamental Iron Curls (6" x 6") stencil; then cut it into a Christmas tree shape.


Above:  On heavily textured silver foil-paper, I made a green print with Ornamental Iron Curls , followed by a yellow print created using Pavilion Shadows (6" x 6") stencil.


Above: With my 6" x 6" stencil Swaying Grasses, I used red acrylic paint to make a print on faintly textured silver foil-paper; then I cut it into a heart shape.  After giving it a red background, I added a small red heart that I'd made with a heart-shaped hole-punch.


My 9" x 12" Fantasia L450 mask was used in creating this next  metallic art sample --


A photo fails to do justice to the reflective sparkle in the above art sample.  I used a quick, easy technique --  simply let the first step be a layer of reflective "metallic" paint.  Then bring on the stencil or mask -- and use it with either matte or glossy acrylic paints (or both).  Another option is using them with opaque and/or translucent acrylic paints.


Below is an example of something metallic that's somewhat similar; this piece was created with part of my 9" x 12" stencil Blooming Where Planted --


Above:  This time, rather than add metallic paint to paper, I started with textured reflective foil gift-wrap paper.  I chose matte acrylic paint to use thru the stencil, because of its contrast with the background.

Thanks for visiting my blog today!

To scroll thru the pages of my stencils and masks at StencilGirl Products, please start here.