Wednesday, June 29, 2022

How to "Un-Pickle" Youngsters' Brains -- with Stencils

Around now, moms of young ones are looking for summer fun projects for youngsters.  

If you're one of them, do you see electronic games as brain-pickling?  So you want to offer hands-on, creative alternatives?

Today's post is for you!  I did this project with young Bible school students and they loved it.  It's a way of creating homemade stamps.

Compressed cellulose sponges have an original width (while still compressed) of about 1/8 inch.  The ones I have measure roughly 3"X 4" but you may find them in a variety of sizes.


Above:  A stack of compressed sponges is on the lower right.  Other compressed sponges are spread across the work surface. Atop each compressed sponge is one of my 6" X 6" stencils -- Feathers s178, Cats s183 , Heron s175 and Osprey Wings s176.  I call this first step "auditioning" because I use it to see which stencil or stencils I want for this project.


Above:  Having narrowed my choise down to Cats s183, I placed the stencil over the compressed sponge and traced the outline with a dark Sharpie marker.


Above:  The tracing after the stencil has been lifted off.


Above:  The cat silhouette has been cut out with Joyce Chen scissors (any sharp-bladed scissors would have worked, but this part of the project is best done by moms, to avoid accidental cuts on young fingers.)  Note the leftover abstract shapes.  They will be saved for a future project.


Above:  I placed the cat silhouette into water, where it immediately swelled from 1/8-inch width to 1/2" width.  This is the part that really young kids love to watch.


Above:  Here's the cat-shaped sponge "stamp," pictured at an angle that shows its new depth.  Before using this stamp, allow it to dry.


Above:  The sponge stamp has been inked with a red, heavy-body acrylic paint, then used to stamp this image onto background paper that I'd previously printed using green acrylic paint and part of my 9" X 12" stencil Twinship L268.)


In its entirety, 
Twinship L268 looks like this--


Thank you, busy moms, for taking time to visit my blog today!  To scroll thru the pages of my stencils and masks at StencilGirlProducts.com, please start here.  Enjoy this summer with your kids!


Saturday, June 25, 2022

Kate Word -- My Happy Discovery


Run -- don't just walk! -- to check out the artwork of Texas artist Kate Word!  You can start here  ... but if you're like me, you'll want to keep going to Kate's website here.

It was the joy of discovering Kate Word's work in StencilGirl Talk that propelled me to her website, where I promptly ordered a cartload of her artwork in prints.

Why?

Theologian and philosopher Thomas Aquinas had a mystical experience after he had already spent a long time writing about God.  Awestruck after this experience, he said that everything he had written was "dust" ... meaning that his own intelligence and imagination, despite his longtime devotion and study, had fallen far short of grasping the scope and wonder of the Divine.

On a much lower scale, I've had the same feeling after seeing Kate Word's art.  Here I have been posting about collages I've created using stencil-printed papers. Well, my own collages became "dust" when I saw the gorgeous artwork of Kate Word!

I'm not saying this just because Kate has used -- among many other stencils from StencilGirlProducts.com -- a few of my design, including Longwood Florals Stencil L676 ... 


Longwood Florals Stencil L676  (9" x 12")


Feast your eyes, below, on what Kate has done using that stencil -- and a number of other stencils from StencilGirlProducts.com. --


But don't stop there!  My jaw hit the floor when I browsed Kate's website, here.  

You can also find Kate at www.instagram.com/katewordart and www.facebook.com/katewordart.

After that, you may very well join me in buying handfuls of her artwork! 

Tuesday, June 21, 2022

Yupo & Abstract Composition Backbones Masks

 Yupo is a synthetic substrate that gives you a choice of thickness per sheet and a range of sizes.  Today's project starts with a sheet of Yupo that had been used in some previous project that I'd discarded.  In that discard, I had washed the Yupo with water and the interesting stains that you see below are what remained -- giving me an automatic background patterns that I liked.

Because Yupo has a somewhat slick surface, many techniques used with it are ones that employ low viscosity media such as inks, Golden High Flow acrylic paints and watercolor.  However, today's project treats the Yupo as if it were stretched canvas or any other non-slippery substrate.


Above:  a color wheel with red dots to indicate the color scheme I'm choosing for this project.


Above:  On the left is the stained Yupo under my four 6" x 6" masks in the series Abstract Compositon Backbones Masks.  The easy one to see is Abstract Composition Backbones Mask 2 s865.  That mask is darkly paint-stained from a previous project as well as scissor-customized.  Altho harder to see, the other 3 masks are present as well.  All of them have been likewise scissor-customized.  Thin strips of green masking tape are securing the masks to the Yupo and the Yupo to the work surface.  I've placed the masks in a way that there is at least one connecting line between all of the masks.  This connection will be clear to the viewer in the finished art-piece.


Above: I've assembled acrylic paints of those chosen colors as well as a collection of sponge brayers (on the far lower right.) Sponge brayers come in 2 - 3 widths depending on which company makes them.  These brayers are one inch wide.


Above:  I've used one sponge brayer to apply acrylic paint across the substrate; it's a yellow with a faint orange tint.


Above:  I've repeated applications of paint, staying within the color range that I chose at the start.


Above: The masks have been lifted off.  Notice that they were arranged so as to have lines that connect all of them.


Above:  the finished artwork, ready to mat and frame.


Thanks so much for coming to see my blog today!  To scroll thru the pages of my stencils and masks at StencilGirlProducts.com, please start here.

Friday, June 17, 2022

Grab-bag of Ideas with Stencils

Below:   A beautiful bullet journal cover was created by artist Cheetarah Cheda -- whose name is as pretty as her artwork!


I've enlarged the above photo (courtesy of Cheetarah Cheda) so that the textured surface of  her journal cover is more clearly visible.  Unless I'm mistaken, Cheetarah has used one of my two Marbles stencils -- 


Marbles 6 Stencil s080 (6" x 6")


Marbles 9 Stencil L156 (9" x 12")


Next in today's line-up:  a stretched canvas that I painted using Palm Fronds Silhouette Small s238 (6" x 6") and Palm Fronds Silhouette Mini M050 (4" x 4").


My first step in creating the painting above was to spread the surface with a uniform layer of Titanium White liquid acrylic paint.  Having a bottom layer of bright white paint makes stencil prints stand out dramatically.  The tool I used to add this coat of paint was a drywall taping knife.  This knife comes in several widths, so I used one that was slightly larger than the 12" x 12" stretched canvas.  With a little practice, the knife makes it possible to create a uniformly flat surface.

I used Golden High Flow paints to develop the painting.  These paints, like alcohol inks, work especially well on a slick, even surface that's been prepared this way.

Today's post ends with a print I made using Ornamental Iron Curls s462 (6" x 6") and Prayer Flags L371 (9" x 12").


 Ornamental Iron Curls s462 (6" x 6")


 Prayer Flags L371 (9" x 12")


Thank you for taking time to visit here today!  To scroll thru the pages of my stencils and masks at StencilGirlProducts.com, please start here.

Monday, June 13, 2022

Ivy!

 The ivy plants in our yard and in our container gardens will hold onto their green leaves all year around...


Above:  a close-up of English ivy in our backyard. 


Long ago, I pressed some ivy-stem-and-leaf-cuttings till they had dried.  Then I scanned them into Photoshop.  From there, they segued into stencils...


Above:  Ivy Frame 9 Stencil L142 (9" x 12")


Above:  Ivy Frame 6 s096 (6" x 6")


Above:  Ivy 6 Stencil s097 (6" x 6")


Above:  Ivy 9 Stencil L143 (9" x 12")


I've used my ivy stencils to make prints with acrylic paints.  Some of those prints became bookmark gifts, while others went on to be greeting card covers...


I created a matching envelope for one of those greeting cards by gluing a leftover strip of print across the bottom....


... and finally, one of the full-size prints became a background page (or a starter page) in my art journal --


All of today's prints were made on "catch-all paper."  I use magazine pages and other papers for "catching" leftover acrylic paints when I finish my large painting projects.  Before placing my brushes into soaking water, I wipe the brushes as clean as possible on these papers -- so that less acrylic paint goes down the drain when I wash brushes at the end of the day.  It's better for the environment.  

Also:  Do you know about this?  If you enjoy making greeting cards the way I do, your production may exceed your needs.  If that happens, isn't it wonderful that you can send your beautiful greeting cards to an organization that makes good use of them?  I think so! 

Thanks for visiting this blog today!

To scroll thru the pages of my stencils and masks at StencilGirlProducts, please start here.

Thursday, June 9, 2022

Handmade Paper???

Do you like the texture-rich look of handmade paper?

Golden Texture Paste gives you that look and does it a whole lot faster than if you had whipped up your own batch in a blender dedicated to paper making.

Here is a video by StencilGirl's MaryBeth Shaw, showing how to use a specific type of stencil with texture paste in creating 3-dimensional shapes for embellishing your art projects.

The necessary type of stencil is one that has a silhouette cut-out like these, for example:


Above:  6" x 6" Cats s183 -- one of the stencils MaryBeth uses in this video

Another example--


Above:  6" x 6" Pair o' Parrots s395


I've designed a number of silhouette-style stencils, some of which would work with this technique up to a point, but additional linework would be needed after the fiber paste had dried, in cases like this ....


Above:  The body of Heron s175 would work fine with fiber paste casting, but the legs would probably be more successful if done with linework, added after the paste had dried.


Have fun with fiber paste shape-making!

To scroll thru the pages of my stencils and masks at StencilGirlProducts.com, please start here.

Thank you for taking time to check out my blog today!

Sunday, June 5, 2022

Abstract Composition Backbones Masks

Today's post aims to illustrate that these masks put into your hands a quick, easy way to establish backbones/scaffolding/ framework for a variety of abstract artmaking adventures.  

I see them as launching pads into abstraction for any artist wanting to break away, temporarily or permanently, from the representational art-making that most of us have practiced, from childhood onward.

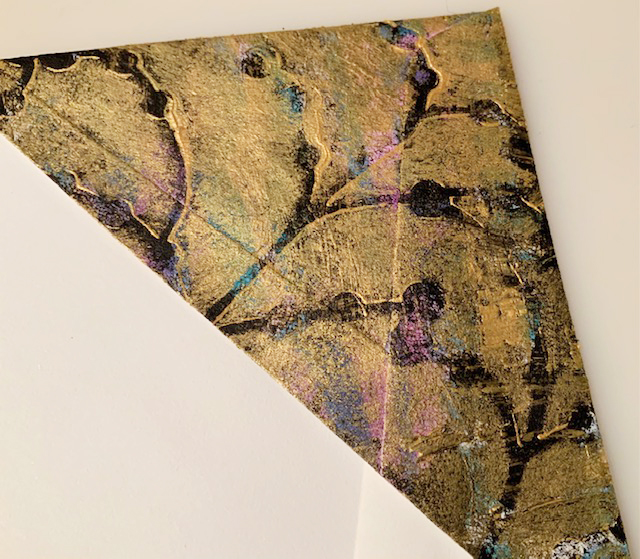
Let's begin with part of a page from an old picture calendar.  (Yes, I still use wall calendars!)  These papers are usually more sturdy than magazine pages or old print-outs of my artwork on copy paper.  Sturdy or not, all three of these papers are popular with me because they provide backgrounds for stencil-printing that are readymade with details, complexity and color.  An interesting background puts you ahead, even before you start!  


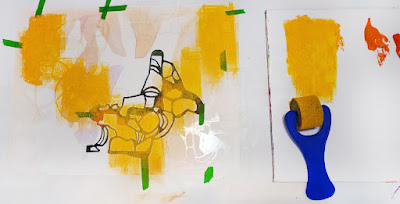
But I do at times use flimsier paper.  The example below shows one of my art sample print-outs on plain copy paper; over that, I used masking tape to secure my 6" x 6" Abstract Composition Backbones Mask 1 s864. (This mask was stained pink as result of an earlier project.)


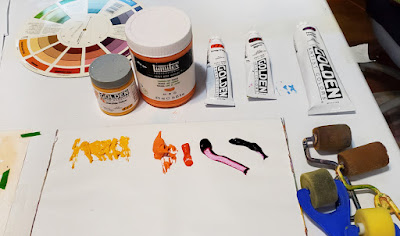
 I then went over the mask using a sponge brayer loaded with heavy-body light magenta acrylic paint.  


After I lifted off the mask, what remained was the print below; the light magenta was opaque, so most of the original background disappeared; but just enough of it remains to lend unique "flavor" and visual interest to the print.  


Below:  an example of a print made over a magazine photo--


Above:  This print was made using 6" x 6" Kaleid s085 with blue acrylic paint, on a busy, chaotic background.


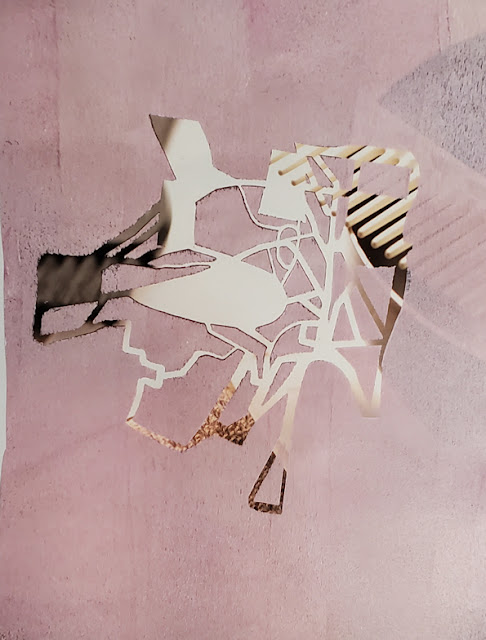
Where am I going with all this?  It's backstory for today's  sequence of steps that I took in developing a pale pink artwork with my 6" x 6" Abstract Composition Backbones Mask 3 s866.  (I've scissor-customized this mask, cutting it free from its square frame.)  This project started with a magazine page background that'd been mostly obscured behind a layer of pale pink that I sponge-brayered over this mask.  Interesting patterns, shapes and colors from the original magazine page are still somewhat visible now that the mask's been removed. In these remaining designs, I saw temptation for building upon them with a Sharpie opaque white paint marker pen.


Below, I drew lines to connect that dominant image to the right edge of the paper as well as the bottom edge.  On the left of that main design, I outlined the original print to give it visual strength and weight.  With another 2 lines, I connected this large shape to the left edge of the paper.  (Here in the West, we read left-to-right.  So, many of my abstracts give the viewer a left-edge "entry point" and a "pathway" visually leading into the artwork, to reach the star of the show.  And most of my abstracts provide the viewer's eye with another path, on the right side, to lead visual attention out toward that edge.  This second line has the goal of "finishing" a piece -- almost the same as putting a period at the end of a sentence.  Additionally, all of the linework has the goal of "anchoring" the chief image so that it doesn't appear as a loose mass afloat in space.  Overall visual satisfaction is the result of this "period-like finish" and the "anchoring.") 


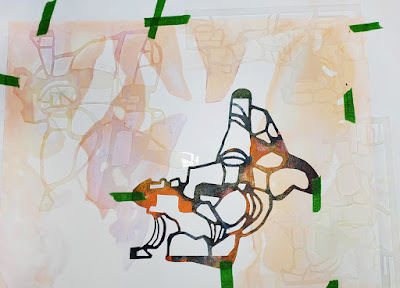
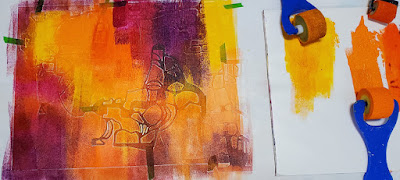
Below:  This separate example of art-in-progress is moving thru the same progression as the pale pink art sample .....


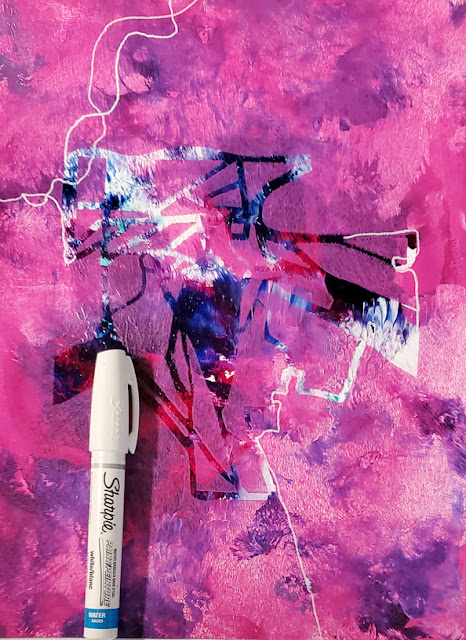
Above:  The same step-by-step approach was applied to this print-in-progress; a layer of opaque paint (mixture of purple and pink) was sponged across 6" x 6" Abstract Composition Backbones Mask 3 s866 while the mask was taped to a background of hectic color.  After the mask was lifted, I used the same marker to extend lines from the central image, tethering it to 3 sides of the paper.  I didn't add linework  to the far right side because the large white area on this side of the print was enough, by itself, to draw a viewer's eye toward the right edge of the paper.


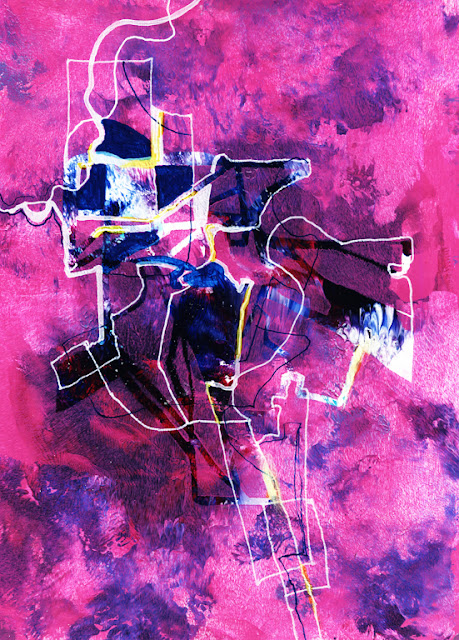
Above: on this art-in-progress, more linework was added.  Notice how linework has greatly altered and enhanced the original print.


Below:  Let's return to today's main (pale pink) art-in-progress.


Above, I've started to add collage papers to the original framework; and in the upper left I've extended a white line as an eye-catching bridge to connect the main attraction with the paper's edge.  This dominant abstract design is now "anchored" on all four sides.

Below: I added more collage papers ...


... and at that point, I called the pale pink artwork finished.  

Today's post has only scratched the surface of all that these masks can do for you.  Here are examples that used only one mask at a time.  But try layering one mask atop another when laying down an opaque coat of acrylic paint over an overloaded background.  That combination will give you instant ultra-complexity, which you can develop in any direction that tempts you.

Thanks for taking time to check out my blog today!  To scroll thru the pages of my stencils and masks at StencilGirlProducts, please start here.

Wednesday, June 1, 2022

Center Stage: Judy Kauffman

Career artist Judi Kauffman knows how to push all of my "delight" buttons!  I'm beyond happy to show more of her artwork here today! 

The idea for this project came to Judi when she was gifted some business-size envelopes.  

Judi's first step was to seal flaps down, permanentlyclosing each envelope that she wanted to use in this project.

Then she made a pair of diagonal cuts on each envelope, as shown below:


Above:  On the far left is a diagram of one finished bookmark being used on a book page.  A photo of the same image is coming up below.


Having finished with the cutting, Judi then inserted parchment paper into each triangular pocket before painting, to keep the  matching sides of each triangular shape from sticking together during paint application.  Below:  A photo repeating what is shown at far left in the diagram above.


Above:  Judi used part of my Fire Cherries Mask L879 (9" x 12") in creating this clever bookmark.


Altho my first guess had been that Judi had used a gel plate for these projects, it'd been a guess that missed the mark.  Instead, Judi used paints with a couple of applicators:  sponges and traditional stencil brushes.  In some cases, she also used a cheap, wide brush for dry-brushing.


Above:  an example of dry-brushing.  The darker red-orange streaks (across a yellow-orange background) were created with a stiff-bristled brush that I'd dipped -- sparingly -- into red-orange acrylic paint.  Dry-brushing is done with a light touch as the bristles are swept across the paper.  Want more detail on dry brushing? It's here)


Today's first series of photos features some of the one-of-a-kind bookmarks that Judi created.   


In the three photos above,  each design comes from Judi having used parts of my 9" x 12" Winter Berries Mask L677.

Below:  Still working with that bundle of envelopes, Judi went on to experiment with whole-envelope designs, making her prints with a combination of my 9" x 12" Tangled Pods Stencil L344  (blue) and 9" x 12" Nosegay Stencil L335 (black.)


On another envelope, Judi created layers of gray, blue and black, each made using 9" x 12" Tangled Pods Stencil L344....


Below:  4 partial prints that Judi created with my Fire Cherries Mask L879 (9" x 12")


Above:  I love Judi's delicious blend of monochromatic browns against a rust-like background!


In their entirety, each of today's stencils and masks looks like this--


 9" x 12" Fire Cherries Mask L879


9" x 12" Tangled Pods Stencil L344


9" x 12" Nosegay Stencil L335


9" x 12" Winter Berries Mask L677


Bushel baskets of thanks go to Judi Kauffman, for allowing me to show her artworks and her diagram here!  To see more of Judi's art, scroll down thru older posts to the post of March 28.

And more thank-you's to everyone taking time to check out my blog today!

To scroll thru the pages of my stencils and masks at StencilGirlProducts.com, please start here.