Today's post offers simple exercises in using complementary colors -- colors that are opposites, or nearly opposites, on the color wheel. Used together, complementary colors bring out the best in each other. Notice on the wheel below that blues and greens are at opposite sides from reds and oranges.
One of my past art teachers injected a new phrase into my vocabulary: "Satisfy the complement."
By that point I had already learned the basics of the color wheel, but this teacher's comment underlined for me the fact that, in this usage, "complementary" means completion.
A viewer of artwork wants, consciously or subconsciously, to see "color completion" in an artwork. The eye is satisfied when it sees color wheel opposites combined in one artwork.
This is the reason you often see, in the work of an experienced artist, both a dominant color that comes from one side of the color wheel as well as a minimalized color that comes from the opposite side or near-opposite side. For example, a successful blue and/or green-dominant painting will contain at least a minimal amount of something within the range of reddish orange.
This minimal color is also called a "spice color" because it adds a visual zing that enhances the dominant color. The "spice" satisfies the viewer's need to see a "completion" within the color wheel.
"What about analogous color ranges?" you may wonder. I'm saving that topic for a future post!
My post for today trots out several stencil-made prints on assorted backgrounds, including foreign newspapers. But the first set of prints were created on plain white papers that were sturdy and glossy.
To launch today's project, I placed a group of stencils atop the white papers and used spray paint to make the first color applications. This base coat of paint was in the red-orange family on some of the papers and in the green-blue family on other papers.
I lifted the stencils after those first prints had dried, then sprayed the papers with top layers of paint, always choosing the color family opposite the base layers of painted color: Papers that had been dominated by reds and oranges (hot colors) were sprayed with blues and greens (cool colors.) Likewise, papers that'd been dominated by greens and blues in their first coating now received reds and oranges as their second layer of color.
I chose two types of spray paint: readymade watercolor sprays -- which are translucent -- and sprays that I've mixed myself, mixing opaque liquid acrylic paint with a little water and a tiny amount of airbrush medium. I keep these mixtures in mister bottles that emit a spray in droplets of varying size.
 |
| Above: Mister bottles filled with my customized color blends |
So, besides being different in color temperatures, the printed papers gained additional complexity thru the use of opaque paints sprayed over translucent paints.
And some of the watercolor sprays were gold metallic, to add bling.
Here are the sprayed papers --
And here are two of those prints (having been trimmed into heart shapes) decorating giftbags.....
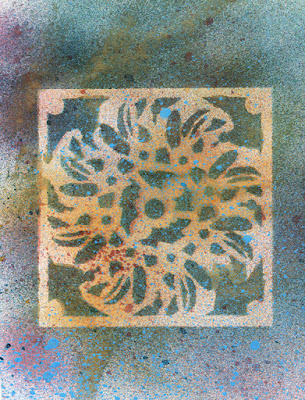
Now I'll trot out a different selection of simple examples showing complementary colors as they work together. The print below was made with my Marbles 9 L156 stencil. (This stencil measures 9" x 12" but its design also comes in a 6" x 6" size -- Marbles 6 s080.)
Having coated the background with orange translucent acrylic paint, I gave it time to dry, then added a complementary color thru the stencil, using a sponge brayer and high-viscosity aqua acrylic paint-mixture.
 |
| Above: Since I didn't have high-viscosity (heavy-body) aqua paint on hand, I mixed soft-body paint with extra-heavy acrylic medium gel, before loading the brayer with paint. |
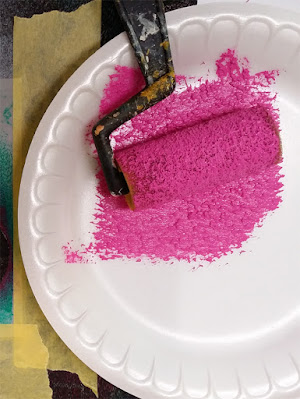
The sample-photo below shows a sponge brayer being loaded with paint ....
Below: This sample-photo shows a paint-loaded brayer being rolled over my 6" x 6" Sassy Spray -- which has been secured with masking tape to a sheet of blue paper.
Moving ahead, I coated newsprint with an aqua and beige mixture; after that dried, I used a sponge brayer to add orange acrylic paint thru two borders from my Swatton Borders # 2 stencil L221. (I had previously cut this 9" x 12" stencil into three strips. It's not necessary to cut any of my three Borders series stencils into strips before use, but I find them easier to use this way.) Altho the aqua-beige background is subtle, it remains in the blue/green color family, whereas the print has been made with a complement color, orange.
 |
| Above: I used translucent acrylic paint in the basecoat, allowing some of the background print to remain visible, thus creating a layered look. Enriching part of this background is an earlier print I'd made with 9" x 12" Two Vases L232 -- using blue acrylic paint. |
Returning to an my earlier combination of strong complementary colors, I made two orange-background prints with bright aqua foregrounds. The print below was made with two of my Trivet series stencils -- left: Trivet B s167 stencil; right: Trivet C s168. Each of these stencils measures 6" x 6" and is part of a 4-piece series that includes one 9" x 12" stencil (Trivet 9 A L202.)
 |
| Above: Trivet B s167, on the left, always reminds me of a turning wheel. Trivet C s168, on the right, makes me think of razor blades! I didn't design either of them with these images in mind. It just happened on its own. |
 |
| Above: This print was made with one of the three borders included in the 9" x 12" Swatton Borders # 3 L222 stencil. |
Today's next art sample stops using complementary colors, instead limiting itself to two colors nearly on the same side of the color wheel. Complementary colors aren't the only way to create contrast that heightens interest. Adding a bright white (a light value) to two dark values brings out an eye-catching contrast.....
Today's next-to-final art-sample:
 |
| Above: Once more, complementary colors are at play -- a blue-green background helps to emphasize the foreground print of orange. |
Too late, I realized that I should have added more solid aqua to the background of this piece, before printing it with an orange paint-loaded sponge brayer and my 9" x 12" stencil Two Vases L232.
But there's always a next time!
Here's a much better example--
 |
| Used: 9" x 12" stencil Two Vases L232 and 6" x 6" Tiger Lily s524. Notice the way dark green brings out the best of the yellow and orange background. |
Mentioned in today's post:
To scroll thru the pages of my StencilGirl stencils and masks, please start here.
I thank you kindly for visiting my blog today. If you wish to subscribe, please leave a Comment below this post, giving your email address. I will not publish the email or sell it. It will be used only for subscription to this blog.


No comments:
Post a Comment