
When you start using Brusho color crystals, you quickly discover that each color contains "hidden surprise" colors; these become visible when activated by water or other liquid. The best way to introduce water, in my opinion, is by using a spray bottle ... a spray bottle that's gentle in its output.
"Less is more!" Just a few sprinkles of Brusho and just a few sprays of water go a long way. Don't be like me and try to overuse these art-making tools!
Brusho bottles are color-labeled on the front of each, but for quicker and easier viewing in the Brusho box, I've written the color name of each bottle on its lid. And I've added notes about each of those colors, as shown in my photo below.
 |
| Notice the small brush at the bottom of this photo. |
My method for applying Brusho crystals is to dip a small DRY brush into a color, hold the brush over my substrate, and hit the brush's handle with my free hand. This scatters the dry crystals down onto the substrate. Your substrate can be mixed-media paper, watercolor paper, stretched canvas, Yupo or any other surface sturdy enough to support water without warping.
In some of today's art samples I've used Brusho crayons....
 |
| Above: the new kelp design measuring 4" x 4" (M339) with Brusho crayons. |
Brusho crayons are simply plain clear wax crayons. Any brand of clear wax crayon will do. You can even use the bottom of a thin white candle. (Without flame! LOL)
I've learned there's a Brusho Basics book, which sounds much more comprehensive than the other two Brusho how-to books that exist (altho its description leads me to think that it covers a lot of territory that won't ever interest me.) Last time I checked, interestingly, the book cost $ 31 - 50 at Amazon, for used copies; $46 - 48 at Amazon, for new; and isn't available at all at Thrift Books, where there's a request waiting list. The Brusho manufacturer itself (in the UK) sells the book very cheaply -- but by the time shipping is added, the cost runs around 25 USD.
Amazon is one of several online places where you can order individual colors of Brusho crystals. You'll find as you continue to use your starter set that you will run out of some colors faster than others.
Sometimes I spray the substrate with water before adding crystals; sometimes, afterward; sometimes both. Other times, I use a paintbrush dipped in clear water to spread the colors of the crystals that are already hydrated on the surface of the substrate.
I often use Brusho crystals alone -- but they pair well with regular watercolors, "metallic" watercolors and Golden High Flow Acrylics. I don't recommend acrylic inks. But that's a matter of personal preference, so be open-minded and have an attitude that you'll try anything at least once!
 |
| Above: the new kelp-inspired design that measures 6" x 6" (s955) is rested on a sheet of all-media paper. Atop it, I first sprinkled some Brusho crystals. Next, I added a little yellow Golden High Flow Acrylic. Last step: A light spray of water across the paper. |

When the acrylic paint had dried partway, I lifted off the mask to see the above results. There is danger in leaving a mask or stencil sitting too long in wet acrylic paint, since acrylics naturally act as adhesives.
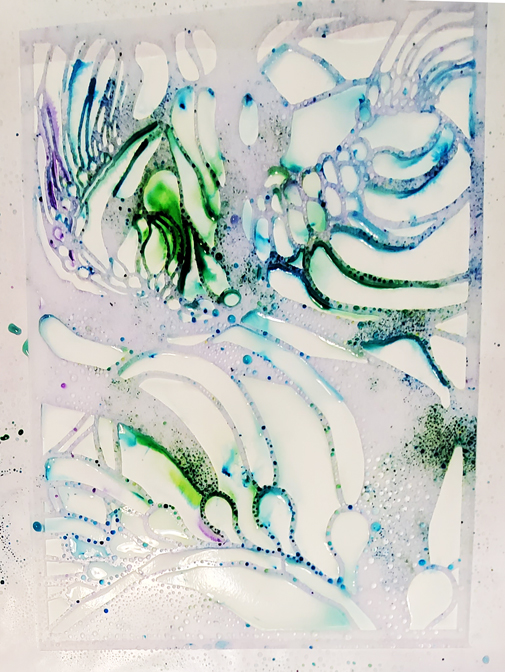
Below: A sequence of photos shows the same approach using 9" x 12" Kelp Forest L963.
 |
| Above: My first step was using the Brusho clear wax crayon to outline some of the shapes that make up the overall design. (If you lose track of where you've used the wax crayon, just test the open areas on the mask or stencil design with your fingertips. Or shine your smartphone's light across the surface) |
 |
| Above: I've scattered on a few Brusho crystals and lightly sprayed the whole surface with water. It may not look like much yet, but a slight scattering of these crystals goes a long way once enough water arrives! See below... |

Above: I've sprinkled on a few more Brusho crystals and again sprayed the whole surface with water.
Below: This is what resulted from those additional crystals and spray of water. The mask has not yet been lifted off the paper.

Before lifting off the mask, I placed printmaking paper over the wet surface shown above. I pressed the paper with both hands to make sure its entire surface touched the whole surface under it, making sure to avoid sideways movement that might dislodge the mask (which was still resting in its original place atop the paper.)

Above: I carefully lifted off the printmaking paper to reveal this monoprint.
As a last step, I lifted off the mask. Below is the print that was created as my next-to-last step in making the monoprint.

Originally I had planned for the print, above, to be the star of the show, but once I'd made the monoprint, I liked it even more.
My newly released designs are 9" x 12" Kelp Forest L963, 6" x 6" Bulbs and Banners s955 and 4" x 4" Seabed Greens M339.
.jpg)
No comments:
Post a Comment