Friday, January 10, 2020

Celebrating Trees!


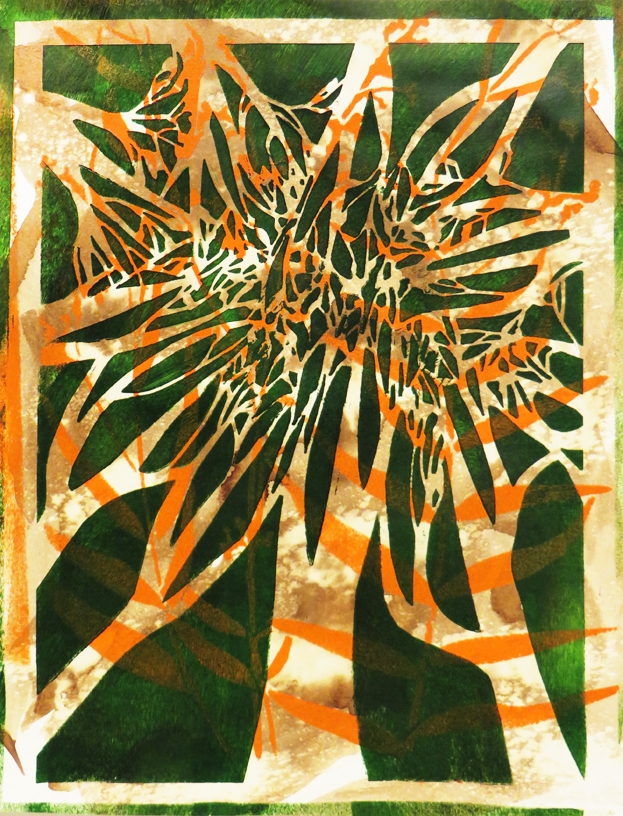
I'm a tree-hugger!  Don't believe that?  Just scroll thru the pages of my StencilGirl stencils and masks, here, to count the designs that are trees or parts of trees.

The first image below is a print I made on the page of an old encyclopedia -- a page that already contained botanical illustrations including a tree.  The mask I used to make this green print was my 6" x 6" Garden at Nemours.  The original inspiration were lush plants in the gardens at historic Nemours Mansion, near Kennett Square, PA.... 


...........But recently I discovered that the same design can be viewed as tropical trees, as shown in the next two images below.  Both were made with my 6" x 6" Garden at Nemourand my 6" x 6" Pair o' Parrots.


The next two images below were printed with my 6" x 6" stencil Mimosa 6 --


In the image directly above, the 6" x 6" stencil Mimosa 6  was used twice, side by side, creating a continuous pattern.  


The background in the image above was printed with my new 9" x 12" mask Looking Up Through Trees.  Atop that print, I glued part of another 9" x 12" mask, Garden Montage -- after that mask had been paint-stained during a previous project. 


I used the same approach in developing the image below.  First I created a background with acrylic paints and Looking Up Through Trees.   After that dried, I came back with pink acrylic paint and my 6" x 6" stencil Swaying Grasses.  Next came my 6" x 6" stencil Mikki's Flowers, which I used on the left with green acrylic paint; and on the right, purple.  You can click on the image below to enlarge it and better see details.


I did likewise in making the image below, starting with acrylic paint and Looking Up Through Trees.   Once that paint had dried, I came back with blue acrylic paint and my 6" x 6" stencil Mikki's Flowers, which I used with purple-blue acrylic paint.  You can click on the image below to enlarge it and better see details.


For the image directly above, I again started with acrylic paint and Looking Up Through Trees.   Later, I returned to add flower prints with purple-blue paint and (on the left) my 6" x 6" stencil Mikki's Flowerson the right, I used the same paint with another 6" x 6" stencil, Swatton Flowers Version 1.  My last step was to use pink acrylic paint with both these 6" x 6" stencils, this time reversing them, using  
Swatton Flowers Version 1 on the left and Mikki's Flowers on the right.


I began the image below with acrylic paints and Looking Up Through Trees.  Next, I created a middle layer -- on the lower left, I used my 6" x 6" Garden at Nemourmask with purple-blue acrylic paint.  In the lower right, I used the same paint with Swaying Grasses.  For my top layer, I used Swatton Flowers Version 1 on the left and Mikki's Flowers on the right.


Thanks for coming to visit here today!  To scroll thru the pages of my StencilGirl stencils and masks, please start here.

Tuesday, January 7, 2020

Scraps Created with Stencil-Prints--and How to Use Them


Scraps!  Often I like to explore by cutting stencil-prints into pieces, creating a pile of scraps, then putting them together in new ways.

I've posted on this here.  And here.  And here.  And here.  Directly below, I'm showing just one example from those earlier posts:


Well, it's happened again!  In my post of January 4, I showed a couple of assemblage sheets created with scraps cut from prints made with Looking Up Through Trees.

Here are a couple additional of these assemblages --


And I've explored more design combinations, using either these or similar sheets that've piled up, over time....


The houses idea, shown directly above, isn't original with me.  I once saw a similar example somewhere else, and decided it would be fun to try it myself.  It's mostly a matter of cutting assemblage sheets into squares and triangles, then assembling them.  I used a couple of different permanent markers to draw in doors and windows.  Before gluing them down, I provided a partial background in a neutral color.  My goal with the background was to give unity to the overall composition. 

I've asked myself,  "Why stop with just stencil-print scraps?  Why can't stencil-print scraps be combined with other scraps?"

It worked!

In the collage shown directly below, I made a background with a piece of a stencil-print created with 9" x 12" Facets.


And in the collage directly above, the red-grey scrap on the far left was cut from a print made with 9" x 12" Twinship.  

Thanks for coming here today!

To scroll thru the pages of my StencilGirl stencils and masks, please start here.

Saturday, January 4, 2020

Wild and Crazy!


In the old days, when I took photography classes with a camera that -- gasp! -- used film, one topic of study was depth of field.  An exercise
 under that topic was to take photos showing foregrounds mostly in focus, middle grounds fully in focus, and backgrounds in hazy focus.  
  

I decided to play around with this idea using one of several collages that I'd assembled by piecing together cut -outs from prints made with my 9" x 12" stencil Looking Up Through Trees.


9" x 12" stencil Looking Up Through Trees


First, one of those collages:


Now, two of my depth-of-field shots (taken with my digital camera):


Taking depth-of-field photos of artwork is easy.  Just place the art on its back on a flat surface.  Then bend low with your camera/smartphone; sometimes you may even want to prop it up on the same surface as the art.  Tilt the camera/smartphone -- so you're shooting from an angle.  And click!  All there is to it!

I could have gone on all day taking those shots, but I wanted to get back to making stencil-prints....


A lot of my prints have been cropped, as shown in many of the above photos, so I can use the top halves as abstract pieces to further cut up, then use in large collages.  Looking at the top of each print, by itself, you'd never know what's being represented.  And that's what I love about abstraction.  Mystery!

Thanks for visiting here today!  To scroll thru the pages of my StencilGirl stencils and masks, please start here.

Wednesday, January 1, 2020

New Year Trees


Happy New Year!

Most trees are bare of leaves right now, but we can use our imaginations (and a stencil) to look ahead to the time when once again we can stand under a canopy of tree branches, their branches intertwined and sprouting clusters of new leaves.


Looking Up Through Trees


I have fun showing off the amazing differences between prints -- achieved just by introducing the stencil to widely varied backgrounds.


The background for the above print was a page from a magazine previously swiped with some leftover acrylic paints.  Below are two close-ups to show in detail the effects achieved when a wild background plays its part, ramping up the drama.


Next in today's post:  more of the same.  This time, the background is a print made with another of my 9" x 12" stencils, Longwood Florals.


Full-size view


Close-up detail

Full-size view

Close-up detail


Below:  today's next-to-last art sample, another close-up detailed piece, cut from a full-size print and collaged onto the face of a greeting card.  Under the card is its envelope, decorated across the front bottom with a strip of colors cut from the same full-sized print.  Self-adhesive store-bought butterflies are flickering thru this fantasy forest!


Below:  another greeting card.  Feel free to click on it to get a close-up and better see the details in its background.


Thank you for taking time to stop here today!  To scroll thru the pages of my StencilGirl stencils and masks, please start here.

Monday, December 30, 2019

PRESSED LEAVES


I was happy to see one of my stencils, 6" x 6" Pressed Leaves, used here today; MaryBeth Shaw chose it, along with other StencilGirl stencils, for developing that impressive, multi-layered art journal page.  


6" x 6" Pressed Leaves

Happy New Year!  

Wednesday, December 18, 2019

Christmas Decorations made with Stencils


Altho Christmas greeting cards are the thrust of today's post, I need to add that these ideas also work as ways to decorate giftbags and to create gift-tags.

The first 3 cards below were made with the same cardstock that I described in my Dec. 15 post -- it's a sturdy cardstock with tiny embedded particles (perhaps ground mica) that reflect light, making a jazzy frame for any decoration to be added.

I buy most of my greeting card blanks from JamPaper.com.  This one measures just under 6"x 6"... and perfectly fits my  6"x 6" stencil.  And its corresponding envelope is exactly 6" x 6", which means there is a surcharge for mailing it.  I handle this problem by using two regular postal stamps.

Sturdy cardstock is important when the greeting card cover has to easily support coarse modeling paste mixed with silver metallic powder -- which is what I used in today's first 2 cards:


The card above was made with my 6"x 6" stencil BUDDING BRANCHES.


The above Christmas card was made with my 6"x 6" stencil Swaying Grasses.


The above card was made with part of my 9" x 12" stencil Queen Anne's Lace.


I created today's top 2 cards using an art spatula to spread coarse modeling paste (mixed with silver mica powder) thru the stencil openings.  After the paste dried, I added highlights with glitter glue.

My approach to the third card, made with a portion of Queen Anne's Lacewas to spray acrylic paint thru the stencil openings.  Since this stencil measures 9"x 12", I masked off portions of the stencil to keep them from showing.  The same finishing touch was used on this third Christmas card, altho you may have to click on the image to enlarge it, to better see the glitter glue.

Acrylic spray paint is available on store shelves, but I make my own, so I can mix custom colors.  (See the photo below.)  I buy spray bottles at drug stores (in the traveling supplies section); then I fill them with a mix of acrylic liquid paint, water and airbrush medium.  The ratio of water to acrylic liquid paint varies, depending on whether I want to end up with a heavy spray or a light one.  The amount of airbrush medium never varies -- it's always just a few drops per spray bottle.  I clean the spray nozzles after each use.  But if they clog between uses, anyway, then I use rubbing alcohol to clear them.


Because the dark bronze metallic cardstock is just that -- very dark -- I sometimes line the insides of the cards with lightweight papers, cut to fit.  


What the inside of my cards looks like, after the light paper is added.


At times, I skip that step and, instead, use white markers or pens to fill out the inside of these greeting cards.

Today's last Christmas card was made with my 4"x 4" Fern Fronds Silhouette Mini Stencil:


I made this final card by spreading heavy-body metallic silver acrylic paint across the stencil, on a substrate of dark blue paper.  Once the paint dried, I cut out the image with decorative Friskar scissors.  After gluing this to a white greeting card blank with an extra-strong gluestick, I outlined it with glitter glue.  I also used glitter on the red center of the candle's flame.  

Thanks for stopping by today!  To scroll thru the pages of my stencils and masks at StencilGirlProducts.com, please start here.

Monday, December 9, 2019

More Christmas Cards


Today's post starts with this Christmas card -- 


The above Christmas card was created with Winter Berries Mask; I used it both in creating the background as well as decorating the textured foil rectabngle that forms the pillar candle.

Winter Berries Mask itself looks like this --


The next card in today's post took more time to develop.

First, I gathered prints I'd made with two 6" x 6" stencils --  Marbles 6 stencil and Sprigs.

Secondly, copying an idea from a commercial greeting card, I drew three Magi on scrap paper.

My third step was to cut out each of the scrap paper figures.  One at a time, I used these as patterns -- I placed them over the stencil-prints and traced around their edges with colored pencils that matched the colors that had been used in printing them.  (Matching colors make the tracing lines look less obvious.)

Next, I used fine-detail scissors to cut out the shapes of the Magi from the stencil-prints.

I glued them to the cover of a greeting card blank to make the card below --


The far-left and far-right Magi were cut from prints made with 6" x 6" stencil Sprigs --


And the center Magi was cut from a print made using 6" x 6" Marbles 6 stencil...


The star was a freehand cut-out.  Or you can join StencilClub and buy the star-themed 3-part stencil set by Mary C. Nasser, which came out August 2017.

Thanks for visiting here today!  To scroll thru the pages of my StencilGirl stencils, please start here.

To follow this blog by email, please use that option in the upper right sidebar.

Wednesday, December 4, 2019

More Giftbags


Today's first art sample is a giftbag decorated with a print on red foil cardstock, made with silver metallic acrylic paint and my 4" x 4" stencil Fern Fronds Silhouette Stencil Mini.


After using my Pioneer brand Embellishment Gluestick to add this cut-out to the white giftbag, I added a flourish using Rangers Industries' glitter glue.  Below is an enlargement showing part of the flourish.


Altho it's not visible in the next two photos below, I used the same glitter glue to add similar flourish lines around the trees--


The giftbag above features cut-outs from prints made with my 6" x 6" stencil Sprigs* and (the bottom layer of the tree) Sassy Spray*, another 6" x 6" stencil.  And the glue glitter embellished giftbag below features a cut-out from a print I made on gold and white marbled paper, using my 6" x 6" stencil Mimosa 6and I like to think this pattern makes a good Christmas tree!


Above:  another giftbag decorated with a print made with silver metallic acrylic paint and my 4" x 4" stencil Fern Fronds Silhouette Stencil Mini.

*In their entirety, Sprigs and Sassy Spray look like this:


Sprigs
Sassy Spray


Thanks for stopping here today!  To scroll thru the pages of my StencilGirl stencils and masks, please start here.