Friday, April 28, 2023

Back Story on Kelp (and More!)

Each of my three new mask designs is based on kelp formations -- yet, each is unique; they are:  

9" x 12" Kelp Forest L963...

6" x 6" Bulbs and Banners s955 ...

and 4" x 4" Seabed Greens M339. 


Back story:  Walking the beach at Cali’s Carmel-by-the-Sea, I found masses of Giant String Kelp (also called Bulb Kelp) abandoned on sand after tides had swept it ashore.  


Above: Taken onshore, this particular photo doesn't show large bulbs, but it does show a few small brown ones, tangled in with the greenery that inspired the part of my design elements that I call streamers.  The textured growths inspired my 6X6 Seaweed 6 Stencil s099.


Bulb kelp is a form of algae capable of photosynthesis.  

Making art with these 3 new releases, I didn't limit myself to Pacific greens and blues; instead, I opted to see these as abstract designs -- so my inner child could emerge to play with any colors!

In playing with these new designs, I've used Brusho watercolor dry pigment crystals, Brusho wax crayons and heavy-body acrylic paints.

Today's post starts with demo photos that focus on my favorite way to use those acrylics.

about my brayer technique:


Above, I've squeezed out some heavy-body acrylic -- in this case, using two colors -- and I've started to load the sponge brayer with paint by rolling it downward multiple times over palette paper.  ("Sponge" brayers are also called "foam" brayers, sold as art supplies for children.)


Below, I have started rolling the loaded brayer over a stencil that's secured to paper with masking tape.


In the two examples above, I've combined two colors -- since pairing colors adds fun to any brayering project with masks and stencils!

Using either a foam (sponge) brayer as I do, or a Gelli Plate, you can get similar results.  I encourage trying both methods!

In the following photos, I'll show some of my results from using my sponge brayers. 

An upcoming post will go deeper into the two-color approach, hinted at above.  

Today's art samples, however, were created using only one top-layer color.  You'll see that altho I've limited myself to using only one color, I've done it as a last step in developing complex images that have visual history.  I've used a single color but other colors peak out from under it.....


Above:  As a top layer, I've used opaque pink heavy-body acrylic paint and 9" x 12" L963 Kelp Forest.  Directly underneath lies a middle layer, made with the same mask, but using translucent red-orange acrylic.  And the bottom layer, still faintly visible thru the top two coats of paint, is a print I'd made with green acrylics and 9" x 12" Boxed Vines L247.

I chose this print for a base since, to my eye, my "boxed vines" design blends in a friendly way with the imagery in my three new releases -- thanks to the flowing curves that dominate, and the circular shapes that are tucked in among those flowing curves.

Because I like this design-blend, I continued to use "boxed vine" prints as my substrate for making 4 more prints.


Thank you for your visit today! For the coming week or so, I'll make daily posts suggesting ideas for using my three brand-new designs.  Coming up ... Brusho colorless wax crayons ... "melting" color crayons ... a whole new way to use stencil- or mask-prints in collage ... and more.  I hope that my art samples will send you off on your own art-making adventures. 

To subscribe to this blog please send your request and your email address to stencilfun@yahoo.com, and you'll be added to the subscription list.

To scroll thru the pages of my masks and stencils at StencilGirlProducts.com, please start here.


Thursday, April 27, 2023

Release of 3 New Designs Today!

Today's post introduces my three new designs!


9" x 12" Kelp Forest L963.


In this 9” x 12” design, Giant String Kelp (aka Bulb Kelp) swirls underwater offering 3 views that start with a close-up of bulbs and streamers flowing from them.  In another area, bulbs and streamers float in the distance.  A third area captures more bulbs and streamers riding the current, farther away still. Kelp “forests,” during growing season, can shoot up 2 feet per day, to reach 250 feet of height!   


This 6” x 6” design frames a strand of Bulb Kelp (aka Giant String Kelp) as it bobs under ocean waves. Emerging from the bulbs are textured green ribbons that ripple like banners riding on the wind.  Here, those banners are still pointing downward (mostly visible on the lower right), but this stalk of kelp will soon shoot vertically up toward sunlight that shimmers on the water's surface. 


4" x 4" Seabed Greens M339.


Giant String Kelp (aka Bulb Kelp) anchors to a rocky seabed and sends green cables ("strings" is a misnomer) up to the water’s surface.  This form of algae is so sturdy that sea otters wrap themselves in its green cables to avoid floating away while asleep.  Measuring 4” x 4“, M339 is the right size for artsy fun on a business trip or vacation.

I'll be making daily posts for the next 7 days or so, showing my art-making adventures with these new masks.

Have you ever tried Brusho watercolor crystals?

 My Brusho crystals have been around a long time. But it's only recently that I've used these watercolor dry pigments with Golden High Flows.  

I'm delighted with what happens when these two media work together on my 3 brand-new releases!  You will be, too, if you like the "loose, painterly" look....


Above:  A print made with Kelp Forest L963, using Brusho crystals and Golden High Flow acrylics on Yupo, a synthetic substrate with a smooth surface -- you might even call it a slippery surface.  (You'll see it called "paper" but a more accurate description would be "plastic.")

My personal preference is to use these media on Yupo or some other smooth surface, as shown above.  But I love experimenting, so I tried this approach on textured watercolor paper, just to see what might happen ...


In contrast with my print on Yupo, the example above (made with only a part of Kelp Forest L963 ) flaunts brighter, more intense color.  

But, setting that aside, notice the subtle difference created by the texture itself.  These subtle differences between substrate textures can work toward developing more variety in your range of artworks.

Experimenting helps all of us grow as artists.  So let your imagination take every leap! 

 I hope you'll stick with me as I make daily posts, for a week or so, while I play with my three new releases.  I'll go into more detail about using Brusho (and Brusho clear wax crayons) with step-by-step demo photos and write-ups.  I'll do likewise with my playtimes using heavy-body acrylic paints .... and "melting" color crayons ... and trying a whole new approach to collage using stencil- or mask-prints.

To subscribe to my blog, please email your request, with your email address, to stencilfun@yahoo.com.  I'll add your email to my mailing list.  (Please be assured that I don't sell email addresses!)

Thank you for stopping by today! To scroll thru the pages of my masks and stencils at StencilGirlProducts.com, please start here.


Wednesday, April 26, 2023

Tomorrow! 3 New Designs! Kelp Goes Wild with Color!

 A design is a design, no matter its origin.  Altho tomorrow's 3 new releases were inspired by kelp formations, I use them with all colors -- not just blue and green.

 I suggest you try anything and everything!  Don't worry about "outcome!"  Perfection would be boring if it were attainable!  Besides, if you don't like your first print -- or second or third -- you can always print or collage over it.  Everything is a learning experience and nothing is wasted.  The overall goal is to have fun!  When you're having fun, you automatically create your best art.


Above:  The new kelp-inspired 6" x 6" design (cut free from its outer square frame) was used on the far left; 2 scissor-customized parts of the new 9" x 12" design have been likewise cut free and added in the center and on the right, forming one image that to my eye flows across the page with a visual "action" like the rolling along of tumbleweeds.  Step-by-step photos showing this piece, start-to-finish, will be posted here in one of the 7 or so daily posts to follow tomorrow's release.


Above: The new 9" x 12" kelp-inspired design has been used with opaque green-white acrylics over a background I'd created on foil giftwrap paper using 9" x 12" Boxed Vines L247. (The blue dots are collage.)


Above:  The new 4" x 4" kelp-based design has been scissor-altered (removed from its square outer frame), then used to make a trail of prints across an earlier print.  The opaque red acrylic covers most of the background but lets glimpses of it peek through.  To my eye, this kind of subtle complexity enriches any art.


Above:  The new kelp-inspired 6" x 6" design (cut free from its outer square frame) was used with light blue opaque acrylic paint on paper previously printed with one of my four Abstract Composition Backbones Masks.  After that blue print had dried, I cut it out and used it as a collage element on marbled paper I'd purchased.  The colors go well together as a happy accident!

Tomorrow all three of the new kelp-inspired designs will be released. They will show up here, with links to take you to their page at StencilGirlProducts.com.

On this blog, I'll be posting daily ideas for ways to use these new releases. Daily posts will last for a week and several more days beyond.

Sunday, April 23, 2023

April 27 will bring 3 Brand-New Releases

On April 27, three new designs of mine will be released at StencilGirlProducts.com.  They form a set that comes in 4" x 4" and 6" x 6" and 9" x 12", but each design is unique and is each is available for separate purchase.  All of the designs are based on formations of Giant String Kelp (one type of seaweed found in the Pacific northeast and elsewhere in the globe.)

Here are a few sample pieces that will be talked about in posts that will start here, April 27. Daily posts will continue for a week or so.


 Stencils = a quick, easy and fun way to make art!

I hope these peeks into the near future will inspire you for making art of your own!  

To scroll thru my stencils and masks at StencilGirlProducts.com, please start here.  

Thursday, April 20, 2023

COMING -- 3 new Designs to be Released April 27!

 I knew a little about Giant String Kelp before I got the idea to create this set of 3 brand-new designs, but I made it my business to learn more before fully developing the designs and then writing about this type of algae (it's a family of seaweed found in the Pacific northeast and elsewhere in the globe.)  Why did I become interested in kelp in the first place?  Sea otters!  These otters wrap themselves in the tops of these "strings" to avoid floating away while asleep.  Yep, they fall asleep while riding the rise and fall of ocean waters.  

Sea otters aren't in my new designs -- but this kind of kelp is!  Here are a few glimpses of art samples that I'll be posting daily, for a week or so, starting on the April 27 release date. 


May these glimpses ahead give you a few ideas for making art of your own! 

Stencils = a quick, easy and fun way to make art!

 To scroll thru my stencils and masks at StencilGirlProducts.com, please start here.  

Monday, April 17, 2023

Business Envelope Sized Greeting Cards

 The April 2023 Party Call exchange of stencil-printed art is now underway in the StencilGirl StencilClub.  This exchange provided a fun challenge for me, since I'd never designed greeting cards of a size and shape to fit into business-sized envelopes.  Linda Edkins Wyatt, a fellow designer at StencilGirlProducts.com, is the brave and energetic soul who's leading the exchange, and  business-sized greeting cards are her brainchild.

A fellow member of StencilGirl StencilClub has Messaged me and in so doing, prompted me to add to this earlier post.  

It's rare to find greeting cards shaped to fit business-sized envelopes.  So the idea might throw some people.  

One approach I suggest is making a template for the project.  First, fold a sheet of copy paper in half.  Place it under a business-sized envelope.  Trace around the envelope to reveal the parts of the paper that need to be cut off, since those areas wouldn't fit into an envelope of this size and shape.  Cutting off those areas leaves you with a template of copy paper; just unfold the copy paper and place it atop the background paper for the greeting card.  Trace around the copy paper; then cut that out. Voila! You now have a perfect-sized background, ready to be decorated into a greeting card.

Of course, some people will just take measurements and work from them in getting the right size for the background paper.  I dislike doing that myself because I never get measurements exactly right.  It would help if I would buy a better quality T-square!

I'll be exchanging with only one other StencilClub member, but once I got going, I liked the challenge so much that I made three of these greeting cards....


The print on the greeting card above was made using 6" x 6" Ferns Stencil s100.   This stencil itself looks like this:


Below:  Today's second greeting card, also made to fit a business sized envelope, was created as a collage built with pieces of prints made using 9" x 12" Garden Montage L652....


Garden Montage L652 itself looks like this:


Today's last greeting card, sized to fit a business envelope, is below. 


The figure above was cut from paper printed multiple times with stencils and masks including the 4-piece collection Abstract Composition Backbones Masks.  (The background paper on the greeting card is actually a lighter blue altho here it appears nearly black!) 

These masks, shown below, provide guidelines that can serve as scaffolding in developing abstracts with composition that pleases the eye.


6" x 6" Abstract Composition Backbones Mask 1 s864


6" x 6" Abstract Composition Backbones Mask 2 s8655


6" x 6" Abstract Composition Backbones Mask 3 s866


6" x 6" Abstract Composition Backbones Mask 4 s867


I'd decided to use a vertical format in making my greeting cards, but a horizontal format could be even better!

Do you love making greeting cards the way I do?  Have you tried making them long and narrow, to fit into business-sized envelopes?  Challenging ourselves is always a good idea!

Thanks for visiting my blog today!  To scroll thru the pages of my masks and stencils at StencilGirlProducts.com, please start here.

Saturday, March 18, 2023

Other Artists Using My Stencils

Today's post launches with cheerful, color-rich artwork by Claudia Holland, using my 9" x12" Facets L283 --


Moving forward ...

Each of us has indelible memories from the year 2020.  

One of the ways of coping was to record feelings in art journals, using imagery sometimes supported by words. 


One day that year, Linda Edkins Wyatt -- a designer at StencilGirlProducts.com -- recorded her feelings in developing the image above.  Her color scheme is showcased in the bar at the far right.  The stencil used in creating the background was my 9" x 12" Vintage Script L267, which looks like this:


Karen Hale is a professional artist I've tremendously admired  for a good number of years.  She's used a couple of my stencils or masks in her art-making; here is one of those paintings, entitled What Is Hidden:


In the painting above, Karen has used both a checkerboard stencil (source unknown) and my 9" x 12" Prayer Flags L371, which looks like this --


You can check out stencils designed by Linda Edkins Wyatt here.

Karen Hale's artwork can be viewed here, a website that I visit often, when wanting to take a visual joyride!

Thanks for checking out my blog today! To scroll thru the pages of my stencils and masks at StencilGirlProducts.com, please start here.

Sunday, March 12, 2023

Have You Thought of These Ways to Use Stencil Prints?

 In a recent post, I had mentioned that my designer friend Judi Kauffman was really good at using a circle cutter for her “Welcome” sign, but she let me know she’d used dies! She used dies for the word Welcome and her birds as well (but hand-cut the feathers they hold in their beaks). She has quite a collection of shapes ranging from simple ovals, circles, and squares to intricate frames, words, and flowers. She uses an AccuCut GrandeMARK for cutting multiple layers, heavier materials and large shapes, and either her beloved vintage Cuttlebug or a Spellbinders Platinum machine for the wafer dies - one layer at a time.

Thank you, Judi, for this education!  There's still a whole lot I don't understand, but I feel I'm inching my way in the right direction on the topic of die cuts!

Something else Judi's taught me has arrived as answer to a long-asked question of mine: "What are more ways to use stencil prints?"

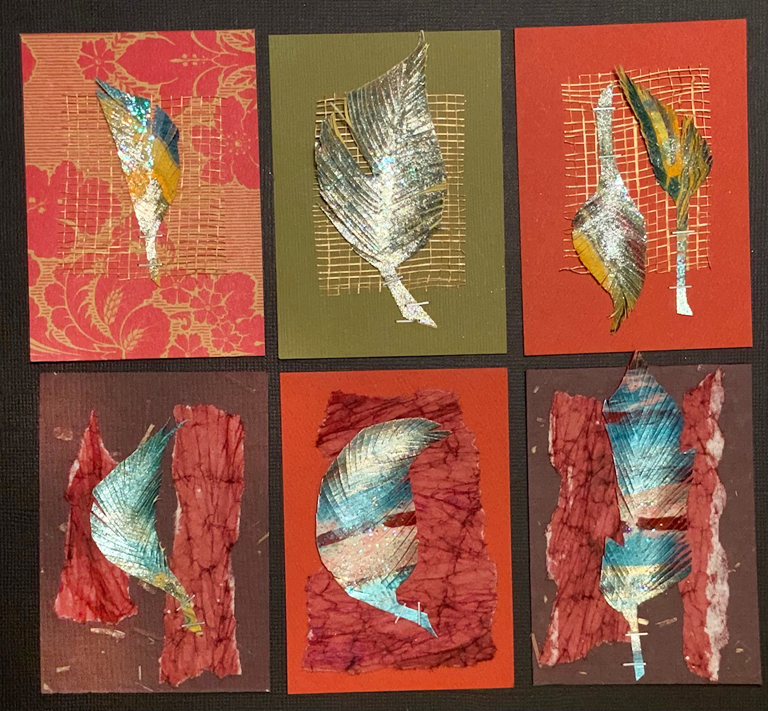
As if reading my mind, Judi shared with me a collection of her artworks made by cutting feather shapes from printed papers, then making cuts all along the edges, leaving central strips to become quills.

Some of Judi's sparkling feathers adorn card fronts and ATCs; others are hanging ornaments; and in the first example below, they glitter inside a 12" x 12" shadowbox frame.


I never would have thought of this way to use stencil-printed papers and I'm delighted not only with what Judi's done but also her precision.

I'll end today's post with yet another way to use stencil prints -- as bookmarks.  The photo below shows a beautiful laminated bookmark that Judi gave me.  In printing, she used aqua and metallic gold paints; in my photo below, the metallic gold appears as yellow --


In making this bookmark, Judi used my 9" x 12" Dangled Pods L490. 


My sincere thanks to Judi and everyone stopping here at my blog today!  To scroll thru the pages of my stencils and masks at StencilGirlProducts.com, please start here.

Monday, March 6, 2023

Unique Idea! Judi Kauffman and Clustered Leaves

My friend Judi Kauffman handed me a wonderful surprise!  She came up with a collection of birds using my 9" x 12" Clustered Leaves L433 with gold metallic acrylic paint -- yes, birds!  Only a clever and creative mind like hers would ever look at Clustered Leaves L433 and say,  "Ah-ha!  Birds!"


Above is 9" x 12" L433 Clustered Leaves ...as I originally viewed the design.  

What Judi did was to give it a 90-degree turn, then turn her imagination loose with that gold metallic acrylic paint on sturdy dark paper.


And here's a close-up:


Notice the feathery cuts on the prize (far left) being flown home by this bird!


Here are two more pieces of Judi's eye candy--


Want to make your own birds and need "eyes" for them?  One place among many to find them is here.

Yes, Judi took me by surprise with her whimsical birds, but, upon sharing these with me, she stirred my memory.  I checked my older file photos to happily find this:


The above hanging ornament was the first artwork by Judi that I had ever shown here.  At that time I hadn't even known who she was.  Judi has mastered the art of cutting "difficult" papers with circle cutters -- a skill that has always eluded me!  Her twin circles came out perfectly.  The red frame is an outstanding way to showcase the inner circle, which Julie cut from a print she made using 9" x 12" L433 Clustered Leaves A welcome message, rubber stamped across the print, is the finishing touch.

Thank you, Judi, for generously sharing your art!  And for showing us how to think outside the box -- so we too can see birds in the clustered leaves!

Thursday, January 5, 2023

Megaphones and other Stencil-Print Goodies

Recently I've been saving empty paper towel rolls and wrapping them in stencil prints -- to make "megaphones" for my one-year-old grandson.  These "megaphones" could also be "telescopes"  but that idea hasn't yet come down the pike.


Here he inspects a megaphone wrapped in a print that was made using 9" x 12" Prayer Flags L371.  This gelatin plate print was gifted to me.


Here he puts his megaphone to use!


Two other megaphones, ready for play:


Left megaphone:  wrapped in a print made with 6" x 6" Dance of the Courting Cranes s394.  Right megaphone:  wrapped in a print made using 6" x 6" Trivet C s168.


Among many other stencils from StencilGirlProducts.com, Karen P. Johnson has used 9" x 12" Prayer Flags L371 and 9" x 12" Vintage Script L267 in this post from StencilGirl Talk Blog. Karen is an artist as well as a fellow stencil designer at StencilGirlProducts.com.

Thanks for stopping by my blog today!  To scroll thru the pages of my stencils and masks at StencilGirlProducts.com, please start here.