
Today brings the unveiling of my brand-new 6" x 6" mask -- Love!

Now picture this:
I once stood tiptoe on the brink of Adventure 101, paint in one hand and my first-ever stencil in the other.
When I took the leap -- daubing paint thru that stencil -- it was as if I'd sprouted wings.
Those wings are called creativity.
One thing I learned early-on was that most stencils and masks work equally well "right-side-up" and "flip-side-up."
Quick example: The two images directly below were created using my 6" x 6" stencil Pair o' Parrots and Garden at Nemours -- both having been used first on one side, then on their flip side.


With time and practice, I learned that this reversal adds impact, variety and rhythm to art-making, especially when I change colors for each print and/or layer prints atop one another.
Okay; most stencils and masks are “double-sided” this way.
But not all.
Masks and stencils like 6” x 6” Love can be used only “right-side-up” – unless I’m working with a Gelli Plate; for that, I place it “flip-side-up” onto the plate, so I’ll get a right-side-up print on paper that I press onto it.
So, Love can’t be reversed. A disadvantage?
No! A challenge.
This challenge, my friends, launches creativity. It can be your wings.
How many ways can you use Love?
How many other stencils and masks can you use alongside this brand-new stencil to expand its possibilities?
How many ways can you use Love?
 |
| Above: Love has been used to make three prints on a chaotic background; each print has a different orientation. The goal is a completely abstract image. |
How many other stencils and masks can you use alongside this brand-new stencil to expand its possibilities?
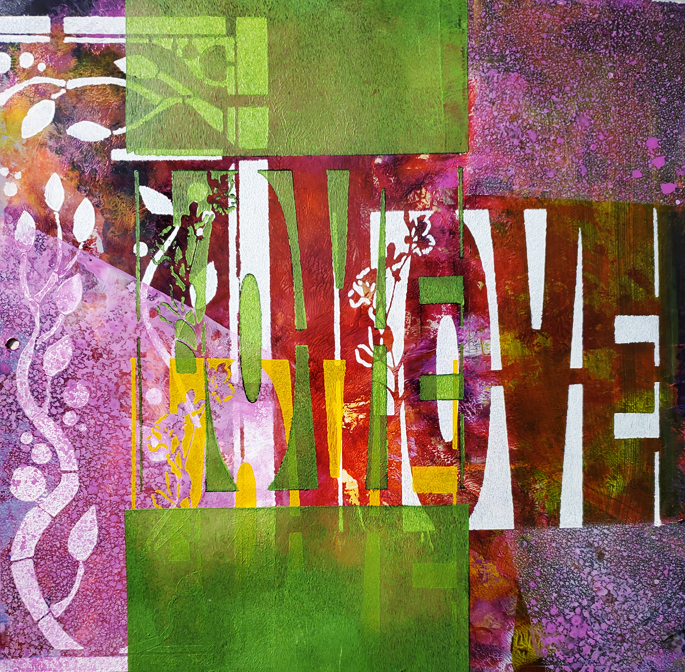 |
| Above: Again, Love has been used to make 3 prints, this time on a background previously printed with part of my 9" x 12" stencil Boxed Vines. The goal, once more, is a completely abstract image. |
 |
| Above: Love has been used with part of my 6" x 6" mask Garden at Nemours. |

You can use Love as a frame to highlight a loved one (human or otherwise); two examples are below:
 |
| Above: the background is a partial page from an old picture calendar. |
 |
| Above: The background is scrapbook paper painted yellow. The frame effect is used differently here, altho the featured image is the same -- a cat. This cat was printed with my 6" x 6" Cats stencil. |
Another creative flight happened for me when I paired Love with another stencil of matching size (6” x 6”), s078 Swatton Flowers Version 1 Stencil.
 |
| Left above: printed using part of s078 Swatton Flowers Version 1 Stencil. Right: printed with 6” x 6” Love. Background was a previously printed scan of a collage I'd made some time ago. |
 |
| Upper left: printed with 6” x 6” Love. Right and bottom: printed using part of s078 Swatton Flowers Version 1 Stencil. Background was a page from an old picture calendar. |
 |
| Center above: printed with 6” x 6” Love. Right and bottom: printed using part of Ivy Frame 9 Stencil (9" x 12"). Upper left: printed with 6" x 6" Ivy Frame 6 Stencil. |
What the above print looked like while still in process --
 |
| 6" x 6" Ivy Frame 6 Stencil has been placed over the now-dry print made with 6” x 6” Love. I carefully used the sponge brayer -- loaded with heavy body acrylic paint -- to press paint thru the openings in Ivy Frame 6 Stencil. A small sponge would have worked better, but I managed okay with the brayer by tilting it. |
Let the wings of creativity take you out for flight!
To scroll thru the pages of my StencilGirl masks and stencils, please start here. To subscribe to my blog by email, please use that option in the upper right sidebar.