Saturday, November 19, 2022

Get Ready for Cyber Monday Sale at StencilGirlProducts.com!


StencilGirlProducts’ only sale of this year starts November 27th. 

That's right! My StencilGirl stencils and masks are going on sale!

Get ready to fill up your cart here !


Above:  A simple collage created with novelty papers for a frame; the framed image was printed with metallic gold heavy-body acrylic paint on glossy black cardstock, using Looking Up Through Trees Small s793.


This design comes in two sizes; here's the other:


The sale will run November 27 - 29.  It's not time yet to place your order, but you can start browsing here !


Get ready to fill up your cart here !

Thursday, November 17, 2022

3D Art for Christmas Mini-Gifts -- Made with Stencils


Please check out the write-up here!  I used this technique to decorate the covers of two small-sized journals that will be Christmas gifts.

Want a sneak-peek before going to that write-up?


Yes, be sure to click here for step-by-step photos and directions in using stencils to make journal covers.  

To scroll through the pages of my stencils and masks at StencilGirlProducts.com, please start here.

Thanks for visiting my blog today!

Sunday, November 13, 2022

Ready to have fun?

Today's post includes both Christmas giftbags and Christmas cards.  And I had fun making them!

First up:  For background I chose a Christmas-themed page from an out-of-date hymnal; after cutting it out with decorative Fiskars, I watercolored it green.

Atop that, I added stencil-printed paper cut into shapes that, once assembled, form a Christmas tree. 


Below:  a close-up of the collage .....


Stencils that I used in printing the paper for forming the tree:


6" x 6" Sprigs s523


and


6" x 6" Trivet A s166


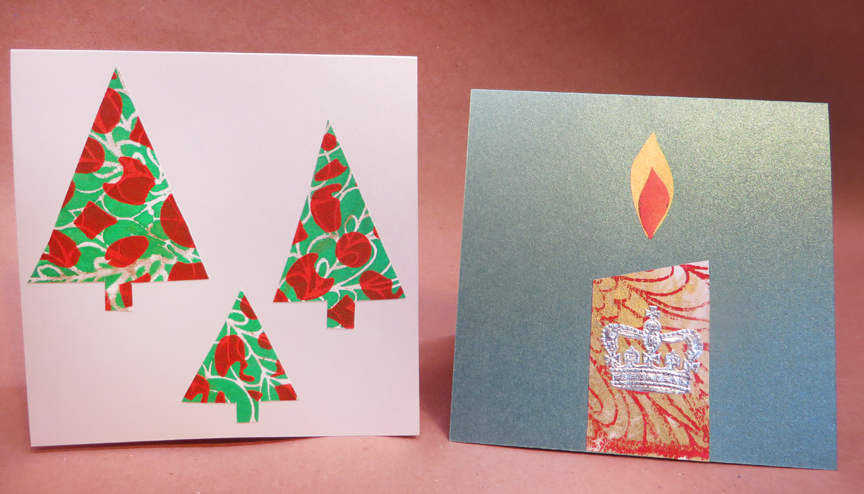
For the following two Christmas cards, I cut my Christmas tree and candle shapes from prints made with the same two stencils shown above.


Close-ups:


At one time I bought my cardstock blanks from JAMPaper.com; most of those had a built-in metallic sheen, like the green card above.  (Now I have to search farther afield to find foldover cardstock blanks for my greeting card projects.)  

The silver crown comes from a collection of similar decorations given to me a long time ago by a dear friend who has since passed away.

Swinging back to giftbags:  I made the candle below by cutting paper printed with my 6" x 6" stencil Mimosa 6 s126--


Mimosa 6 s126


I buy my blank giftbags here.

Today's giftbags are lined with plain white tissue paper, but to have more fun, I suggest printing your tissue paper using stencils -- but be careful to sparingly use heavy-body acrylic paint (plain or "metallic.")  Giftwrap tissue is flimsy, so make your prints as gently as you can!   (If you end up with a few torn scraps, save them for your future collage projects!)    

Thanks for visiting my blog today!  To scroll thru the pages of my stencils and masks at StencilGirlProducts.com, please start here.

Thursday, November 10, 2022

Stencil Prints for Christmas Cards


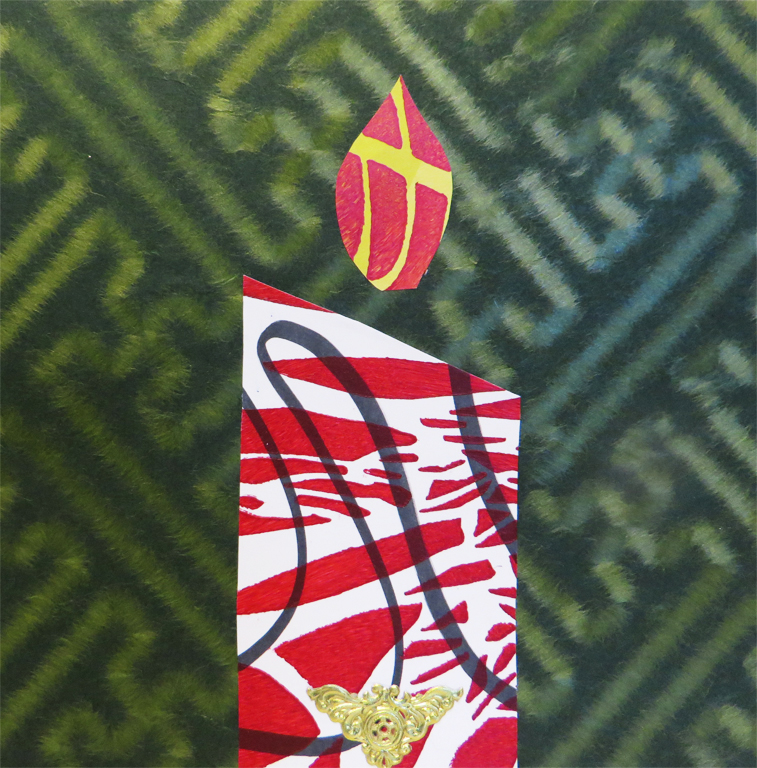
Below:  Looking Up Through Tree Large L753a 9" x 12" mask, is what I used with red acrylic paint to make this print on plain white paper.  After the paint dried, I went over the print with a black marker to create random squiggles.


These dominant colors of red and white put me in a Christmas mood -- so I decided to cut the print into pieces and use parts in collage-cover greeting cards.  Candles are often my Christmas decoration of choice.  (My greeting card blanks come from JAMPaper.com.  The green textured backgrounds [shown below] were cut from novelty papers that I bought years ago at an art supply store.) The candles' flames were cut from another stencil-printed paper (yellow paper stencil-printed with red acrylic paint.)


Next in today's post:  a collage I created for a past online workshop with Jane Davies.  I pulled these collage elements from a stack of papers I'd previously prepared using a couple of my stencils and masks available at StencilGirlProducts.com.  


Above:  In the mid-center-right area, I collaged a piece of deli wrap that I'd imprinted with red acrylic paint using my 6"X 6" stencil Kaleid s085.


In the close-up above (top-center), you can see a piece of paper printed with my 9"X 12" stencil Twinship L268.  Here, I used red acrylic paint on a substrate of black-and-white dot-decorated scrapbook paper.


After finishing this collage, I took a step backward to study my results.  The finished piece wasn't satisfying me!  So I decided to cut out a section and glue it to the face of a 5"X 7" blank greeting card (Strathmore brand). 


Featured in today's post are three masks, all available at StencilGirlProducts.com .  (Note:  Looking Up Through Tree Large L753 is a 9" x 12" version of a design that also comes in a 6" x 6" size:  Looking up Through Trees Small s793.)


6"X 6" Kaleid s085


9"X 12" Twinship L268


Thanks for visiting my blog today!

To scroll thru the pages of my stencils and masks at StencilGirlProducts.com, please start here.

Sunday, November 6, 2022

A Christmas Card with Texture and Dazzle ... Tho These Photos Don't Show it as Well as I'd Like

 Today's post highlights two photos of the same Christmas card cover --


The top photo comes close to showing the luminosity of these winter leaves, created with my 6" x 6" stencil Pressed Leaves and paint that I'll describe below. And, after that paint dried, I outlined the leaves with silvery glitter glue (Ranger Industries.)

The second photo comes closer to showing the metallic dark bronze background as it really is -- this cardstock boasts a beautifully deep color with embedded flakes that give it a delightful luster.

I buy most of my foldover greeting card blanks from JamPaper.com.  The foldover card shown in today's post is no longer available, alas.  I'm glad I bought my supply back when I did!   Today's card measures just under 6"x 6"... and perfectly fits my 6"x 6" stencil.  And its corresponding envelope is exactly 6" x 6", which means there is a surcharge for mailing it.  I handle this problem by using two "forever" postal stamps.

For making the imprint, I stirred up a custom blend of light modeling paste and Schmincke silver metallic powder.  (This powder is to be used with caution.  Working with it, I wear disposable gloves and am very careful to avoid letting the powder get airborne, where it could be breathed.  Wearing a dust mask is recommended.)

After spreading the paint thru the stencil, I immediately set the stencil down into a basin of water, where it waited till I could later lift it out and wipe it clean with paper toweling or an old rag.  I don't clean stencils after using regular acrylic paint with them, but when using a thick, three-dimensional medium with stencils, I want to keep the medium from drying on them.  Dried thick media could easily change the shapes of some stencil openings or block some openings altogether. 

Instead of using this custom mix, I could have instead chosen high-body silver metallic acrylic paint, which is probably easier for artists to find.  But I wanted to experiment.  Customizing is fun!  I encourage everyone to go wild and try new things!  And to comb the Internet searching for cardstock of the "metallic" kind shown here today.

Thank you for visiting my blog today!  To scroll thru the pages of stencils and masks at StencilGirlProducts.com, please start here.

Wednesday, November 2, 2022

Reflections on an Annual Local Art Show and Sale

Since its starting year -- except for the pandemic "time-out" -- I've happily participated in a local art show/sale. 

This particular show has always held a special place in my heart because its proceeds go to a wide range of local charities. 

Despite my history with this show/sale, it wasn't until this year that my eyes opened to something I’d overlooked.  I had worn blinders. 

Being an artist is a state of being; I've always known this to be a big part of my identity; so awards and ribbons haven’t mattered to me.  Outside recognition is nice, of course, but my goal in making art is to dance with the Holy Spirit – He leads and I follow.  For me, nothing else can top this taste of heaven.  Once an artwork is done, I’ve already moved on, mentally.  I’m usually preoccupied with plans for an upcoming art-making adventure, so I appear “spacey” to some people; but so what? 

Believe this or not:  Because I’ve always known I’m an artist, it had never dawned on me that some people make art hungering for outside recognition. They look to the bigger world for validation.  

Over the summer of 2022, I’d participated in an online class of more than a 1,000 participants in English-speaking countries around the world.  That class started to open my eyes; then, participating in this year’s local art show completed the picture for me.

I'd been so busy living inside my own little soul that I had never before glimpsed a wonderful truth --

A very important function of this show ... and probably many other shows/sales ... is that ribbons are hung and award certificates are handed out.  This is priceless encouragement  for people who are drawn to art-making, yet seek outside affirmation.  In giving public recognition to these people, this kind of show chases away the mini-demons of self-doubt.

I applaud that.  


Wednesday, October 26, 2022

SPRIGS -- Two Sizes, 2 Ways

A design I call "sprigs" emerges today from stencil storage -- in two sizes, for two projects. First, the quick one...


Above:  Two papers multi-printed with one of the 9 stencils (and 2 bonus basks) that are included in 9" x 12" ATC Mixup Swatton # 2Both papers are now giftwrap. The red and gray one shimmers with a light topcoat of translucent red metallic paint.  The green and gray paper was a page from an old picture calendar.  The original photo contained a white path that now adds a spark of detail to the finished giftwrap.

Today's second project follows a sequence of steps; it's my take on a technique that I learned from MaryBeth Shaw at StencilGirlProducts.com. 

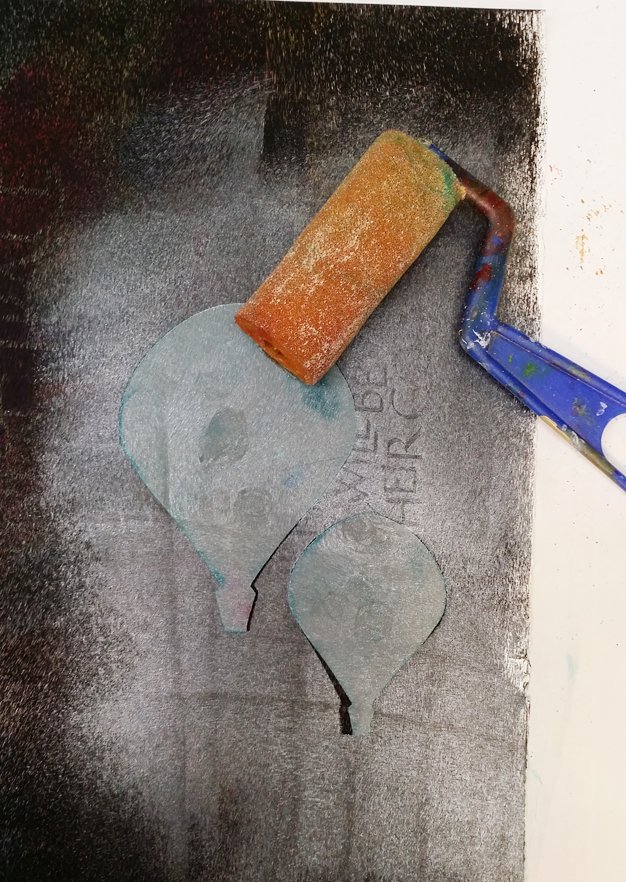
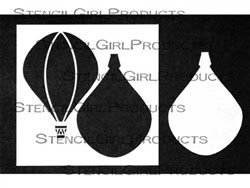
Step 1:  On sturdy black paper, I used a sponge roller to apply gray acrylic paint over two masks, one that comes included in Hot Air Balloon Stencil and Mask s547 and one that comes included in Hot Air Balloon Balloon and Mask Mini m185.


Having lifted off the two masks, I now had two silhouettes, shown above (step 2.)

The photo below shows step 3, when  I continued using Hot Air Balloon Stencil and Mask s547 and Hot Air Balloon Balloon and Mask Mini m185 -- but this time, I switched from the two masks to start using the stencils.  I used green masking tape to secure the larger stencil atop the larger of the two silhouettes. I made sure to align this stencil exactly with the silhouette.


Next, I used a less tacky masking tape (yellow) to cover part of the stencil so that paint would touch only the larger balloon on the left.  For this, step 4, I again used a sponge brayer, this time loaded with heavy body pink acrylic paint.....


Step 4, below, is a close up showing the stencil now covered with pink paint.  Above that, the bottom edge of 6" x 6" Sprigs s523 is visible.


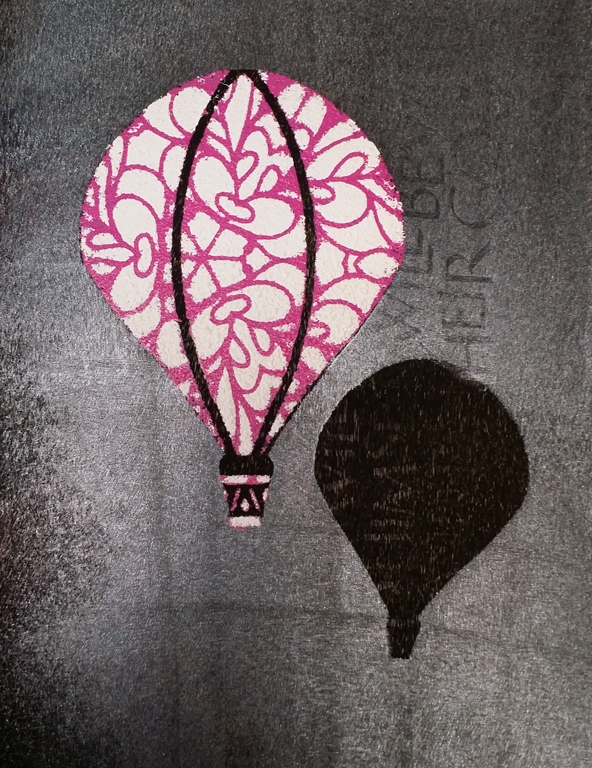
A close up of step 5.


Above:  Having placed Sprigs s523 atop the larger balloon, I used a different sponge prayer to add a layer of white acrylic paint.  I was careful to keep Sprigs s523 pressed firmly down, to ensure good overall coverage with the opaque white paint. Extra firm pressure is needed when using one stencil or mask atop another.  

Below, in step 6, I've lifted off Sprigs s523, then the yellow masking tape and, third in sequence, the stencil from Hot Air Balloon Stencil and Mask s547.


Below is the last step, showing that I've repeated the same sequence with the smaller of the two balloons.


Moving thru these steps, I learned something new.  It happened right after step 4, when I found myself with too much leftover pink paint already loaded into the sponge of the brayer.  

So I rolled the brayer across another sheet of paper. Look at what happened --


Because the paint-loaded brayer had already been rolled across the balloon stencil, it retained not only the extra paint, but also the imprint of the stencil.  As you can see above, this resulted in an interesting border of partial images of the balloon.

From now on, when I have a sponge brayer still loaded with wet paint, having just run it across a stencil, I'll grab another paper and do this again, to see what new trail of partial images will be created.  Fun!

Featured in today's post:


Above:  9" x 12" sheet of artist trading card-sized stencils and masks ATC Mixup Swatton # 2.


Thanks for stopping here today!  To scroll thru the pages of my stencils and masks at StencilGirlProducts.com, please start here.

Saturday, October 22, 2022

Mask s865 Stars in a New Post

Abstract Composition Backbones Mask 2 s865 arrives in mailboxes measuring 6" x 6" ... but for today's post (and most of my other posts that focus on any mask in this set of 4 ) the mask has been scissor-customized; I've removed the square outside border.


Above: This was my original placement of the (orange-pink paint-stained) mask, on a background that had been blue, but was now mostly white.  (The circular patterning came from the type of applicator I used, a sponge with a bulb shape at one end.)  This original placement proved to be temporary.  I decided to switch to a vertical composition, shown below:


Having switched to a vertical composition, as shown above, I've torn green masking take into strips with irregular edges and used these strips to add length and width to the design I have in mind.  The mask will be the "heart" of the finished artwork, but it will benefit from the taped patterns that will help me build a the type of composition called a cruciform.


Above:  a full-sized view of the painting in progress.


The photo above shows the start I've made, using a brush with a handle, a small sponge-topped paint applicator, and a couple of sponges that are each bulb-shaped at one end.

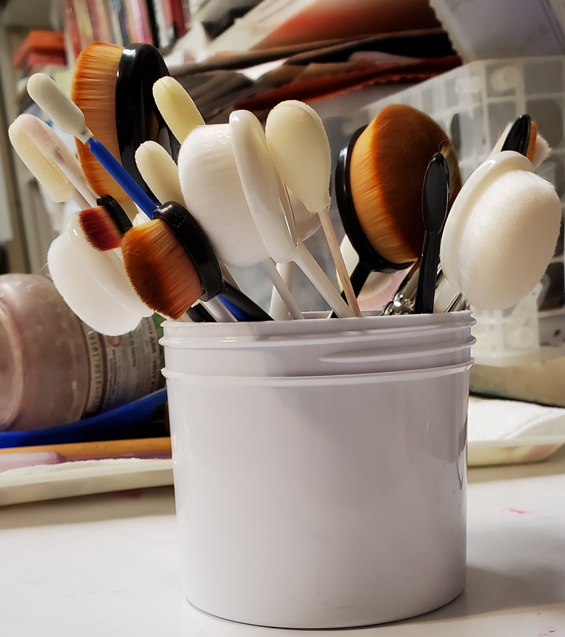
The next shot is a close-up of one of the brushes I used.  These brushes, sold as cosmetic applicators, have soft, ultra-dense bristles, so they make prints very similar to the prints that come when using sponges.  The main difference is that these have long plastic handles, as shown below.


Below:  Another close-up, taken after I had added more of my heavy-body acrylic paints.  The applicator is one of my bulb-ended sponges (which, like the ones with handles, are sold as cosmetic applicators.) At this state of the painting, the masking tape strips are still in place, so as I add paint to the substrate (an old page from a picture calendar) the tapes are keeping paint from covering the areas they cover.


Above: I've lifted off the strips of masking tape.

Below:  A close-up detail of one area.


Above: This photo shows the art with two new developments.  (1)  With a sponge I've added, around the heart of the painting, a filmy layer of zinc white acrylic paint thinned with matte medium gel.  This addition softens the lines left by the masking tape strips without totally removing the lines. When I added this mist-like layer, I used (if memory serves correctly) Sidewalk 3 of Puerto Rico s784, designed by MaryBeth Shaw. (2) I've pulled out a piece of orange "bleeding" tissue paper (shown on the far right) and have started to tear off small bits to place in some areas across the surface.


As shown above, the tissue bits have been sprayed lightly with a spray bottle.  My next step will be to remove the papers themselves, after they have "bled" enough to create scattered bits of bright dark orange.

Below is the finished artwork.


Below:  My collection of "cosmetic" brushes with handles (and some narrow-sponge-topped applicators with handles that are normally sold for cleaning guns -- something I will never, never use for anything other than daubing paint thru stencils and masks!)


Thanks for checking out my blog today! To scroll thru my pages of stencils and masks at StencilGirlProducts.com, please start here.