
A design I call "sprigs" emerges today from stencil storage -- in two sizes, for two projects. First, the quick one...

Above: Two papers multi-printed with one of the 9 stencils (and 2 bonus basks) that are included in 9" x 12" ATC Mixup Swatton # 2. Both papers are now giftwrap. The red and gray one shimmers with a light topcoat of translucent red metallic paint. The green and gray paper was a page from an old picture calendar. The original photo contained a white path that now adds a spark of detail to the finished giftwrap.
Today's second project follows a sequence of steps; it's my take on a technique that I learned from MaryBeth Shaw at StencilGirlProducts.com.
Step 1: On sturdy black paper, I used a sponge roller to apply gray acrylic paint over two masks, one that comes included in Hot Air Balloon Stencil and Mask s547 and one that comes included in Hot Air Balloon Balloon and Mask Mini m185.
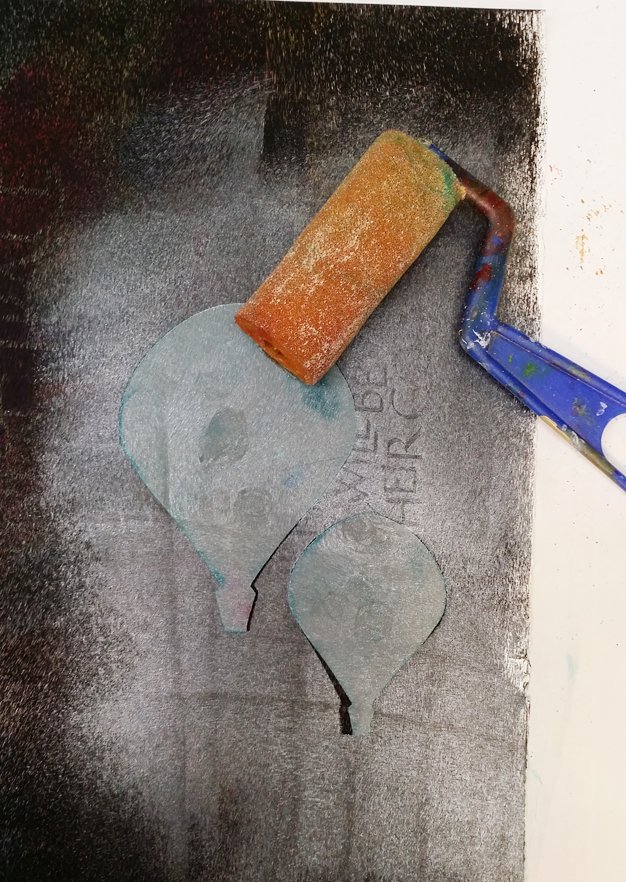

Having lifted off the two masks, I now had two silhouettes, shown above (step 2.)
The photo below shows step 3, when I continued using Hot Air Balloon Stencil and Mask s547 and Hot Air Balloon Balloon and Mask Mini m185 -- but this time, I switched from the two masks to start using the stencils. I used green masking tape to secure the larger stencil atop the larger of the two silhouettes. I made sure to align this stencil exactly with the silhouette.

Next, I used a less tacky masking tape (yellow) to cover part of the stencil so that paint would touch only the larger balloon on the left. For this, step 4, I again used a sponge brayer, this time loaded with heavy body pink acrylic paint.....

Step 4, below, is a close up showing the stencil now covered with pink paint. Above that, the bottom edge of 6" x 6" Sprigs s523 is visible.


A close up of step 5.
Above: Having placed Sprigs s523 atop the larger balloon, I used a different sponge prayer to add a layer of white acrylic paint. I was careful to keep Sprigs s523 pressed firmly down, to ensure good overall coverage with the opaque white paint. Extra firm pressure is needed when using one stencil or mask atop another.
Below, in step 6, I've lifted off Sprigs s523, then the yellow masking tape and, third in sequence, the stencil from Hot Air Balloon Stencil and Mask s547.
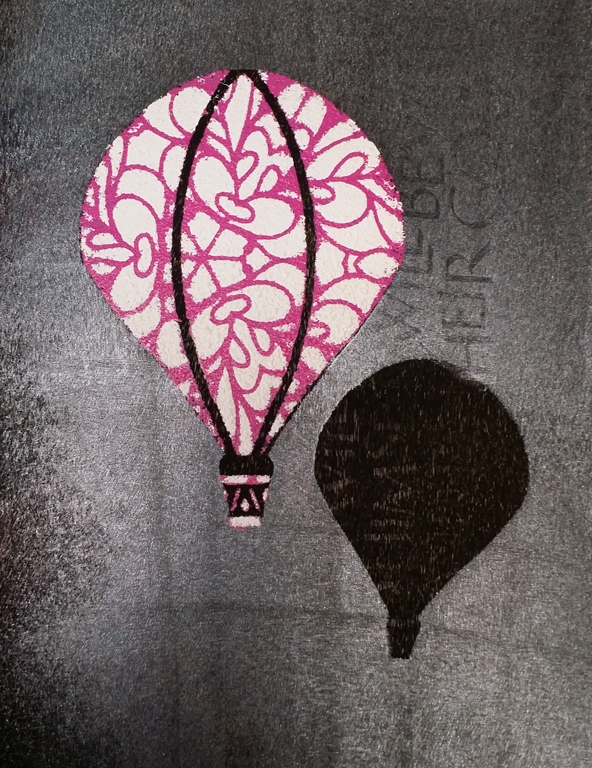
Below is the last step, showing that I've repeated the same sequence with the smaller of the two balloons.


 |
| Above: 9" x 12" sheet of artist trading card-sized stencils and masks ATC Mixup Swatton # 2. |


No comments:
Post a Comment