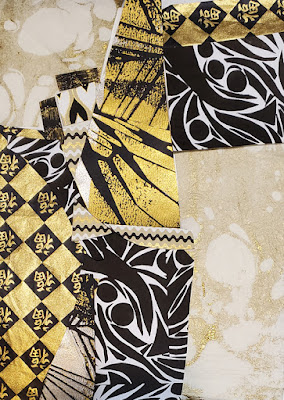
One way to use stencil- and mask-printed papers is to cut them into random pieces, then assemble them in a collage with other papers.
Below are steps I took in developing a collage on 9" x 12" stretched canvas.
For strength, this abstract artwork needed a "backbone" to run down the central area from top to bottom.
My chosen "backbone" materials were papers printed with 9" x 12" Palm Fronds Silhouettes Large L791 on black cardstock using a sponge brayer loaded with heavy-body silver and gold acrylic paints.
Above is the first phase of the project as I auditioned pieces of paper for assembling into the collage. The central piece was printed using Palm Fronds Silhouettes Large L791, while the gold and white marbled paper was a purchase, as was the paper with squiggly lines.
Below: More papers were auditioned....
Above: On the far left another purchased paper was auditioned. The bold black-and-white prints were born as result of my having created a simple printing plate, this way --
I cut out pieces of 1/4-inch-thick industrial foam in random shapes that included "shards" and circles. With extra-heavy matte medium, I glued these pieces into patterns atop a sheet of extra-thick cardboard. Next, I coated the entire piece, front and back, with two layers of acrylic matte liquid medium, allowing drying time between layers. This coating made the printing plate more or less waterproof. After painting the plate's raised areas with heavy-body black acrylic paint, I pressed the plate to sheets of white paper.
When that phase of the project was done, I scanned some of the white papers printed with the printing plate, and printed the papers. Those black-and-white prints are what I cut up to audition for placement in today's collage.
I used gel medium, both glossy and matte, to complete the collage as it appears below--
 |
| Palm Fronds Silhouette Large L791 (9" x 12") |
Thanks for visiting my blog for its first post of 2022! To scroll thru my stencils and masks at StencilGirl Products, please start here.


No comments:
Post a Comment