For the first time in a while, I dipped into the wisdom of Mary Beth Shaw's book StencilGirl Mixed Media Techniques for Making and Using Stencils. If new copies have sold out, used copies are still available via the link above.
This project calls for sheets of polystyrene foam. If you don't want to buy these synthetic boards in bulk, you can check your local deli or grocery store to see whether meat or deli slices are used as disposable trays. Once the edibles are gone, you can wash the trays and you're good to go.
Following MaryBeth's directions, I cut out the rectangular bottom of a deli tray. Atop that, I placed my 4" x 4" mask Carnival m340 -- which I've cut free from the top portion of its original frame. Already paint-stained from use in other projects, this mask is now shows up very well in the photos below!
Next, I needed a stylus.
I chose the wider-tipped stylus ....
(You can substitute a ballpoint pen for a stylus.)
Below: With the stylus, I outlined the shapes of the mask, and I added line patterns all around those shapes.
Next, I loaded a rubber brayer with heavy body acrylic paint. Here I've used a tablet of pallet paper to load the brayer with paint. (In the past, I've used the back of a dollar store plastic cutting board.)
Once the brayer was evenly coated with paint, I rolled it across the piece of imprinted plastic foam....
While the paint was still wet, I placed my homemade printing plate face-down onto paper--
 |
| Above: This paper started as a photo from an old picture calendar. I monoprinted over the photo with orange, red and yellow acrylic paints. |
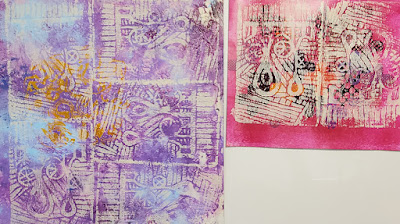
I continued loading the brayer, spreading paint on my homemade printing plate and pressing it face-down, till the whole page was covered with print. That page appears on the left side of the photo below.
 |
| Above: To its right is a blue paper printed with the same repeating pattern. |
I printed 2 more papers (to be used in later projects) ....
(A homemade printing plate is easy to clean if it's swished through a basin of water while the paint is still wet, then dried with old towels or textured paper towels. These textured surfaces help remove paint from the indentations made by the stylus. A soft-bristled old toothbrush works, too.)
Although I could have used a printed paper or two for the cover of an art journal -- or as giftwrap -- I instead decided, for today's project, to decorate the cover of a composition book ....
Below: I've cut strips from my first printed paper to make a piece that fit the composition book --
Above: the finished project. After gluing the paper to the composition book cover, I added a small piece of textured paper and a paint-covered wood heart. The heart itself is decorated with a piece of my printed paper that I've cut into heart-shape with a punch.
Check out Hobby Lobby for their wood tissue box covers -- these are perfect for covering with thin, sturdy printed papers; they make unique gifts.
And the same is true for this. I've worked with these hinged boxes so I know how much fun they are to cover with sturdy but thin printed papers.
Daily posts will continue for a week or so as I explore more ideas for using my just-released masks, 6" x 6" Champagne s960 and 4" x 4" Carnival m340.
To subscribe to my blog, please email stencilfun@Yahoo.com and ask to be added to my mailing list (I never sell email addresses. They go onto my mailing list and no farther.)
To scroll thru the pages of my masks and stencils at StencilGirlProducts.com, please start here. Thanks for stopping here at my blog today!


This brings back memories! I loved decorating these composition books and I love yours!
ReplyDelete